I’ve made a couple updates to the Autodesk Fabrication script libraries. If you use them, you can download updated versions from here.
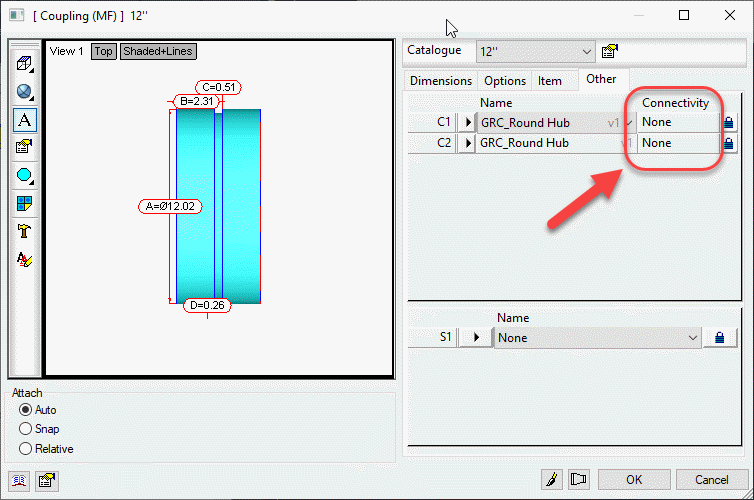
Scripts have been updated to include the Connector Material property found on CID/Patterns 522, 1522 & 2512 as shown below…
This property is intended to be used by a connector to specify a alternate material the connector can connect to. This allows a coupling to connect to alternate materials such as with transition couplings.
I have updated the Autodesk Fabrication COD Scripting resources. Resources have also been reorganized. Everything is still there but you may have to navigate to it differently.
Most of the updates are additions to the COD Scripting reference. They now include all the information that was in my Advanced Scripting sessions at MEP Force and Autodesk University.
A complete list of all COD Scripting resources can be found here. The COD Language reference is a complete list of all properties, functions, operators, keywords, and anything else scripting that I’m aware of. Everything I know about COD Scripting both documented and undocumented is located here. If you notice properties or functions in COD scripts of yours or from others that is not listed here, please let me know. I’d love to add anything new you find.
Not only is DOS still relevant, its often one of the quickest ways to get some things done.
On XtraCAD.com, someone recently asked how to get the system Date and Time in an Autodesk Fabrication COD script. I provided a solution that uses DOS commands inside a COD script. That solution is explained in more detail here.
DOS’s “Date” Command
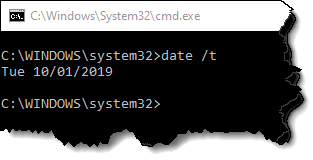
Using DOS, we can use the “DATE” command with the “/T” Switch to output the current date to a DOS prompt.
The information given by this simple command is all we need. A script can easily read the data if the output is redirected to a data file.
We’ll get a little more ambitious and get particular on the formatting. We’ll remove the “Tue” and format the date in the format “yyyy.mm.dd”.
To do this, we can use the “FOR” command in DOS.
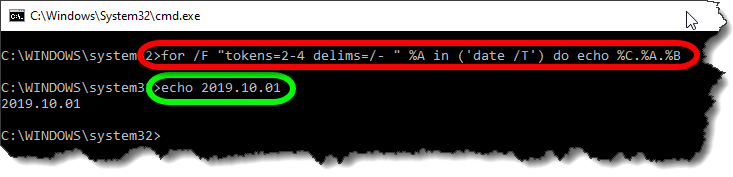
for /F "tokens=2-4 delims=/- " %A in ('date /T') do echo %C.%A.%B
The Red circled area is the command. It takes the data from the Date command and breaks it apart by the delimiters (DELIMS) which is spaces ( ), forward slashes (/) and dashes (-). You’ll note that the Date doesn’t actually contain any dashes so it’s just ignored.
The TOKENS specifies we want the 2nd thru 4th items of data. They will be assigned sequentially to variables starting with “%A”. The Green circled area is the resulting output ECHO’d to the DOS Window in the format we want.
%A = 2nd piece of data (month)
%B = 3rd piece of data (day)
%C = 4th piece of data (year)
Sending Data to a File
Now that have our DOS command, the next step is to send the output to a file on disk. Doing this will allow the COD script to read it back later.
For this purpose, we use a re-director to pump the data to a file. We simply append a suffix like this…
for /F "tokens=2-4 delims=/- " %A in ('date /T') do echo %C.%A.%B>"C:\Temp\COD Data.Txt"
A few notes about redirecting data to a file….
We use double quotes around the file path and name in case it contains spaces. This way, DOS doesn’t interpret the space as a separator between commands.
The Greater-Than (>) symbol is used to redirect output to a file. If the file already exists, it will be overwritten.
Double Greater-Than (>>) symbols can be used to “append” to the end of an existing file. This is handy if you want to add more data to the same file. If the file doesn’t already exist, it will be created.
We Have DOS, Now for the COD Script
Now that we have our DOS syntax down, we can start writing out COD Script. To start, I typically generate a few variables that help me format things.
REM ------------------------------
REM DQ = Double Quote Character
REM CR = Carriage Return Character
REM ST = Single Tab Character
REM WF = Working File
REM ------------------------------

DIM DQ = ascii(34)
DIM CR = ascii(10)
DIM ST = ascii(9)
DIM WF = "C:\Temp\COD Data.Txt"
Because some of our syntax contains double quotes, and because strings (text) in a COD script also contain double quotes, having multiple double quotes in a row can be confusing. Additionally, sometimes the script has trouble understanding where one string ends vs what’s a string containing a double quote.
To handle this, I set a variable (DQ) that will represent any double quote within a COD Script string. I also use a Carriage Return (CR) variable and a Single Tab (ST) variable for formatting purposes that you’ll see later.
Lastly, I also set a variable for the data file. It’s at the beginning, it’s easy to find and change without having to get in the middle of a lot of confusing formatted string data later.
Executing DOS From the Script
To execute an external command from a script, we can use the EXEC function.
<command> = “CMD.EXE” This is the DOS Command Interpreter
<execution mode> = exec_wait + exec_show_min These are a couple variables that tell the external program to “Wait” until finished before proceeding with the rest of the script and to minimize the Window.
<command/arguments> = The Prior DOS Syntax (with modifications) goes here.
The CMD.EXE program takes an argument of “/C” followed by the command it’s going to execute which is our DOS Syntax. Pay close attention, because here’s where we’re going to have to break up the DOS commands and embed our variables for the embedded double quotes.
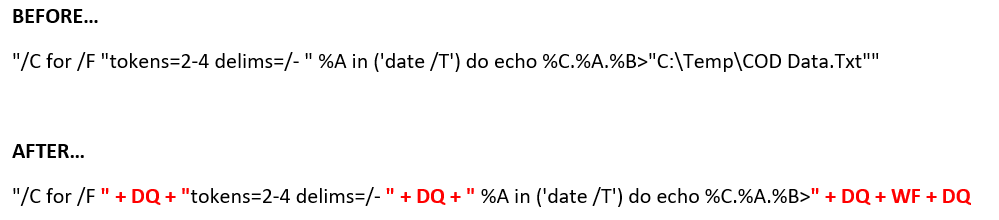
The below is a single “String” with double quotes on each end. It also has a lot of double quotes inside the text which will confuse you and your script. This below syntax is WRONG and needs to be corrected….
"/C for /F "tokens=2-4 delims=/- " %A in ('date /T') do echo %C.%A.%B>"C:\Temp\COD Data.Txt""
To do this, it’s easier to illustrate in color. We’re going to take one very long complicated string, and break it into several smaller strings when there’s double quotes within the string.
That is, where ever there’s a double quote within the string, we’re going to make a smaller string before and after, and piece them back together and use our DQ variable to embed the double quote between them.
This works for the first two double quotes. But at the end of the string, we’re going to do something a little different. Here, we want to remove file name and use the WF variable we set earlier to store the file name. And because the filename may have a path, we surround it with DQ variables to embed it in double quotes.
The next piece of code should look like this when we’re done. This will run our DOS command and dump the date to a file,
REM ---------------------
REM Get Date (yyyy.mm.dd)
REM ---------------------

Exec("cmd.exe", exec_wait + exec_show_min, "/C for /F " + DQ + "tokens=2-4 delims=/- " + DQ + " %A in ('date /T') do echo %C.%A.%B>" + DQ + WF + DQ
Reading Our Data File
Now that we’ve dumped the data file to disk, we can read it back in from the COD script using the following code…
DIM myDate
Object myFile as File (WF, forinput+istext)
myDate = myFile.Readline()
myFile.Close()
This code opens the file and reads its data and saves it to a variable. You’ll also note that this code doesn’t add extra double quotes around the WF “Working File” variable. That’s because they aren’t needed here, and will in fact cause problems. The COD Script language is actually better at handling files with and without spaces because it uses a comma (,) as it’s data separator between the file name and file read modes.
Displaying Our Data
Last, we can display the data in a simple debug dialog. Here, you’ll see I make use of the ST variable to place a single tab between the data purely for formatting purposes.
Debug "Date:" + ST + myDate
The Bigger Picture
The following code takes all the above principals and goes a little further. With everything you’ve learned, you should be able to figure out what it’s doing and how. It’s doing all the same things plus a little extra…
Also writing TIME and the USERNAME of the currently logged in Windows User to the data file.
It’s “Appending” the TIME and USERNAME using “>>” instead of “>” that DATE uses.
It’s reading 3 lines of our data file
The data file is deleted after it’s read leaving our system clean of temporary files.
The data is displayed by also using the CR (Carriage Return) variable to start new lines for the additional pieces of data.
REM ------------------------------
REM DQ = Double Quote Character
REM CR = Carriage Return Character
REM ST = Single Tab Character
REM WF = Working File
REM ------------------------------

DIM DQ = ascii(34)
DIM CR = ascii(10)
DIM ST = ascii(9)
DIM WF = "C:\Temp\COD Data.Txt"

REM ---------------------
REM Get Date (yyyy.mm.dd)
REM Get Time (hh:mm)
REM Get User (login name)
REM ---------------------

Exec("cmd.exe", exec_wait + exec_show_min, "/C for /F " + DQ + "tokens=2-4 delims=/- " + DQ + " %A in ('date /T') do echo %C.%A.%B>" + DQ + WF + DQ)
Exec("cmd.exe", exec_wait + exec_show_min, "/C for /F " + DQ + "tokens=1-2 delims=: " + DQ + " %A in ('time /T') do echo %A:%B>>" + DQ + WF + DQ)
Exec("cmd.exe", exec_wait + exec_show_min, "/C echo %username%>>" + DQ + WF + DQ)

REM ---------
REM Read Data
REM ---------

DIM myDate
DIM myTime
DIM myUser

Object myFile as File (WF, forinput+istext)

myDate = myFile.Readline()
myTime = myFile.Readline()
myUser = myFile.Readline()
myFile.Close()

REM ----------------
REM Delete Data File
REM ----------------
Exec("cmd.exe", exec_default + exec_show_min, "/C DEL " + DQ + WF + DQ)

REM ------------
REM Display Data
REM ------------

Debug "Date:" + ST + myDate + CR + "Time:" + ST + mytime + CR + "User:" + ST + myUser
I didn’t plan up updating scripts again so soon but I found a couple more undocumented properties. I thought I’d post them sooner rather than later.
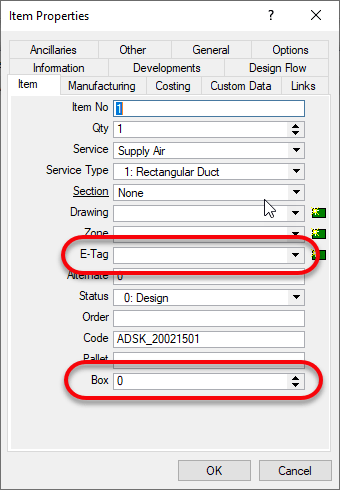
The two ITM properties I found are “BOX” and “E-Tag“.
BOX is only visible from CAMduct. It’s intended purpose appears to be for specifying a “Box” for the ITM in question for shipping purposes but you could use it or anything. Despite it being visible only in CAMduct, using COD Scripts, you can read and write it from ESTmep or CADmep too.
E-TAG is visible from any of the Fabrication products. It’s used for Equipment Tags. You can see both properties from here if in CAMduct or only E-Tag is ESTmep or CADmep.
Scripts Updated
All Debug Scripts – Nothing major, just formatting in the comments section.
WriteAll_Props (Job).cod – Updated to support BOX & E-TAG properties.
WriteAll_Props (Library).cod – Updated to support BOX & E-TAG properties.
I’ve made a couple updates to the Autodesk Fabrication script libraries. If you use them, you can download updated versions from here.
Scripts Updated
Debug
Debug ITEM Library.cod
Debug ITEM Sealant.cod
Job Items
WriteAllLibrary (Job).cod
WriteAllSealant (Job).cod
WriteAll_Props (Job).cod
Library Items
WriteAllLibraries (Library).cod
WriteAllSealant (Library).cod
WriteAll_Props (Library).cod
Issues Corrected
Issue 1: Scripts accessing the “Library” property were failing on CID/Pattern 2199. Scripts have been updated to watch for this and report it as an ‘Unknown‘ Library.
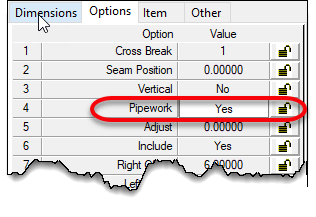
Issue 2: Some CID/Patterns can be configured to be pipework or duct work depending on the “Pipework” option’s “Yes/No” status. Scripts were updated to properly report or ignore this property depending on the Sealant value being present.
If the option is set to “Yes“, the pattern is a pipework item. If set to “No”, the pattern is a sheet metal item. Sheet metal items contain the “Sealant” property where as Pipework items do not.
This condition is present in the following CID/Patterns…
149
838
902
1101
1238
1239
1240
1241
1242
1247
1248
Special thanks to Kyle Speropoulos of MMC Contractors in Kansas City for alerting me to this issue.
Under the resources menu for Autodesk Fabrication, the COD Scripting section has been updated. This now points to another sub-menu of additional COD Scripting reference information.
The link to the COD scripting libraries has also moved one level deeper so if you have a bookmark and it comes up blank, you many need to re-link it.
I still have more information to add that I’ve not previously documented. These are more advanced functions or other undocumented functions. I’ll post notices as I update them.
You can find the additional COD Scripting information compiled here. Direct links to all the scripting reference information is below…
For years, I’ve shared my Fabrication COD scripts with the industry. These can be used to examine database content using Excel.
Tyler Phillips of Bruner Corporation recently posted a nice article on LinkedIn about using Microsoft PowerBI. His PowerBI dashboard provides a great way to help visualize the data behind your Autodesk Fabrication content.
Simply put, the scripts I share dump property data to multiple CSV files. Tyler used that data for some of the PowerBI data sources. This allowed him to built a dashboard which helps him visualize and navigate the data in a more meaningful way. And better yet, he publish a fantastic article on LinkedIn that explains how to do it.
Microsoft PowerBI Dashboard of Autodesk Fabrication Content
This is a great example of leveraging data from multiple sources. PowerBI help you mash it together to give you meaningful information that’s simple to understand and navigate.
If you’ve ever struggled with ESTmep reporting, just think of the possibilities. By taking the above concept and using it across CSV exports from ESTmep you could easily overcome gaps in estimating reporting.
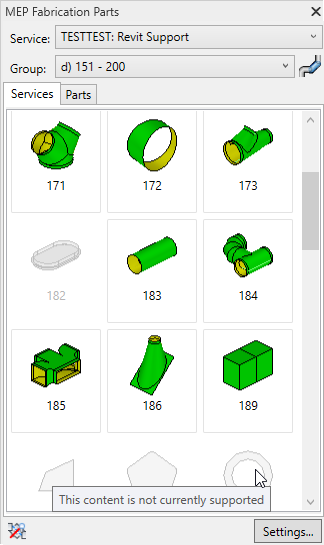
It no secret that not every Autodesk Fabrication pattern is supported in Revit. I’ve recently finished a more in-depth analysis of which patterns are and are not supported in Revit. Each of the 703 different pattern types were tested in each version and each update of Revit.
On the Fabrication COD Scripts page, you can find a Revit Support Report script. That script will analyse your ITM library and generate a CSV report of the status of every ITM in your Fabrication Configuration.
You can also find the complete results of my testing on the Revit Support page. Here’s a summary of the the testing…
Tested Version
Each of the below versions of Revit were tested with all the the 704 different patterns:
2016
2016R2
2061R2SP7
2017.0
2017.1
2017.2
2018.0
2018.1
2018.2
2018.3
2019.0
2019.1
2019.2
Testing Criteria
“Supported” for purposes of this testing is based on whether Revit allows a particular pattern to be used in the Fabrication Part Browser.
Testing Results
Testing results will have one of the following status descriptions.
No – No Revit support
Varies ({verison}) – Revit support varies between Revit version
Yes (Risk) – Revit does support but use NOT recommended due to issues
New ({version}) – New Pattern supported in later Revit versions
Yes – Pattern is supported in all Revit versions with no significant issues
Support Status = No
No – Parts not supported by the Parts Browser are obviously listed as having “No” support. There are a total of 84 different patterns listed in this category. They are as follows…
125
126
127
128
129
130
141
158
202
203
204
205
206
207
208
209
210
211
212
213
215
216
218
220
221
228
230
301
302
308
503
505
521
530
764
765
803
804
805
806
833
873
910
913
928
960
961
964
966
969
974
980
983
985
994
996
999
1049
1102
1106
1114
1142
1150
1152
1157
1161
1162
1165
1168
1169
1181
1194
1196
1198
2185
2189
2190
2191
2192
2199
2200
2873
3108
3873
Support Status = Varies
Varies(version) – In some cases, Fabrication Parts were initially allowed or supported in earlier versions and later were restricted. These parts have a status of “Varies” followed by the version where the change occurred. It’s recommended you avoid use of these patterns even in versions where they work as they will not be supported in later versions. There are 17 patterns that once worked in Revit but are no longer supported. They are as follows…
0
182
222
381
845
853
855
864
876
898
903
912
915
971
1105
1170
1175
Support Status = Yes (Risk)
Yes (Risk) – Patterns that list “Yes (Risk)” are technically supported in Revit but I highly recommend avoiding their use. Patterns with this status have issues like inserting at the Revit’s Project Base Point and not the cursor location. They also have a tendency to crash Revit if you attempt to grip or edit them. As a result, I highly recommend avoiding their use. There are 29 patterns in this category. They are listed here…
119
189
317
346
347
348
349
350
351
352
353
368
369
390
392
397
398
415
810
828
922
930
962
963
968
973
1159
1160
1176
Support Status = New
New (version) – Some patterns were not around in earlier versions of Revit but later added and supported in Revit. These patterns are listed as “New” followed by the version of Revit they became available in. These patterns are generally safe to use for Revit. There are 19 patterns in this category which are listed here…
217
1206
1207
1238
1239
1240
1241
1242
1243
1244
1245
1246
1247
1248
1249
1250
2197
2198
2217
Support Status = Yes
Yes – Parts allowed by the browser that work across all versions of Revit are listed with e “Yes” status. There are 555 patterns in this category. They are listed here…