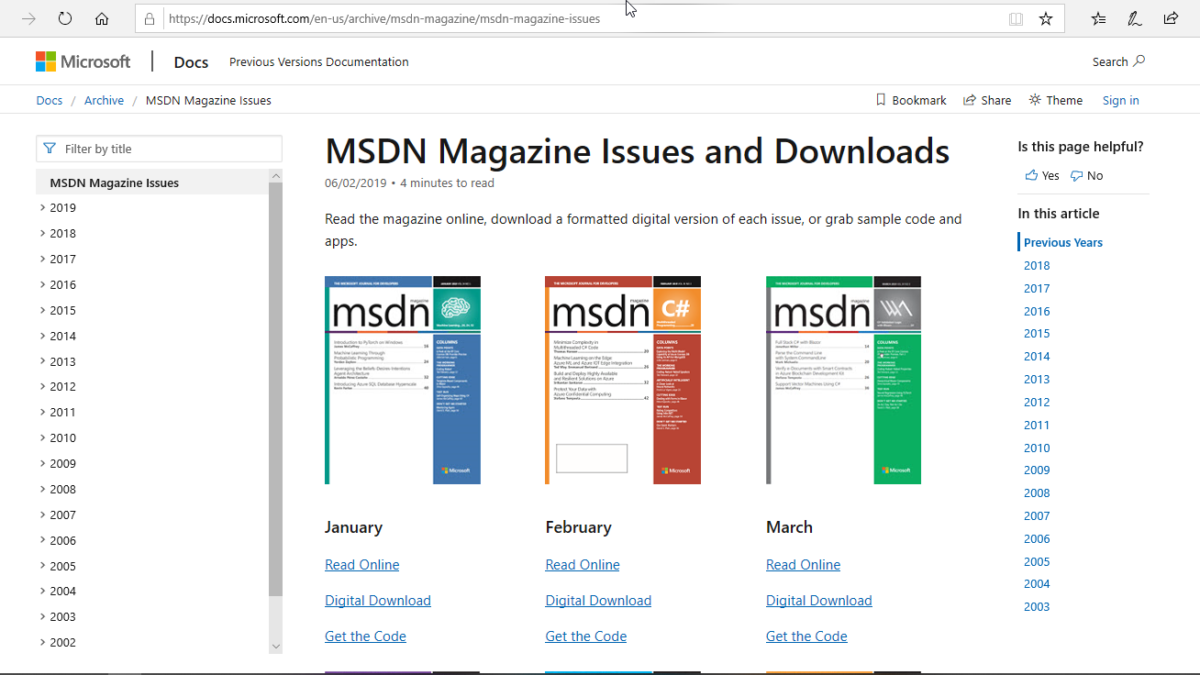
If you’re a full time professional software developer, this is likely old news. For the rest of those who fall into the “Self-taught”, “Part Time” or “Recreational” category it may surprise you that Microsoft has a magazine dedicated to software development.
MSDN (Microsoft Developer Network) has put out the MSDN Magazine for almost 2 decades. You can access old issues here…
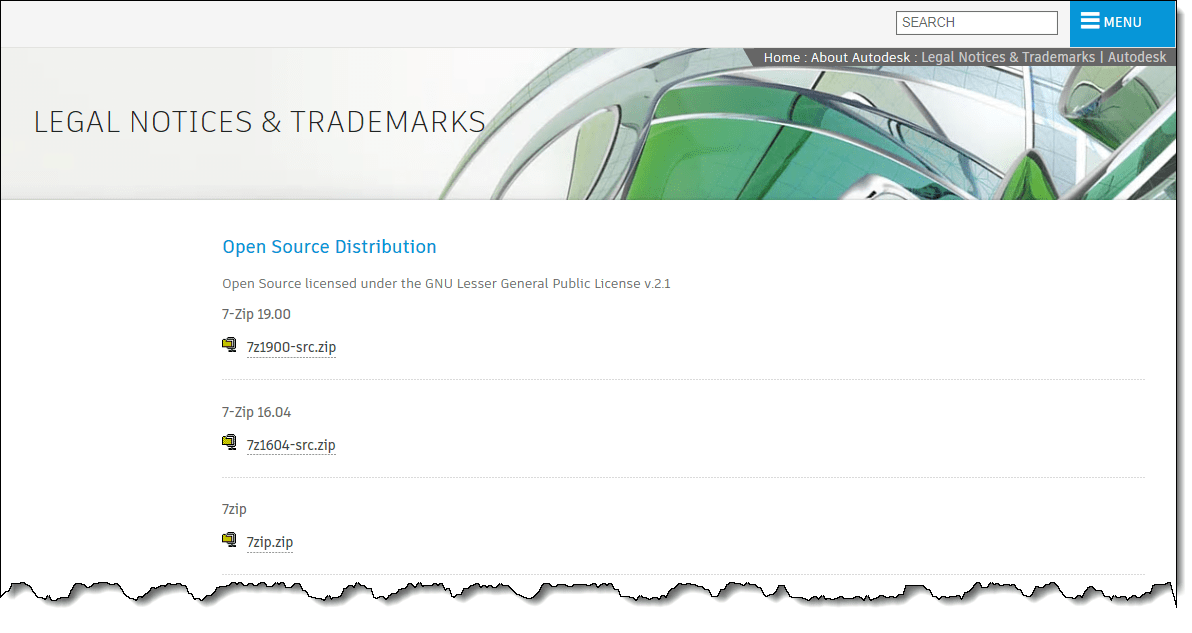
Did you know Autodesk makes extensive use of several open source technologies in their products? If you’re curious, they maintain a list as well as the distributions. Click Here if you want to check it out.
It’s no secret that Autodesk regularly changes their pricing structure. Here are some upcoming changes you should be aware of….
NEW “Multi-User” Subscriptions for “Collections” will increase an estimated 33% on February 7, 2020.
NEW “Multi-User” Subscriptions for “Single Products” will increase an estimated 14% on February 7, 2020.
It’s my understanding that existing multi-user licenses that are renewed are not subject to the price increase.
Reading between the lines, it appears Autodesk is slowly trying to eliminate network licenses. Obviously, they would rather sell you two licenses as opposed to have you share onE between two users.
Based on over a hundred hours of license usage research in my last two employers in the MEP Engineering and Construction space, here’s the breakdown I’ve seen…
2 to 3 Engineers can share a single license (this is what Autodesk wants to reign in)
1 to 1 User to License ratio for trade detailers
1/3 of company users fall into the very low usage…”once or twice a month” or “once a week for a half hour” category (if you have enough network license capacity)
What Autodesk fails to realize (or ignores) is that there are a couple reasons network licenses are important even if you can’t share a license. Those are the last two of the above bullet points.
1) Very Low Usage
Users who “Would” use products but don’t “Need” then get access. This can lead to future sales if usage increases. It can also help promote product knowledge to a larger audience.
2) Licensing Usage Analytics
If you’re trying to migrate users from AutoCAD to Revit, or implement other product roll outs, analytics are important to gauge adoption. It also helps you plan for the future.
Yes, Autodesk has some analytics but they’re completely inadequate for anything truly meaningful. In fact, they’re often misleading which lends itself to over licensing…which they like. For a better reporting tool, check out JTB Flex Report.
A Word About Perpetual Maintenance Subscriptions
There’s still some folks hanging on to their old perpetual maintenance licenses. Let me tell you here and now that’s a waste of time and money. On August 31, 2019, Autodesk ended support for 2010 and older versions. There’s no guarantee your old products will activate into the future.
As a lot of customers are finding this year, 3 years in to subscriptions, it’s cheaper to convert to subscription than maintain a perpetual seat. Perpetual seats are anticipated to increase another 20%. Additionally, if you convert to subscription now, it’s still cheaper than a new subscription. Autodesk has announced that Perpetuals converted to Subscription will not have any more than a 5% increase every OTHER year through 2028. This means you’re converted seat will be cheaper than a new subscription for a long time.
Yet another reason is that Autodesk controls licensing. It’s 100% in their control. Let’s take Navis Manage as an example. You could keep hanging on to it but all they have to do is say it’s no longer a valid product…it’s ends of life. And your only option is to buy a full new subscription of this new “Navis Quantum” product (I just made that up….just like they can) that replaces it.
The last reason to switch to subscription now, it’s your last chance. I’m hearing that in May 2020, you’ll no longer be able to convert your perpetual license to subscription. This means they can jack up the perpetual maintenance as high as they want and if you don’t like it, you’re left dropping it and buying a full subscription seat. If you’v been around long enough, you know they’ll run a promotion here and there offering a discount to convert to the few remaining holdouts. But the promotional discounts typically only applies to the first year…every other year you’re paying the full subscription costs.
If you’re still on maintenance, consider switching before May. For more information on Maintenance to Subscription, check out this Autodesk FAQ.
PS: Autodesk’s Fiscal Year End is January 31. Now’s the perfect time to make the changes to your licensing. I always structure mine to renew in January for that reason.
I have updated the Autodesk Fabrication COD Scripting resources. Resources have also been reorganized. Everything is still there but you may have to navigate to it differently.
Most of the updates are additions to the COD Scripting reference. They now include all the information that was in my Advanced Scripting sessions at MEP Force and Autodesk University.
A complete list of all COD Scripting resources can be found here. The COD Language reference is a complete list of all properties, functions, operators, keywords, and anything else scripting that I’m aware of. Everything I know about COD Scripting both documented and undocumented is located here. If you notice properties or functions in COD scripts of yours or from others that is not listed here, please let me know. I’d love to add anything new you find.
In a recent LinkedIn post, the topic of Tolerance Stacking was brought up. I’m not a machine designer, but I’ve spent a lot of my past life in Manufacturing. In that world, the term was used frequently. If the term was used in Construction, it certainly wasn’t when I was listening.
Tolerance Stacking can be described (in my mind) as the accumulation of allowable tolerances to a point where the design is no longer suitable for it’s intended purpose. Errors resulting from Tolerance Stacking are caused by a few things…
Lack of tolerance awareness
Poor annotation and documentation of tolerances
Both of the above
Tolerance Stacking Explained
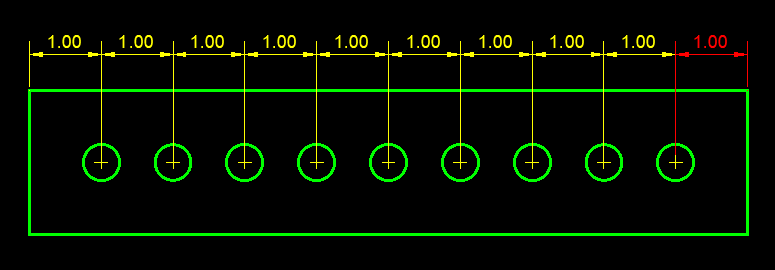
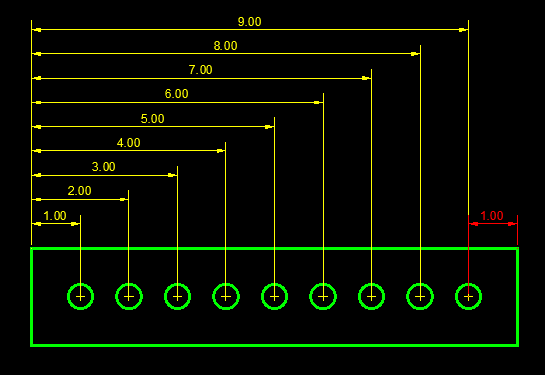
The best way to understand Tolerance Stacking is from a few examples. In our first example, we see a part 10 Units long with 9 holes, equally spaced 1 Unit apart. Take note of the RED dimension on the right.
10 Unit Long Part with 9 Holes Spaced 1 Unit apart
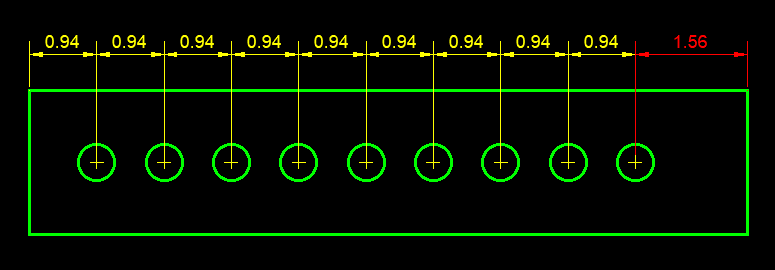
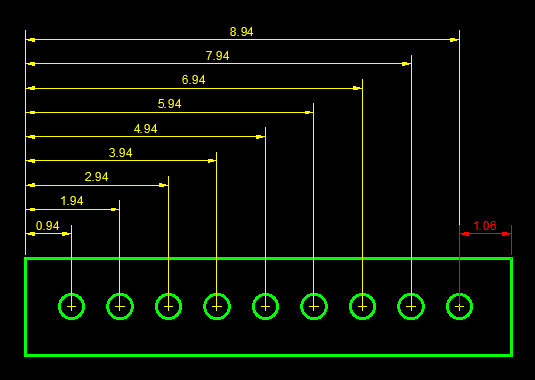
You may have seen parts dimensioned like this. Looks pretty normal. Now lets consider this same part and assume the dimensions have a tolerance of +/- 0.0625 (1/16 Inch). Now lets also assume that all the dimensions are in the negative -0.0625. The following graphic illustrates this condition. Again, notice the RED dimension on the right.
Tolerance Stacking using the an allowed -0.0625 on each dimension.
Is the overall length really have enough tolerance to compensate for the accumulation of those tolerances?
Now lets look at the same part, same tolerances but annotated/documented differently. It’s not as “pretty” and takes up a lot more real estate on your drawing.
Same part as before but dimensioned differently.
But lets look at that same -0.0625 extreme case tolerance in this scenario. Once again, keep an eye on that RED dimension to the right.
Using an alternate annotation approach solves the Tolerance Stacking problem.
This latest example solves the Tolerance Stacking issue by clearly outlining where the tolerances are allowed. In fact, in construction, we’re already doing this. We just don’t call it Tolerance Stacking.
In construction, one of the ways we eliminate Tolerance Stacking is by dimensioning to gridlines and columns. Dimensions in relation to known fixed points minimized Tolerance Stacking.
Are you old enough to remember when rafters were layed out by hand on the job site and cut individually? You would cut one and use it as a template and use that to mark the others. You never installed the template and used the next cut as your template for another. This minimized Tolerance Stacking as well.
Geometric Dimensioning and Tolerancing – GDT
What’s less familiar, is another concept used heavily in automotive and other precision manufacturing. It’s called Geometric Dimensioning & Tolerancing or “GDT” for short.
Traditional linear tolerances have flaws. GDT on the other hand more accurately describes “features” and allowable deviation from the desired location using a more complex form of graphics and symbols.
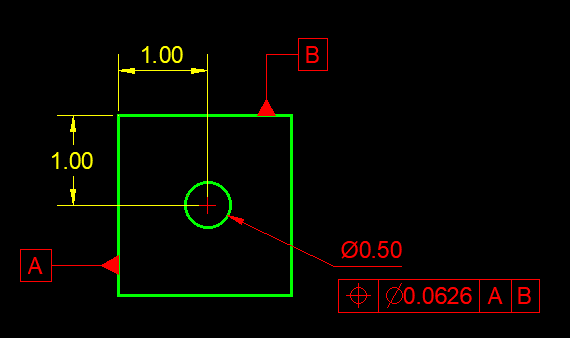
Once again, the best way to explain this is with some illustrations. The following example shows a square part with a hole in the middle. Pay close attention to the RED dimensions.
Top Left – Perfect Part (not real world) Top Right – Hole moved 0.0625 to the right Btm Left – Hole moved 0.0625 up Btm Right – Hole moved 0.0625 in both directions
In this example, you see when the hole is moved to the maximum tolerance in both directions, it’s actually further away from it’s desired position than 0.0625.
This is where GDT comes in. In this last example, GDT is used to “Describe” the allowable deviation from it’s ideal position.
GDT can more accurately describe tolerances.
There’s actually an ASME Standard for GDT (Y14.5.2) and a full explination of GDT is not only beyond the scope of this blog but my knowledge, There’s a lot of courses out there specifically for this but a good “101” description can be found here.
Given trends in Prefab, Modularization, and Construction becoming more like Manufacturing….Makes you wonder….should there be a “GDT” style of documentation for construction?
If you’re attempted to download any of my COD Script libraries over the last couple weeks, you may have found the links were bad.
This should now be corrected. The issue was caused when the site was moved to a new hosting provider. Their newer WordPress setup used a different character set than was originally used when the site was originally setup.
Let me know if you notice any issues. There are still a few character anomalies in other pages and tables that will be fixed as I have time.
Autodesk has released update 2020.1 for Autodesk Fabrication products CADmep, CAMduct and ESTmep. You can see the small token list of fixes here.
Really not much in the way of fixing the many legacy, multi-release defects that have been piling up. Still no word on the update to plug the security hole in Revit where you’re COST/LABOR data can be mined by others.
One thing to note about this release, it’s not an “Update” that patches your existing system. The Update requires a full install. That means that 2020 versions of CADmep, ESTmep, CAMduct as well as Tracker, CAMduct Components and Remote Entry need to be removed first.
I would NOT recommend installing the update from the Autodesk Desktop App. I’ve tested on multiple systems both personal and corporate and it gets hung indefinitely on the uninstall of the 2020 versions.
If you do want to install the update, I highly recommend uninstalling yourself before adding the 2020.1 versions. Even manual uninstalls of 2020 have been hit or miss. If they hang, they’re usually already uninstalled and using Task Manager to cancel the running MSIEXEC tasks is enough to finish the uninstalls. Best of luck!
Any sheet metal shop that CNC cuts their liner has likely configured their database to make seam adjustments in the liner developments. These settings are typically global and tell CAMduct to remove the Liner thickness from the Male or Female part of the development.
Another common setting is the compression adjustment in the Insulation Materials. These are all fairly common and self explanatory for most people looking to configure these settings.
Length Adjustments on Radius Elbows
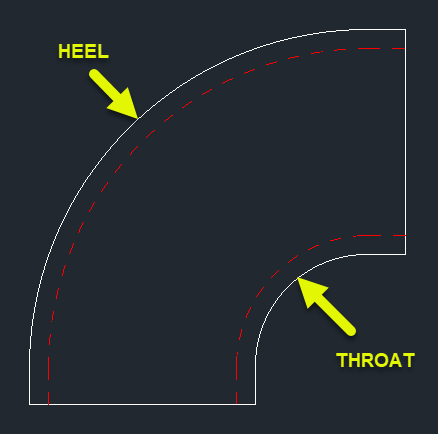
What’s a little less obvious is how to adjust the throat and heel lengths on a radius elbow. If the liner is developed based on metal size, the throat is typically too short and the heel a little long. This is due to the bending allowance of thicker materials. While acoustic liner has a little give but when using something like armorflex for liner, it’s a little more rigid and these lengths can cause issues.
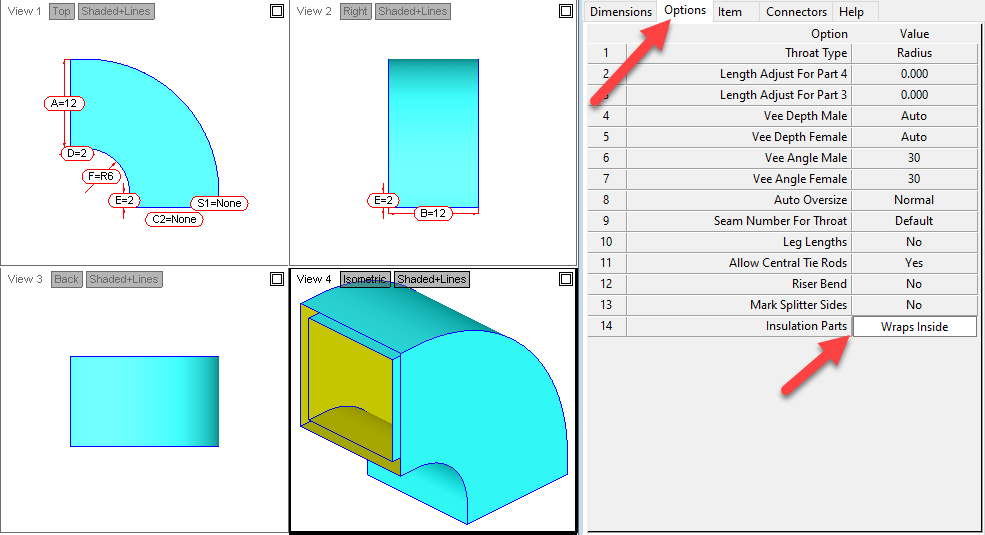
To better understand the Throat and Heel of a radius elbow, we can look at the Top view (cheek). The following image shows the Throat and Heel pointed to with arrows. You’re looking at these parts on their edge.
Prepare Your Fittings
To configure the calculation used for the liner on these parts, you first need to change an option on your ITM. The following image is for a radius elbow (CID 4). Here you’ll want to change the “Insulation Parts” Option to “Wraps Inside“. If you leave this set to the default “Same”, the adjustments made later will have no effect.
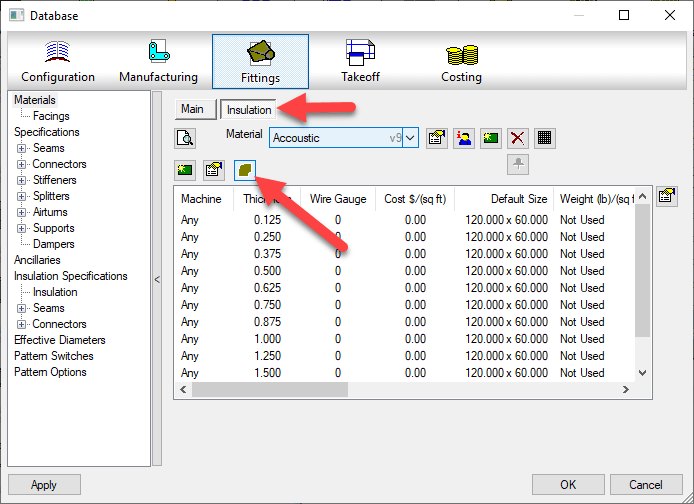
Configure Material Adjustments
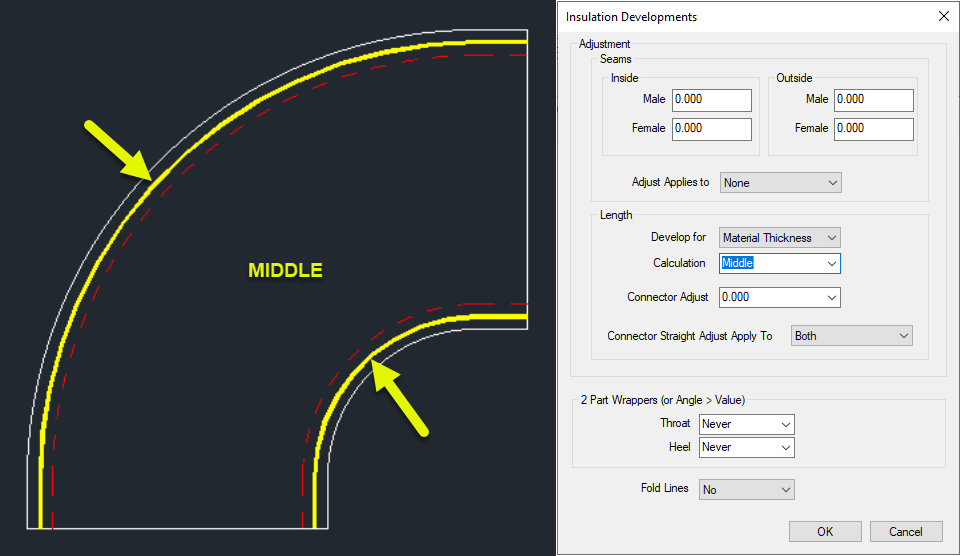
To make adjustments to the liner calculation, you’ll go to the Insulation Materials and click the “Insulation Developments” button.
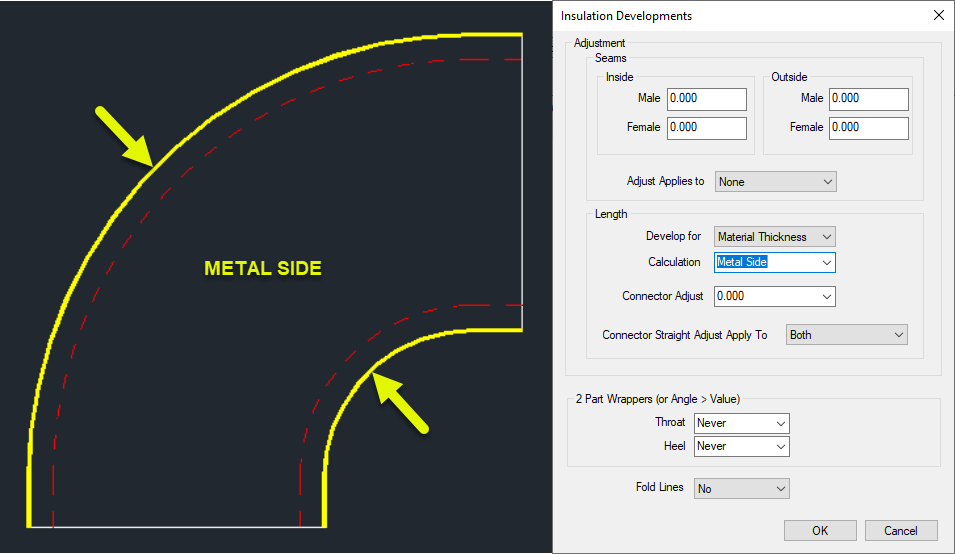
This will bring up a dialog where you can make changes to how the liner gets developed on the throats and heels. The various settings are as follows…
Metal Side
Throat & Heel Liner Developed to the same length as the metal fitting.
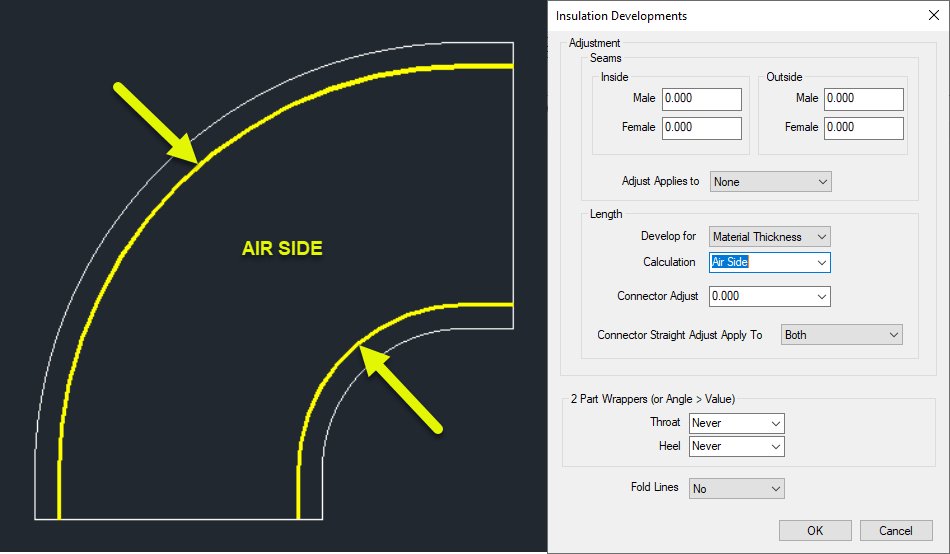
Air Side
Throat & Heel Lengths Developed Based on the AIR side of the liner thickness.
Middle
Throat & Heel length developed based on the middle of the liner thickness.
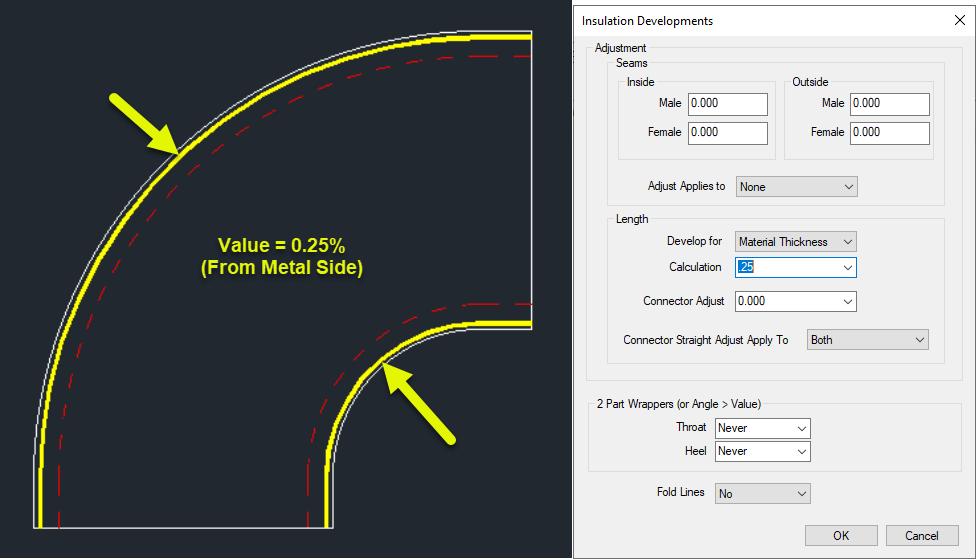
Value (Between 0.0 and 1.0)
Value is between 0 and 1 as a percentage of the liner thickness calculated from the metal side.
0 = Same as “Metal Side” 0.5 = Same as “Middle” 1.0 = Same as “Air Side”
Not All Fittings Supported
Not all fittings support the “Insulation Parts” option. You can run one of the Library export scripts that dumps all the OPTIONS to a CSV file and sort in Excel to look for the CID’s in your library that support “Insulation Parts”. Scripts can be found here.
Not only is DOS still relevant, its often one of the quickest ways to get some things done.
On XtraCAD.com, someone recently asked how to get the system Date and Time in an Autodesk Fabrication COD script. I provided a solution that uses DOS commands inside a COD script. That solution is explained in more detail here.
DOS’s “Date” Command
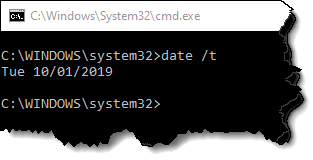
Using DOS, we can use the “DATE” command with the “/T” Switch to output the current date to a DOS prompt.
The information given by this simple command is all we need. A script can easily read the data if the output is redirected to a data file.
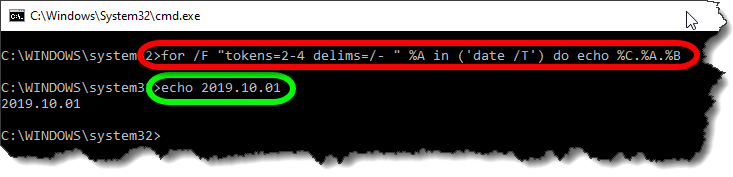
We’ll get a little more ambitious and get particular on the formatting. We’ll remove the “Tue” and format the date in the format “yyyy.mm.dd”.
To do this, we can use the “FOR” command in DOS.
for /F "tokens=2-4 delims=/- " %A in ('date /T') do echo %C.%A.%B
The Red circled area is the command. It takes the data from the Date command and breaks it apart by the delimiters (DELIMS) which is spaces ( ), forward slashes (/) and dashes (-). You’ll note that the Date doesn’t actually contain any dashes so it’s just ignored.
The TOKENS specifies we want the 2nd thru 4th items of data. They will be assigned sequentially to variables starting with “%A”. The Green circled area is the resulting output ECHO’d to the DOS Window in the format we want.
%A = 2nd piece of data (month)
%B = 3rd piece of data (day)
%C = 4th piece of data (year)
Sending Data to a File
Now that have our DOS command, the next step is to send the output to a file on disk. Doing this will allow the COD script to read it back later.
For this purpose, we use a re-director to pump the data to a file. We simply append a suffix like this…
for /F "tokens=2-4 delims=/- " %A in ('date /T') do echo %C.%A.%B>"C:\Temp\COD Data.Txt"
A few notes about redirecting data to a file….
We use double quotes around the file path and name in case it contains spaces. This way, DOS doesn’t interpret the space as a separator between commands.
The Greater-Than (>) symbol is used to redirect output to a file. If the file already exists, it will be overwritten.
Double Greater-Than (>>) symbols can be used to “append” to the end of an existing file. This is handy if you want to add more data to the same file. If the file doesn’t already exist, it will be created.
We Have DOS, Now for the COD Script
Now that we have our DOS syntax down, we can start writing out COD Script. To start, I typically generate a few variables that help me format things.
REM ------------------------------
REM DQ = Double Quote Character
REM CR = Carriage Return Character
REM ST = Single Tab Character
REM WF = Working File
REM ------------------------------

DIM DQ = ascii(34)
DIM CR = ascii(10)
DIM ST = ascii(9)
DIM WF = "C:\Temp\COD Data.Txt"
Because some of our syntax contains double quotes, and because strings (text) in a COD script also contain double quotes, having multiple double quotes in a row can be confusing. Additionally, sometimes the script has trouble understanding where one string ends vs what’s a string containing a double quote.
To handle this, I set a variable (DQ) that will represent any double quote within a COD Script string. I also use a Carriage Return (CR) variable and a Single Tab (ST) variable for formatting purposes that you’ll see later.
Lastly, I also set a variable for the data file. It’s at the beginning, it’s easy to find and change without having to get in the middle of a lot of confusing formatted string data later.
Executing DOS From the Script
To execute an external command from a script, we can use the EXEC function.
<command> = “CMD.EXE” This is the DOS Command Interpreter
<execution mode> = exec_wait + exec_show_min These are a couple variables that tell the external program to “Wait” until finished before proceeding with the rest of the script and to minimize the Window.
<command/arguments> = The Prior DOS Syntax (with modifications) goes here.
The CMD.EXE program takes an argument of “/C” followed by the command it’s going to execute which is our DOS Syntax. Pay close attention, because here’s where we’re going to have to break up the DOS commands and embed our variables for the embedded double quotes.
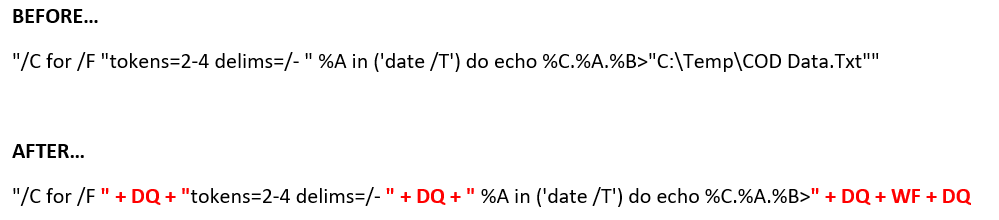
The below is a single “String” with double quotes on each end. It also has a lot of double quotes inside the text which will confuse you and your script. This below syntax is WRONG and needs to be corrected….
"/C for /F "tokens=2-4 delims=/- " %A in ('date /T') do echo %C.%A.%B>"C:\Temp\COD Data.Txt""
To do this, it’s easier to illustrate in color. We’re going to take one very long complicated string, and break it into several smaller strings when there’s double quotes within the string.
That is, where ever there’s a double quote within the string, we’re going to make a smaller string before and after, and piece them back together and use our DQ variable to embed the double quote between them.
This works for the first two double quotes. But at the end of the string, we’re going to do something a little different. Here, we want to remove file name and use the WF variable we set earlier to store the file name. And because the filename may have a path, we surround it with DQ variables to embed it in double quotes.
The next piece of code should look like this when we’re done. This will run our DOS command and dump the date to a file,
REM ---------------------
REM Get Date (yyyy.mm.dd)
REM ---------------------

Exec("cmd.exe", exec_wait + exec_show_min, "/C for /F " + DQ + "tokens=2-4 delims=/- " + DQ + " %A in ('date /T') do echo %C.%A.%B>" + DQ + WF + DQ
Reading Our Data File
Now that we’ve dumped the data file to disk, we can read it back in from the COD script using the following code…
DIM myDate
Object myFile as File (WF, forinput+istext)
myDate = myFile.Readline()
myFile.Close()
This code opens the file and reads its data and saves it to a variable. You’ll also note that this code doesn’t add extra double quotes around the WF “Working File” variable. That’s because they aren’t needed here, and will in fact cause problems. The COD Script language is actually better at handling files with and without spaces because it uses a comma (,) as it’s data separator between the file name and file read modes.
Displaying Our Data
Last, we can display the data in a simple debug dialog. Here, you’ll see I make use of the ST variable to place a single tab between the data purely for formatting purposes.
Debug "Date:" + ST + myDate
The Bigger Picture
The following code takes all the above principals and goes a little further. With everything you’ve learned, you should be able to figure out what it’s doing and how. It’s doing all the same things plus a little extra…
Also writing TIME and the USERNAME of the currently logged in Windows User to the data file.
It’s “Appending” the TIME and USERNAME using “>>” instead of “>” that DATE uses.
It’s reading 3 lines of our data file
The data file is deleted after it’s read leaving our system clean of temporary files.
The data is displayed by also using the CR (Carriage Return) variable to start new lines for the additional pieces of data.
REM ------------------------------
REM DQ = Double Quote Character
REM CR = Carriage Return Character
REM ST = Single Tab Character
REM WF = Working File
REM ------------------------------

DIM DQ = ascii(34)
DIM CR = ascii(10)
DIM ST = ascii(9)
DIM WF = "C:\Temp\COD Data.Txt"

REM ---------------------
REM Get Date (yyyy.mm.dd)
REM Get Time (hh:mm)
REM Get User (login name)
REM ---------------------

Exec("cmd.exe", exec_wait + exec_show_min, "/C for /F " + DQ + "tokens=2-4 delims=/- " + DQ + " %A in ('date /T') do echo %C.%A.%B>" + DQ + WF + DQ)
Exec("cmd.exe", exec_wait + exec_show_min, "/C for /F " + DQ + "tokens=1-2 delims=: " + DQ + " %A in ('time /T') do echo %A:%B>>" + DQ + WF + DQ)
Exec("cmd.exe", exec_wait + exec_show_min, "/C echo %username%>>" + DQ + WF + DQ)

REM ---------
REM Read Data
REM ---------

DIM myDate
DIM myTime
DIM myUser

Object myFile as File (WF, forinput+istext)

myDate = myFile.Readline()
myTime = myFile.Readline()
myUser = myFile.Readline()
myFile.Close()

REM ----------------
REM Delete Data File
REM ----------------
Exec("cmd.exe", exec_default + exec_show_min, "/C DEL " + DQ + WF + DQ)

REM ------------
REM Display Data
REM ------------

Debug "Date:" + ST + myDate + CR + "Time:" + ST + mytime + CR + "User:" + ST + myUser