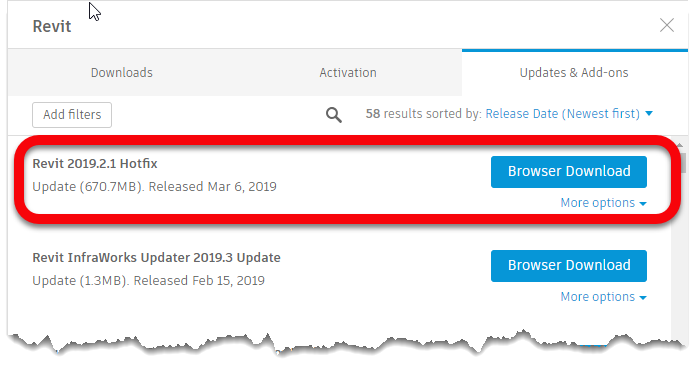
For Autodesk Fabrication Part users, this is a Hotfix you’ll want to get applied. Since the first release of Fabrication Parts in 2016, there’s been ongoing issues with MEP Systems modeled with Fabrication Parts.
The issues is that to add/remove or update Fabrication services, you need to reload your configuration. This often would cause “disconnects” between parts. Often this would happen for no good reason or explanation as the parts involved may not have even had changes to them.
This has been a difficult issue for Autodesk to resolve because it’s been difficult to reproduce. Since the 2016 until now, Autodesk has slowly made the issue better but it’s still not eliminated. With this hotfix in 2019, Autodesk is taking another stab at it and hopefully it’ll be eliminate. IF not fixed once an for all, hopefully it’ll be another small incremental step better.
You can review the release notes for all Revit 2019 updates here. Look for the notes under 2019.2.1 Hotfix and you’ll see the following note…
“Resolved an issue that could cause MEP Fabrication elements to disconnect when reloading a Fabrication configuration.”
Downloading The Update
The Update is available from the Autodesk Desktop App provided it’s working for you. (Note: Mine seems to lockup or crash repeatedly since installing the Autodesk Desktop Connector. Uninstalling and reinstalling the Desktop App seems to only resolve the issues for a short while)
Alternatively you can download from the Autodesk Accounts portal if you have download permissions given to you from your contract administrator.
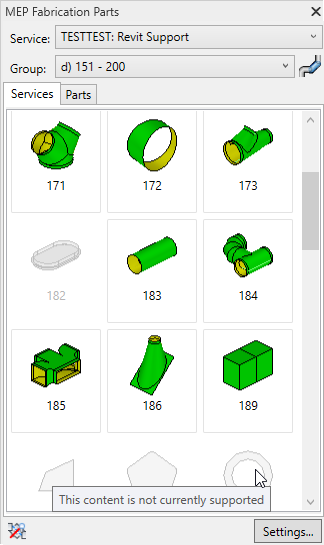
It no secret that not every Autodesk Fabrication pattern is supported in Revit. I’ve recently finished a more in-depth analysis of which patterns are and are not supported in Revit. Each of the 703 different pattern types were tested in each version and each update of Revit.
On the Fabrication COD Scripts page, you can find a Revit Support Report script. That script will analyse your ITM library and generate a CSV report of the status of every ITM in your Fabrication Configuration.
You can also find the complete results of my testing on the Revit Support page. Here’s a summary of the the testing…
Tested Version
Each of the below versions of Revit were tested with all the the 704 different patterns:
2016
2016R2
2061R2SP7
2017.0
2017.1
2017.2
2018.0
2018.1
2018.2
2018.3
2019.0
2019.1
2019.2
Testing Criteria
“Supported” for purposes of this testing is based on whether Revit allows a particular pattern to be used in the Fabrication Part Browser.
Testing Results
Testing results will have one of the following status descriptions.
No – No Revit support
Varies ({verison}) – Revit support varies between Revit version
Yes (Risk) – Revit does support but use NOT recommended due to issues
New ({version}) – New Pattern supported in later Revit versions
Yes – Pattern is supported in all Revit versions with no significant issues
Support Status = No
No – Parts not supported by the Parts Browser are obviously listed as having “No” support. There are a total of 84 different patterns listed in this category. They are as follows…
125
126
127
128
129
130
141
158
202
203
204
205
206
207
208
209
210
211
212
213
215
216
218
220
221
228
230
301
302
308
503
505
521
530
764
765
803
804
805
806
833
873
910
913
928
960
961
964
966
969
974
980
983
985
994
996
999
1049
1102
1106
1114
1142
1150
1152
1157
1161
1162
1165
1168
1169
1181
1194
1196
1198
2185
2189
2190
2191
2192
2199
2200
2873
3108
3873
Support Status = Varies
Varies(version) – In some cases, Fabrication Parts were initially allowed or supported in earlier versions and later were restricted. These parts have a status of “Varies” followed by the version where the change occurred. It’s recommended you avoid use of these patterns even in versions where they work as they will not be supported in later versions. There are 17 patterns that once worked in Revit but are no longer supported. They are as follows…
0
182
222
381
845
853
855
864
876
898
903
912
915
971
1105
1170
1175
Support Status = Yes (Risk)
Yes (Risk) – Patterns that list “Yes (Risk)” are technically supported in Revit but I highly recommend avoiding their use. Patterns with this status have issues like inserting at the Revit’s Project Base Point and not the cursor location. They also have a tendency to crash Revit if you attempt to grip or edit them. As a result, I highly recommend avoiding their use. There are 29 patterns in this category. They are listed here…
119
189
317
346
347
348
349
350
351
352
353
368
369
390
392
397
398
415
810
828
922
930
962
963
968
973
1159
1160
1176
Support Status = New
New (version) – Some patterns were not around in earlier versions of Revit but later added and supported in Revit. These patterns are listed as “New” followed by the version of Revit they became available in. These patterns are generally safe to use for Revit. There are 19 patterns in this category which are listed here…
217
1206
1207
1238
1239
1240
1241
1242
1243
1244
1245
1246
1247
1248
1249
1250
2197
2198
2217
Support Status = Yes
Yes – Parts allowed by the browser that work across all versions of Revit are listed with e “Yes” status. There are 555 patterns in this category. They are listed here…
Here’s another simple Attacher tip for Fabrication products. If you hold down the Shift key while clicking on the Attacher arrow in CADmep, ESTmep or CAMduct,. the arrow rotates the opposite direction.
Clickingthe Attacher – Notice it Rotates in the “Clockwise” Direction Clickingthe Attacher – Notice it Rotates in the “Counter-Clockwise” Direction
Sometimes the best tips are the simplest. They can often be forgotten about or never learned because of that. Here’s a reminder for those that may not know or have forgotten…
In CADmep, or the 3d viewer of ESTmep or CAMduct, you can hold the Control key while clicking the attacher arrow to rotate the arrow 180 degrees. The below screen recordings are both done from CAMduct but ESTmep or CADmep work just the same.
Clickingthe Attacher – Notice it Rotates in 90-Degree IncrementsCtrl-Clicking the Attacher – Notice it Rotates in 180-Degree Increments
Over the years, I’ve written a number of scripts helpful for managing an Autodesk Fabrication configuration. I’ve given them away in my Autodesk University session I’ve taught so they’ve circulated around a bit.
I’ve rewritten most, streamlined them, made enhancements, added others, etc, etc. Because I’m always updating and changing them, I thought I’d host them here too. I can then just post when I update them.
There’s are 2 sets of scripts covering the following topics…
Debugging Properties Scripts
Job Item Scripts
Library Item Scripts
One set is for use in 2019.0 and earlier versions (but work in any version), the others are designed for 2019.1 and later when Autodesk added support for the Pattern Number property.
You can get to the scripts from the menu or click here. The scripts are free to use for all except employees of ENGworks or anyone working on the behalf of ENGworks. (contractors, consultants, etc.) who are prohibited from use.
Note: If you’re in the Mechanical Contracting business like myself, don’t hold your breath. Not much has changed in the last year. With all the talk from Autodesk about industrialized construction, we still see very little. Most of the contractors I know are starving for better tools and efficiency. We’re employing extra man hours and people continuing to develop “workarounds” for Autodesk’s lack of investment in our industry.
For those running network licenses of Autodesk products, you can get a jump on your 2020 product roll-out by upgrading your FlexLM versions now.
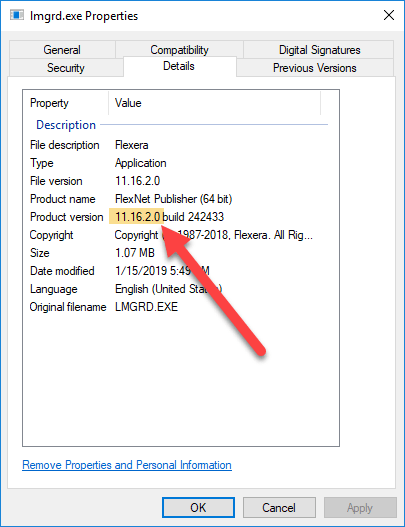
Autodesk 2020 product versions will require FlexLM v11.16.2.0 or later. You can read more about it and download from Autodesk web site here.
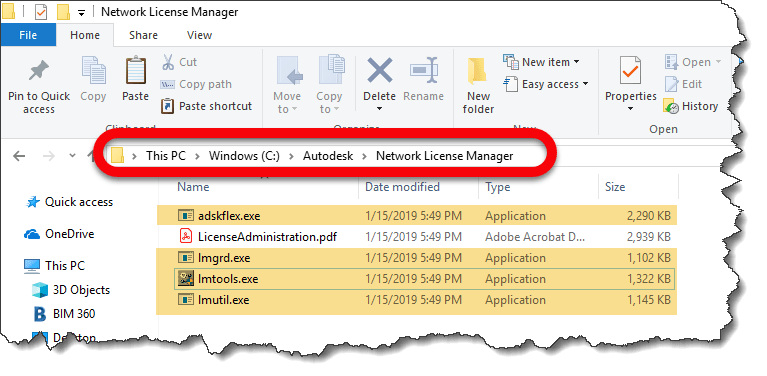
To verify your version of FlexLM, browse to the install location on your license server and look for any of the following files…
Right-click on any of the files and select Properties. From the Details tab, look for the Product version line and verify the number is at least 11.16.2.0 or later.
If you have an older version, perform the following steps…
Download the proper MSI installer from Autodesk’s web site here.
Stop/Terminate the FlexLM service on your network license server.
Backup the FlexLM files listed earlier in the event you have issues.
Install the MSI locally on your computer and browse to location you just installed.
Copy the files from your local install to the network license server install location.
Verify the files properties to make sure they are the proper version.
Restart your FlexLM license service and check it’s status.
Test launching some Autodesk products to make sure licenses are being served properly.
Options: You can then uninstall the MSI you just installed locally as it’s only purpose was to extract the FlexLM program files.
That’s it. Your next step will be up update licenses once the products are released.
Update Tip
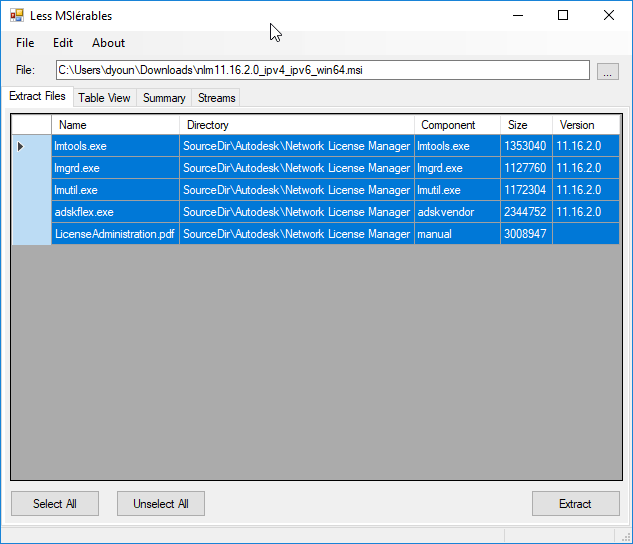
You don’t actually need to install the MSI files to extract out the FlexLM program files and daemon executable. There’s a free/open source utility called LessMSI which will extract files from an MSI file.
You can download LessMSI from here. Using this utility, you can use either a command line version or GUI to extract files embedded in an MSI file without installing it. An image if the program’s dialog is shown below showing the contents of the FlexLM MSI file.
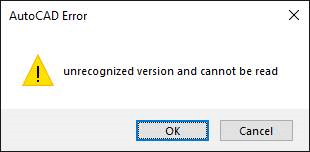
If AutoCAD has ever given you an error “unrecognized version and cannot be read” error, it’s likely a corrupt CTB/STB file. An image of the error can be seen below…
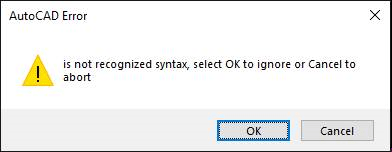
You can also see this followed by another error dialog, “is not recognized syntax, select OK to ignore or Cancel to abort“. This error also shown below, is likely related to the same corrupt CTB/STB file.
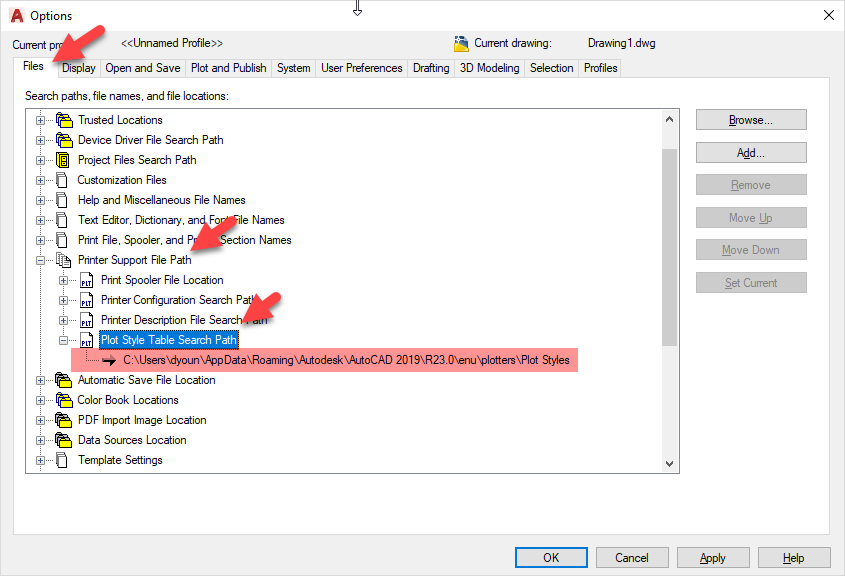
Where Are CTB/STB Files Located?
To find where your plot style tables are located, type “OPTIONS” in AutoCAD”s command line. In the “FILES” tab, expand the “PRINTER SUPPORT FILE PATH” node as shown below.
A few things to note and the plot style tables support path….
Support paths are specific to the AutoCAD profile that’s loaded. Load a different AutoCAD profile and the path may be different.
AutoCAD profiles are user specific, if other users log into the system, they may also be pointed to a different path.
Support paths for the plot style tables will follow nested folders. That is, if you have folders under the configured path, AutoCAD will look in all those sub-folders for additional CTB/STB files too.
Shortcuts are followed. IF you have shortcut placed in the support path, AutoCAD will also follow and look for CTB/STB files in the location the shortcut points to as well as any sub folders there too.
It’s not a lot, but there are some improvements in Revit 2019.2 for Mechanical Contractors using Fabrication Parts. Martin Schmid, MEP Product Manager with Autodesk, explains more with some great video examples on the Revit Blog.
If you use BIM360 Design (formerly “Collaboration for Revit” a.k.a. C4R) along with the Autodesk Desktop Connector, you should be aware of a common mistake that can lead to data loss.
BIM360 Design or C4R as the older version is called, is used to store Revit models in the cloud on Autodesk’s BIM360 platform. BIM360 Design using the BIM360 Docs platform as storage platform. C4R on the other hand uses the older BIM360 Teamfor storage of the Revit models.
While you could (can) upload your Revit models via the web interface to either storage platform, Revit would not see these files. They needed to be enabled for Collaboration and uploaded through Revit. This process made changes to the Revit files which enabled collaboration from BIM360 Design/C4R.
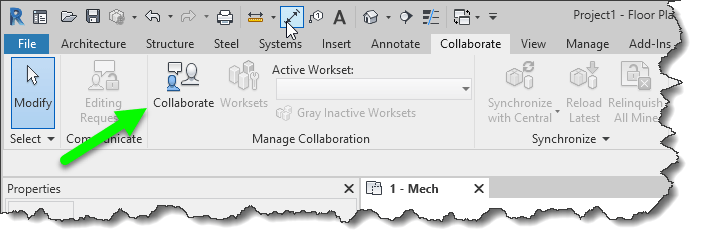
BIM360 Design/C4R collaboration is enabled and files uploaded using the Collaborate ribbon in Revit.
while Revit models need to be uploaded this way, there was no other way to upload other files types besides the web interface. Even if you did upload AutoCAD, IFC, Navis or other files types that Revit can link, there was no way to link these files into Revit from the BIM360 platforms. If you linked them from your server, the other members of your team without access to your server would not have access.
Autodesk Desktop Connector was created for this purpose. While you can’t link a non Revit file type into Revit directly from BIM360, you can use the Autodesk Desktop Connector to sync those other files types locally to your computer. Any other team members also using the Autodesk Desktop Connector would then also have access to those same files and the links would be identical.
What’s the problem?
The common problem that comes up when using BIM360 Design/C4R along with the desktop connector is Autodesk’s unfortunate choice in using the same icon for both products.
Depending where you see the icon, you get different results. If you click the one that references BIM360 collaboration services you’re good. If you click the one that references the Autodesk Desktop Connector, bad things can happen.
When a file is enabled for Collaboration and you open it through the Autodesk Desktop Connector, Collaboration is disabled and the file is configured as a local file or central file like you’d typically use of a file server. When this happens, the file is seen as being different and will not sync back to the BIM360 platform.
What this means then if that you have two different version of the file. One stored locally from the Autodesk Desktop Connector and another cached locally when opened from BIM360 Collaboration service (BIM360 Design / C4R) When you look at BIM360 Docs or BIM360 Team portals, you only see one version.
How do I know I’m using the correct Icon to open my Revit file?
Depending on the particular versions of Revit and their update versions, your install of Revit may appear different but the underlying concepts are the same. For these images, Revit 2018.3.2 and 2019.1 were used.
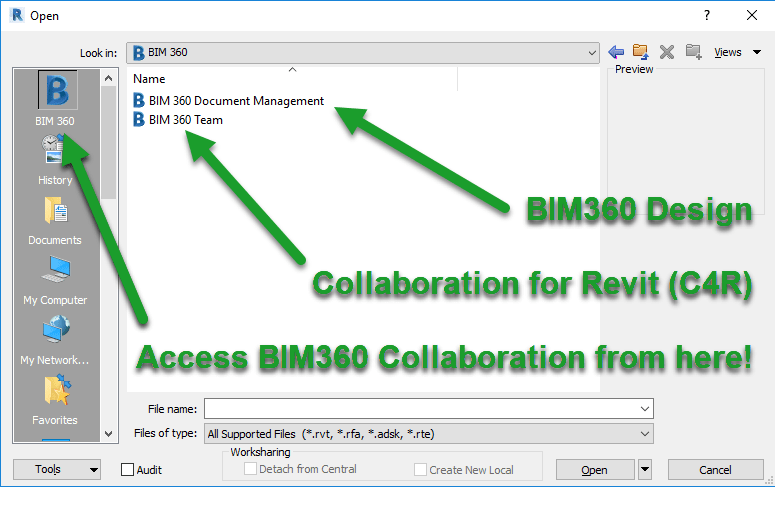
When opening a Revit model from 2018, you’ll see the “B” shortcut in the left. This is the proper way to open BIM360 Design/C4R enabled files. BIM360 Design and/or C4R sites will be listed depending if you have been given access to projects within those sites that use 2018 version of Revit.
Revit 2018 Open Dialog when accessing BIM360 Collaboration models.
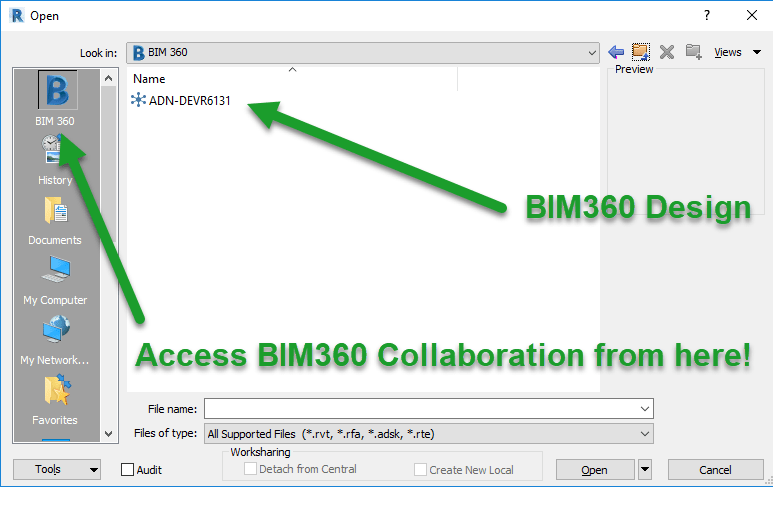
When opening a Revit model from 2019, you’ll also see the “B” shortcut in the left. The same as with 2018 versions, this is the proper way to open BIM360 Design enabled files. BIM360 Design only will be listed because 2019 doesn’t use BIM360 Team/C4R. If nothing is displayed here, you may not have been given access to projects within those sites that use the 2019 version of Revit.
Revit 2018 Open Dialog when accessing BIM360 Collaboration models.
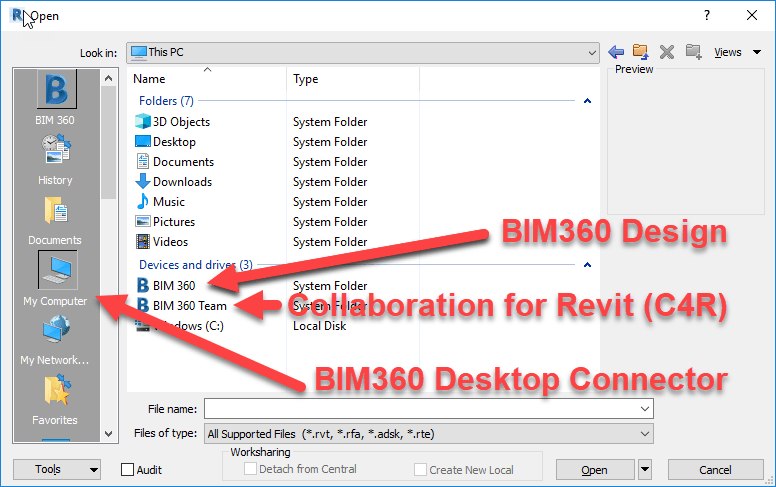
The other place you may see the BIM360 icon is from My Computer or other shortcuts that look at your local system. The following image shows 2018 when using the incorrect shortcut because it instead points to the Autodesk Desktop Connector drive on your computer.
Revit 2018 Open Dialog when accessing the Autodesk Desktop Connector Drive
And once again, 2019 versions of Revit are similar. On clue is that here, even though 2019 doesn’t support C4R, they are listed here. This is because you’re not accessing via Revit’s collaboration tools, you’re simply accessing a special local drive on your computer that’s syncing everything in the BIM360 platform completely independent of Revit.
Revit 2019 Open Dialog when accessing the Autodesk Desktop Connector Drive
More clues when opening Models from the Recent Files List
If you’re trying to open Revit models using the Recent Files list, there’s a few subtle clues that tell you if you’re opening a collaboration enabled BIM360 model or simply opening a model from the Autodesk Desktop Connector drive.
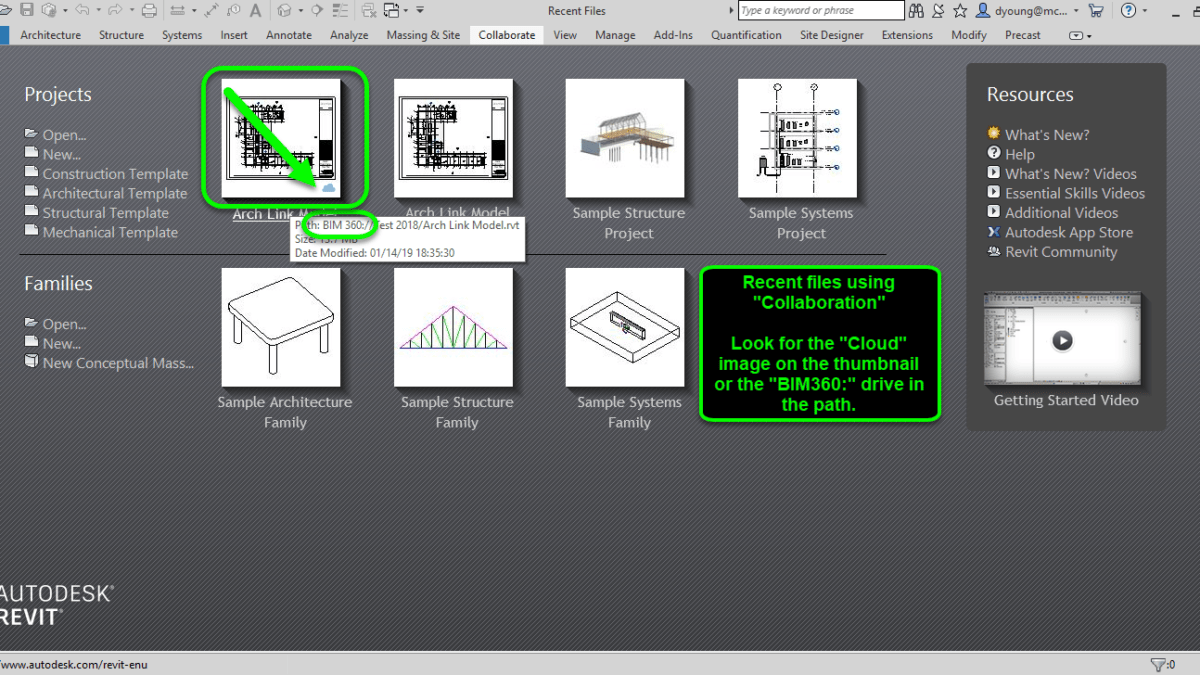
The following image shows Revit 2018 with a BIM360 Design/C4R model correctly. Notice the drive letter in the path as well as the “Cloud” image in the thumbnail.
Revit 2018 with a Recent File that uses BIM360 Collaboration
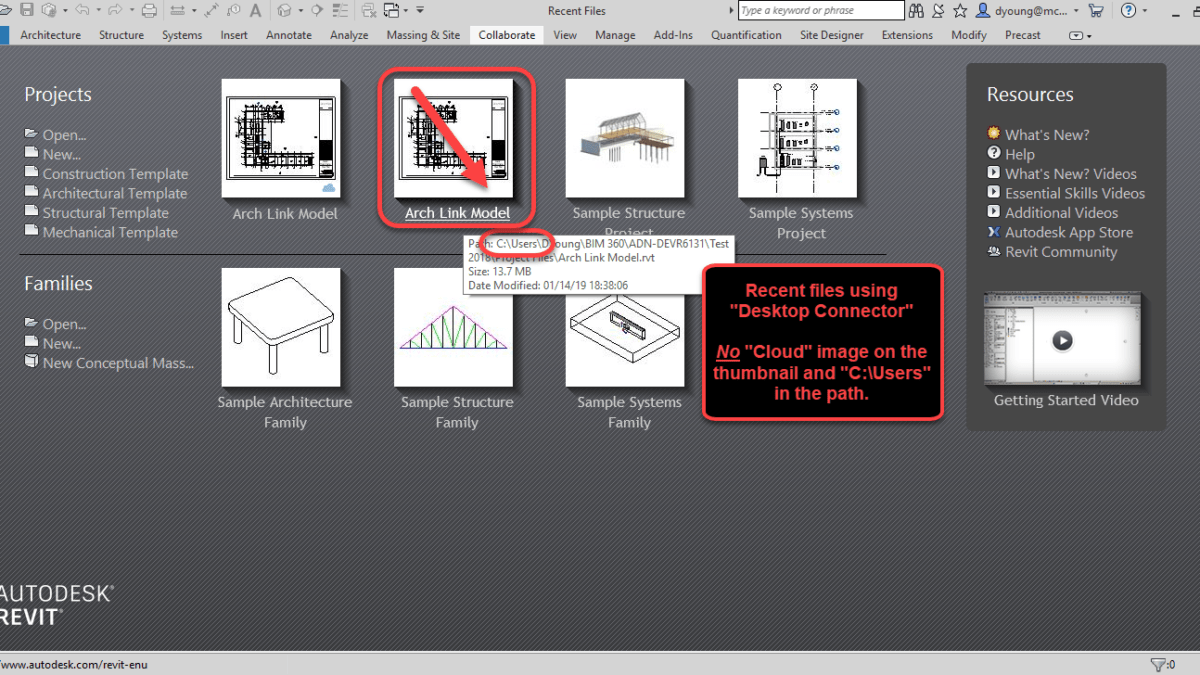
The following image shows Revit 2018 with a Recent File that was accessed incorrectly from the Autodesk Desktop Connector. Notice the path will point to your Users folder on your computer and there’s no “Cloud” image on the thumbnail.
Revit 2018 with a Recent File that uses Autodesk Desktop Connector
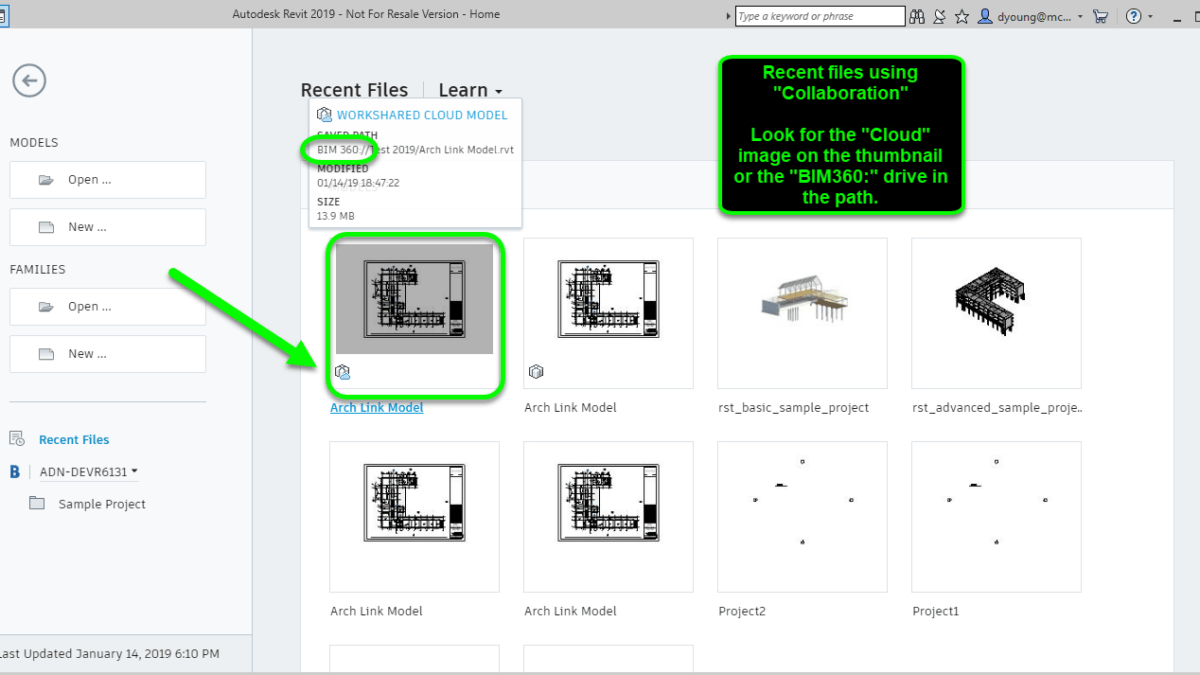
Similar to 2018 but formatted differently, Revit 2019 displays the same details in it’s Recent Files. The following image is 2019 showing a recent file opened correctly through BIM360 Collaboration tools.
Revit 2019 with a Recent File that uses BIM360 Collaboration
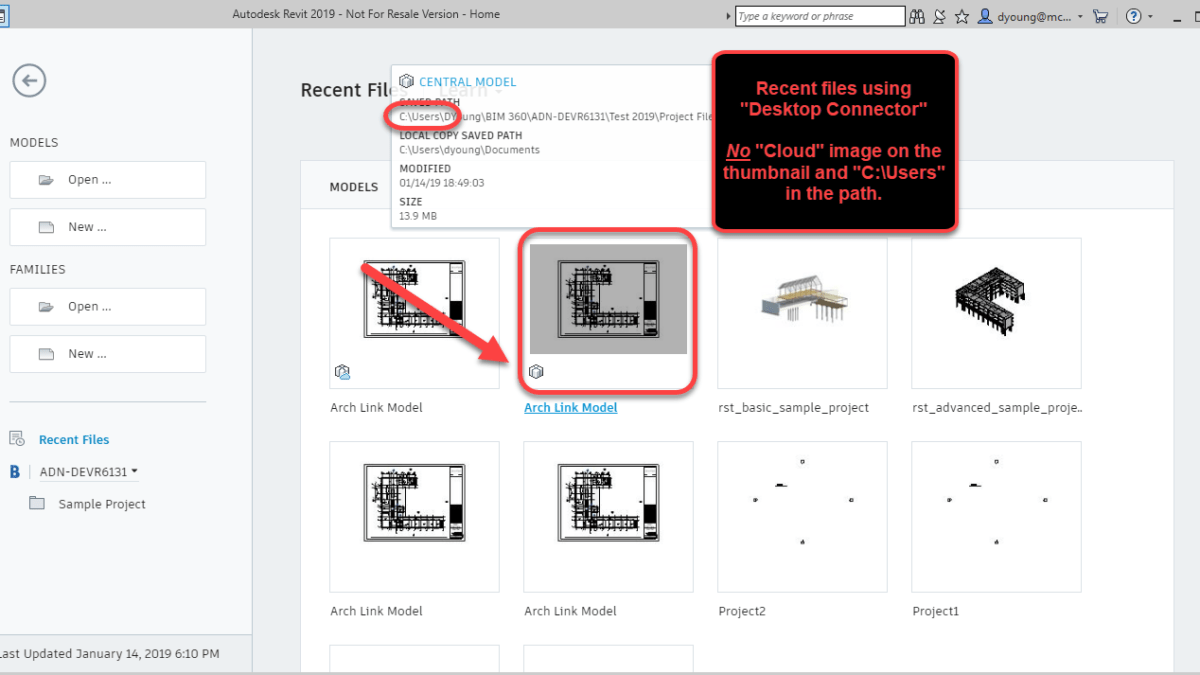
And one more image below that shows a recent model opened incorrectly from the Autodesk Desktop Connector.
Revit 2019 with a Recent File that uses Autodesk Desktop Connector
Additional Clues
Looking at some of those subtle options can easily be overlooked or forgotten. Especially in the daily stress of production and deadlines. There are a few more obvious clues that can tell you if you’re opening your Revit models correctly.
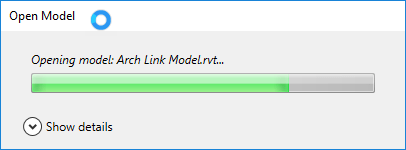
For starters, when you open a BIM360 Design or C4R model properly in Revit, you’ll see a nice status dialog indicating that the files is being opened and sync’d locally.
Opening BIM360 Models Properly Displays A Status Dialog
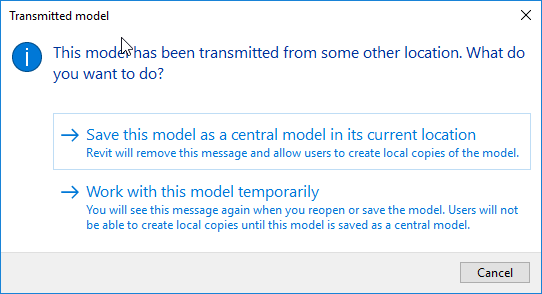
On the other hand, there’s a major red flag when you open the files incorrectly though the Autodesk Desktop Connector. When you open the files incorrectly, you’re prompted to work on the model temporarily or save it locally as a Central Model. If you see this dialog, you know you opened the file incorrectly and should click the Cancel button.
Revit Model Opened Incorrectly from the Autodesk Desktop Connector
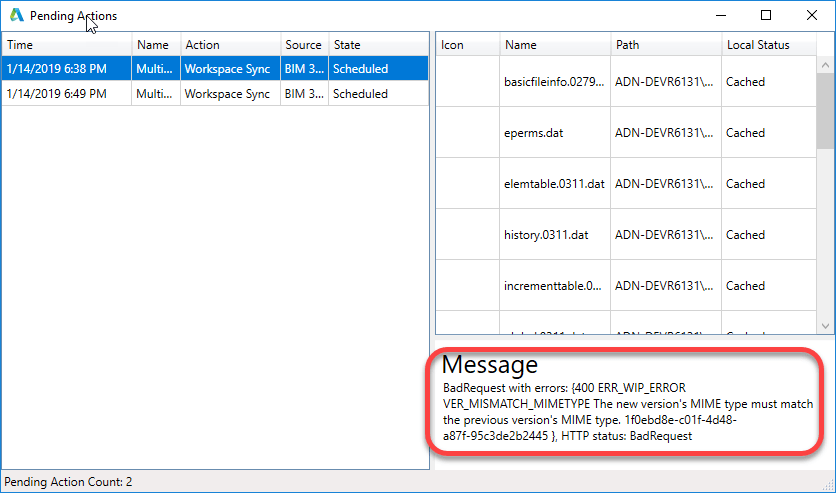
If for some reason you or another user did open the file incorrectly, you can use the Autodesk Desktop Connector icon in the Windows System tray to review the pending actions. There will likely be warnings when reviewing the connector’s syncing status tasks. Note however that that lack of pending tasks with errors does not mean a file can’t been opened incorrectly. Any number of other actions could have overwritten the local copy or cleared those actions.
Autodesk Desktop Connector Pending Actions With Errors
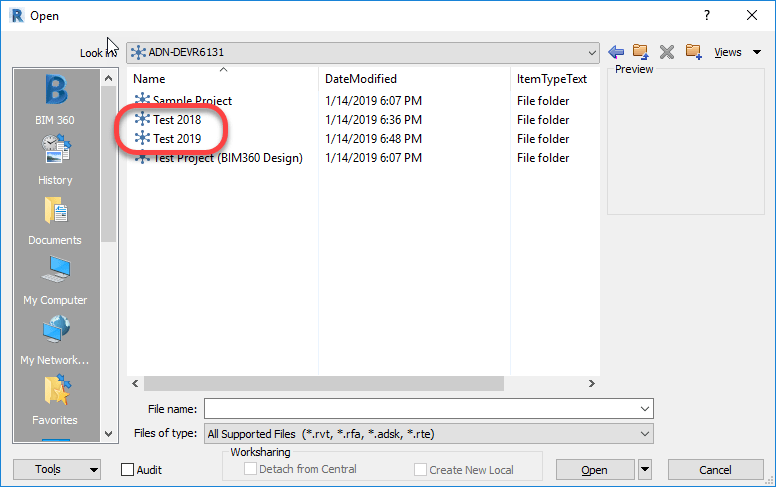
Another subtle clue is that if you look at the collaboration hubs and you see multiple projects that use different versions of Revit between them, you know you’re opening the models incorrectly. The Autodesk Desktop Connector display all projects, regardless of Revit version being used because it;s independent of Revit. When opening files correctly for BIM360 collaboration, Revit 2018 will only see 2018 project versions and Revit 2019 will only see 2019 project versions.
Again, if you don’t see differently projects that use different Revit versions, that does not mean you’re opening them properly. You merely may have been granted to projects of only one Revit version. But if you do see multiple projects you know are using different versions of Revit, it;s a sure sign you’re opening the files wrong.
Two Projects Using Different Versions of Revit Listed Together is a Red Flag
Best To Avoid Using The Dropdown
The last word of warning is with using the drop down list in the Open dialog. Depending when and how you’ve accessed Models, neither BIM360 icon may be present, one or the other may be present, or both BIM360 icons may be present. Because they have no description, its hard to tell wich does which.
The following image shows the Dropdown list expended with both BIM360 icons displayed. One will take you to the proper BIM360 collaboration tools and the other, incorrectly to the Autodesk Desktop Connector.
BIM360 Collaboration and Autodesk Desktop Connector Icons Look Similar.
Because of this very subtle difference, it’s likely a best practice to not use them ever. If they don’t show up on your system, don’t worry. They typically won’t display until you’ve first accessed the corresponding My Computer or BIM360 shortcuts on the left side of the dialog.