Fabrication Print Objects
Duplicate Objects = Different Results
Autodesk Fabrication reports can be tricky. It’s not always clear what’s happening with the data you’re trying to report or where it’s coming from. To make matters worse, some print objects are listed more than once.
These duplicate print objects are not just in multiple categories for you’re convenience when building reports. In fact, they don’t even report the same information.
In this example, we’ll look at Item Connector Fabrication Time as it applies to a Tee duct fitting, Each Tee fitting has 3 connectors which we’ve set to a Ductmate connection. We’re using this connector because it has labor attached to it in the default Imperial configuration that Autodesk ships with Fabrication CADmep, ESTmep and CAMduct.
The following image shows our report editor for an Item report. The Red and Green shows the same name for the print objects. One is located in the Costing group and the other in the Connector group.
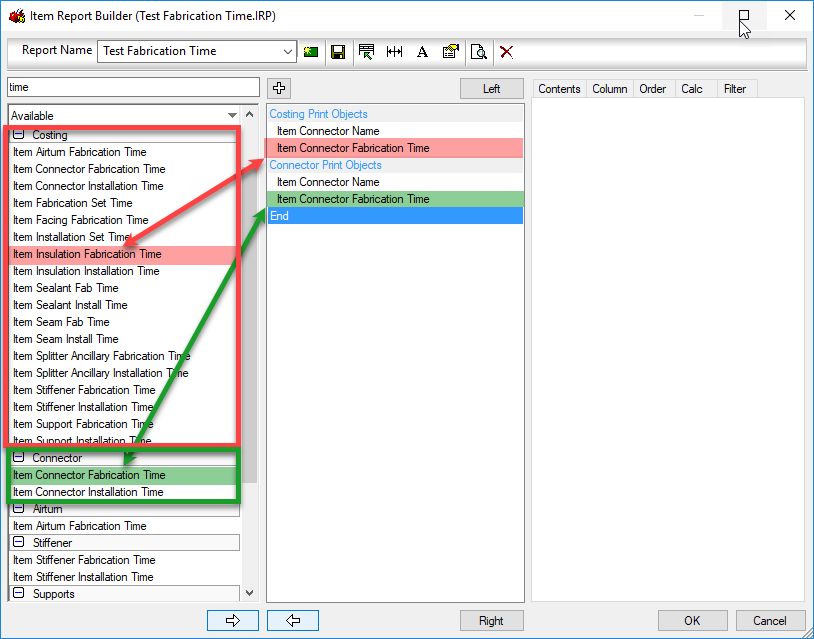
The “Costing: Item Connector Fabrication Time” print object returns the time for ALL the connectors on the fitting. The “Connector: Item Connector Fabrication Time” print object on the other hand return the fabrication time for each connector individually.
The next image shows the preview of our Item report. Costing Print object is in the top table (red) and the Connector print object is in the bottom table (green).
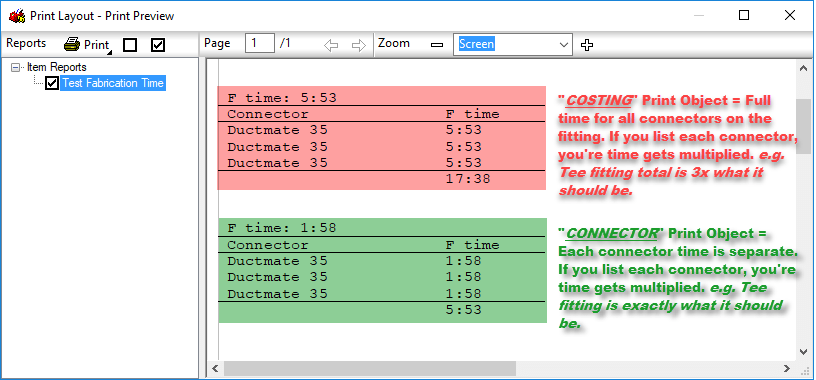
Now, there’s nothing really wrong with the top (red) table that uses the Costing print object except one thing. The Connector Name print object is located in the Connector print objects group which is based in “each” connector”. Using the Connector Name will list the connector 3 times, but it;’s mixed with the print object from the Costing group. This means that the table, shows 3 rows, one for each connector (Name) but the Fabrication Time for each connector listed, is the total for the entire fitting. When totaled, this results in a Fabrication Time 3x more than what it should be for the Tee fitting we used as an example.
You can download a Zipped copy of the IRP used for this test here. Just unzip the *.IRP file and copy it to the folder for your reports in your Fabrication configuration.
To recap, be very cautious about grabbing the first print object you see in a report when you scroll through them. There may be duplicates and they could yield different results. Once added to your report, it’s very difficult to know where that print object was from without intimately knowing the differences between them.