Under the resources menu for Autodesk Fabrication, the COD Scripting section has been updated. This now points to another sub-menu of additional COD Scripting reference information.
The link to the COD scripting libraries has also moved one level deeper so if you have a bookmark and it comes up blank, you many need to re-link it.
I still have more information to add that I’ve not previously documented. These are more advanced functions or other undocumented functions. I’ll post notices as I update them.
You can find the additional COD Scripting information compiled here. Direct links to all the scripting reference information is below…
Over the years, I’ve written a number of scripts helpful for managing an Autodesk Fabrication configuration. I’ve given them away in my Autodesk University session I’ve taught so they’ve circulated around a bit.
I’ve rewritten most, streamlined them, made enhancements, added others, etc, etc. Because I’m always updating and changing them, I thought I’d host them here too. I can then just post when I update them.
There’s are 2 sets of scripts covering the following topics…
Debugging Properties Scripts
Job Item Scripts
Library Item Scripts
One set is for use in 2019.0 and earlier versions (but work in any version), the others are designed for 2019.1 and later when Autodesk added support for the Pattern Number property.
You can get to the scripts from the menu or click here. The scripts are free to use for all except employees of ENGworks or anyone working on the behalf of ENGworks. (contractors, consultants, etc.) who are prohibited from use.
Disclaimer: I’m not a professional coder. Just a good hack, script kiddie, amateur, whatever you want to call me. But I’ve been doing it for a while and I tend to be good at finding ways to make things less error prone. I also pickup tricks from industry peers who humble me with their ability.
If you aren’t a professional programmer, you’ve likely never been told either. So I’m telling you as its helped me and I’m sure it’ll help you too if you’re an amateur like me.
This works regardless of language. Whether you code in Visual Basic, AutoLISP, Java, C# or any other language the concepts are the same but the syntax will be different. For this reason, I’ll use pseudo code…that is, syntax that isn’t any particular language but uses terms obvious to describe what’s going on.
The Issue with Strings (Text)
A common activity in any programming is reading text, often called String data types. You read the value from somewhere else like a property or have the user type the data. You then need to test the data in a conditional statement to see if the data is valid. You may also be testing to see which action to take depending on what was typed.
The problem when doing this is you don’t always know the case used when typing. Most conditional testing on string data is CaSe SeNsItIvE. Take the following examples….
MyValue = "Elephant"
if MyValue = "Elephant" then
  MessageBox "Yes - There's an Elephant in the room"
end if
This code works because the case of the text strings is identical. But what about this….
MyValue = "elephant"
if MyValue = "Elephant" then
  MessageBox "Yes - There's an Elephant in the room"
end if
In the above code, the test fails because the “E” in “Elephant” is now lower case. This is very simple to solve and is obvious once it’s pointed out.
To resolve this, when you test a String value, use code to force the value to either UPPER (or lower) case and test against that. Now look at the following code…
MyValue = "Elephant"
if Upper(MyValue) = "ELEPHANT" then
  MessageBox "Yes - There's an Elephant in the room"
end if
…or this example….
MyValue = "Elephant"
if Lower(MyValue) = "elephant" then
  MessageBox "Yes - There's an Elephant in the room"
end if
In either of these examples, we take the value we want to test, force it’s case one way or the other and test against that case. Now it doesn’t matter what case is typed by a user or returned when reading a value, the test is now essentially inoculated from case differences by forcing it one direction or the other.
A Less Obvious (but related) Tip
Another common mistake I see people do is not use this technique when they know the software better. For example, lets say you wanted to retrieve the type of AutoCAD object and noticed that AutoCAD ALWAYS returns the name in mixed case….”Line”.
It’s common for less experienced programmers but very smart and observant coders to ignore the tip I just suggested. I’d advise you to NOT do that…always use a forced case when testing text strings. Even when you’re sure the value you are reading and testing is always a particular way.
Why? What happens if…that pesky if…AutoCAD or whatever you are using changes? Autodesk sees a lot of programmers…maybe they overhaul AutoCAD code and object types are now returned upper or lower or a mix? You’ve now put in the hands of someone else if your program will break in the future. As unlikely as it seems, it’ll eventually happen. The key to writing resilient code is tricks like this. Think of it as a coder’s version of “Defensive Driving”. Anticipating future inconsistencies and planning for them makes your code more resilient and less likely to break on your next upgrade.
ActiveX is a framework developed by Microsoft in 1996 which adapts earlier concepts of COM (Component Object Model) and OLE (Object Linking and Embedding). Most people may think of this as Visual Basic (pre .Net era) programming.
This was supposed to fade away as Microsoft moved to the .Net based languages so Autodesk pulled support in the shipping versions of AutoCAD years ago. It was however still available as a separate download for a limited time but that time never arrived. Microsoft kept it around and still today, Autodesk supports VBA, a version of Visual Basic embedded within the Application over half a decade later.
If you’e not interested in programming AutoCAD in VB or VBA but do use AutoLISP, I’d encourage you to keep reading, this article is still for you.
Enabling VBA in AutoCAD
If you want to take a stab at VBA programming in AutoCAD, you’ll need to install the Visual Basic Extension. The extension can be downloaded for 2016 – 2019 versions of AutoCAD from this link….https://tinyurl.com/AcadVBAInstaller
Download the VBA Enabler for AutoCAD from Autodesk’s web site.
VBA Help for the AutoLISP Programmer
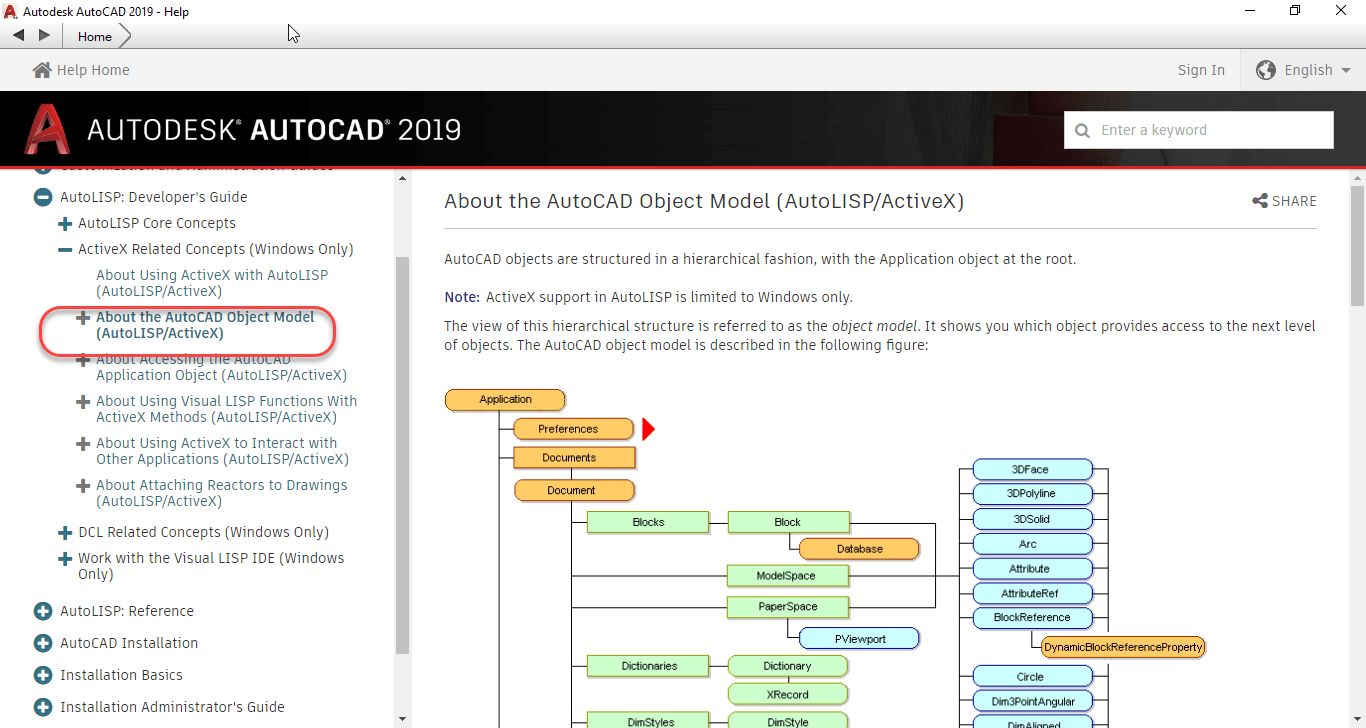
Now, with AutoCAD’s help now Online, you might be tempted to think that it’s the most robust help you can get from Autodesk. Simply typing “F1” will bring up AutoCAD’s help and browsing through the developer documentation, you can find documentation of AutoCAD’s ActiveX Object Model like seen in the following image.
AutoCAD’s ActiveX Object Model is buried in the AutoLISP documentation Online.
Looking at the above image, the graphic of the Object Model contains no hyperlinks. And there’s no documentation on the Methods, Properties and Events typically available for this type of programming.
If you’re programming in VBA, the VBA Editor has tools for helping navigate this model or provides a lot of Auto Complete functionality when typing code. This doesn’t help anyone trying to program ActiveX from AutoLISP.
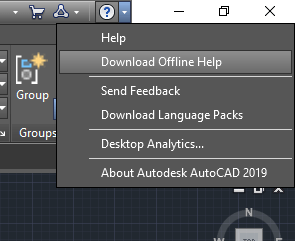
This is where the Offline Help comes in. You can access the OffLine Help download page from within AutoCAD by clicking the down arrow next to the question mark in the upper right corner of AutoCAD and then selecting Download Offline Help to download and install the help system.
Got to the Offline Help Download page from this menu.
You can also click the following link….https://tinyurl.com/Acad2019-OfflineHelp to go to the AutoCAD 2019 Offline Help download page as shown in the following image.
Download and Install Offline Help from this page.
Configuring Offline Help
Once installed, you can configure AutoCAD to use the Offline version of Help by typing Options at the command line and clearing the toggle in the following image.
Clear this Toggle to Default AutoCAD to Offline Help
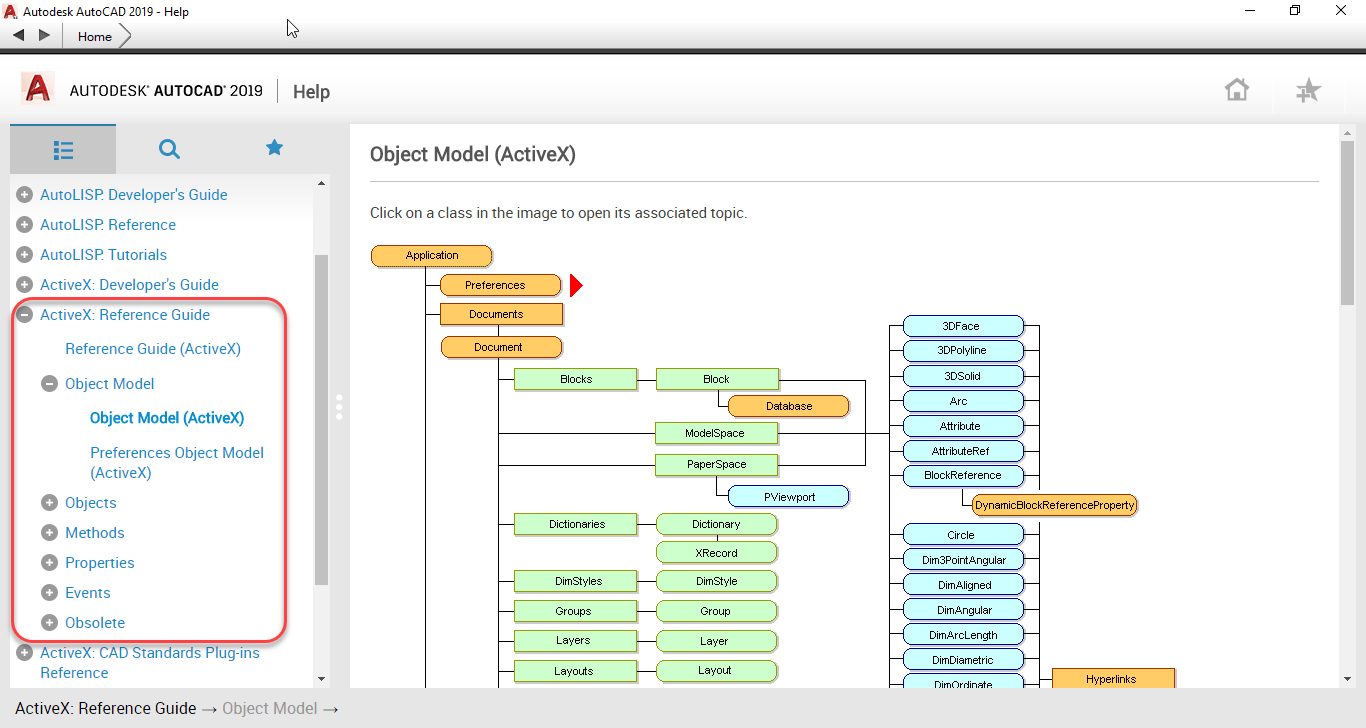
Once configured, typing “F1” will access the Offline help. One of several added pieces of Documentation which includes the ActiveX Developer’s Guide, is the ActiveX Reference Guide. You can see the graphic of the same Object Model documentation as before, but this one is hyperlinked to documentation of the Objects as well as lists all of the Methods, Properties and Events.
The ActiveX Reference Guide contain all the documentation you need for ActiveX programming.
While all of documentation is written with the Visual Basic programmer in mind, the organization of the ActiveX object model and everything else is where you can get all the documentation you need to help translate the function calls to their AutoLISP syntax. When you make a call to (vl-load-com) in AutoLISP, you have access to over 2000 additional AutoLISP functions with a VLR- prefix. These functions are all documented here in the ActiveX Reference Guide in Visual Basic syntax.
In a future post, I’ll explain how to translate the Visual Basic documentation to AutoLISP syntax. If you don’t want to wait, review the ActiveX documentation found in the AutoLISP developer guides…it’s all in there!
One Final Note: You do NOT need to install the VBA Extensions in order to program w/ActiveX from AutoLISP. Just install with Offline Help and you’ll have everything you need.
If you’re an AutoLISP programmer and use Autodesk Fabrication CADmep, you most likely know that there’s a COD Scripting language in Autodesk Fabrication that provides read and/or write access to CADmep properties. The problem with COD Scripts, is that sometimes they’re not powerful enough to do all of the other things you’d like to do and you may want to use AutoLISP.
What you may not know is that you can access the vast majority of CADmep properties from AutoLISP. To so this, you need to configure CADmep’s List Setup dialog which will provide a light weight but similar interface to what you see when you build reports in Autodesk Fabrication.
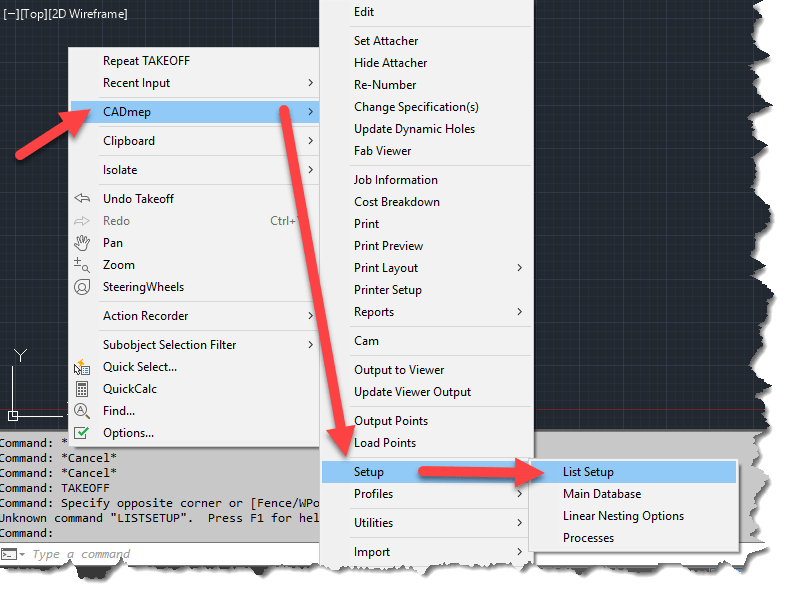
To access List Setup, right-click in an open area or the drawing editor and then select “CADmep” -> “Setup” -> “List Setup” from the menu.
ListSetup will Provide access to CADmep Properties
Configuring List Setup will provide access to the configured properties via DXF codes which are one of the most common ways of accessing object properties in AutoLISP. (You can also access these same DXF based properties via VBA, ARX or .Net)
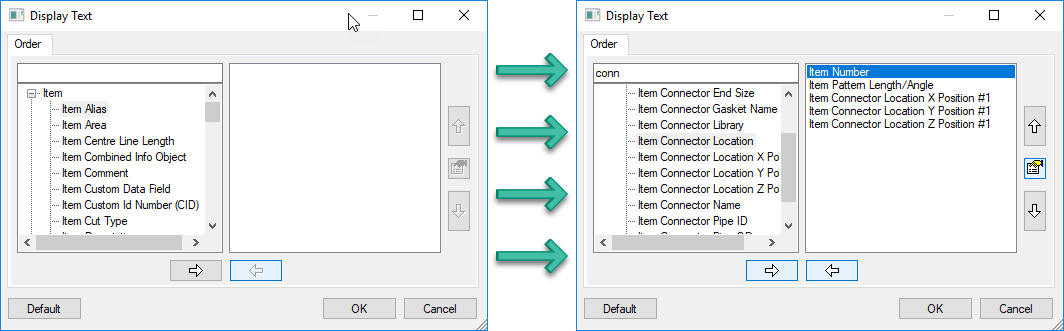
The following image shows the List Setup dialog before (left) and after (right) being configured. Simply add the properties you want to extract in the order you want them.
Before and After Configuration of List Setup
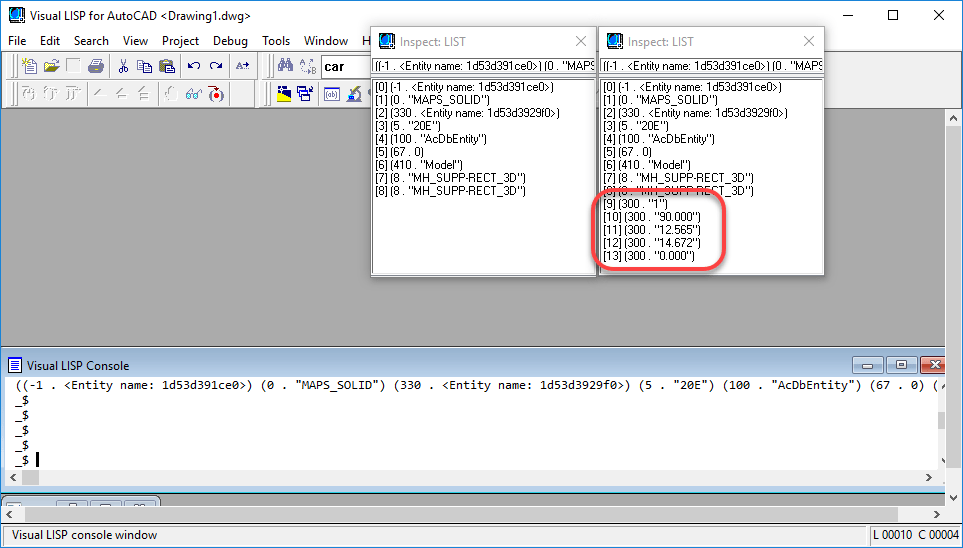
Once you’ve configured the properties you want, a simple call to the (ENTGET) function in AutoLISP will return the data you’re looking for. You can see in the following image, that we’ve saved the DXF data to two different variables in the VisualLISP editor. The listsetup-blank variable (left) was done before configuration and the listsetup-config variable (right) was done after the configuration of List Setup.
CADmep Properties can be Found in the 300 DXF Group Codes
The code used to extract the data is the following….
Because the VisualLISP editor does not word wrap it’s results, you can use the Inspect
Now, there are a few things to know about this method….
All CADmep properties show up in DXF Group Code 300. If you are returning multiple properties, you’ll have multiple 300 codes to parse through.
The order the properties are configured in List Setup is the order the properties will appear when returned in AutoLISP. There really is no other foolproof way of knowing which codes are which properties (unless obvious by their value) without knowing the order List Setup was configured.
If you later change the properties or their order, you’ll likely break your existing code. Think carefully about what you may want later and add it from the start even if you don’t want it at this time. If you need to add properties later, simply add them to the end of the list.
This method works well for reading Fabrication properties. It doesn’t allow you to set them using functions like “(ENTMOD)” or “(ENTUPD)“
Have you ever received a list of coordinates in a CSV file and wanted to place those in AutoCAD? Were you aware this can take as little as 2 minutes?
For a very long time, AutoCAD has supported SCRIPT files. A script file is nothing more than a text file (using only Notepad) that lists the everything that you’d typically type to AutoCAD’s command line.
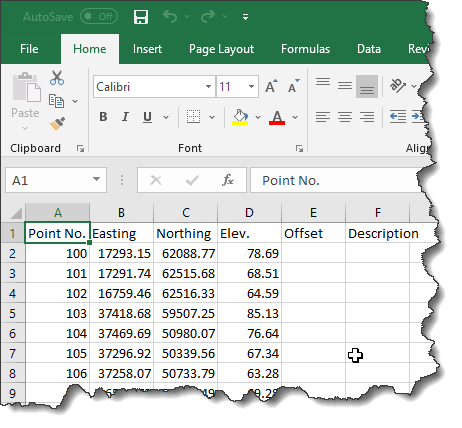
Take for example the following CSV file. How would we get this into AutoCAD?
Points List in CSVFormat Opened in Excel
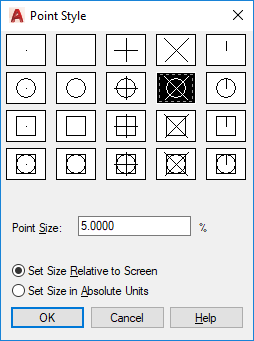
To figure out what we need to type in AutoCAD, let’s first start by making sure our Point style is something other than a single dot so it’s more easily visible on your screen. To do this, type “PTYPE” at AutoCAD’s command line. If you don’t get the following dialog, Escape out of the command and type “DDPTYPE” and try again. Select a point style that suites you.
Point Style Dialog
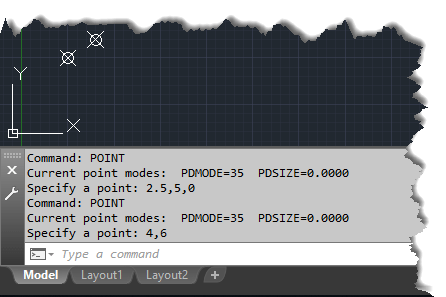
Now that you have a point style that’s more visible on the screen, lets type the Point command and see what input it takes.
You can see from the below image of the command line that once we type “POINT” and press ENTER or SPACEBAR, there’s a little text that displays the current point style and size. You’re then prompted for the coordinates. The points in this example were entered by typing X,Y,Z coordinates for one point and X,Y coordinates for the other. After typing the coordinates and pressing ENTER, the command completes.
X,Y or X,Y,Z Formats Can Be Used For Points
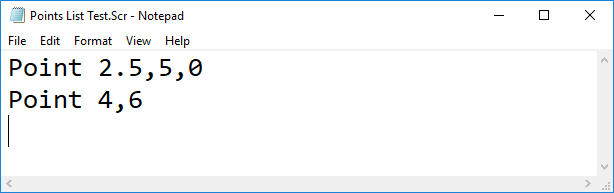
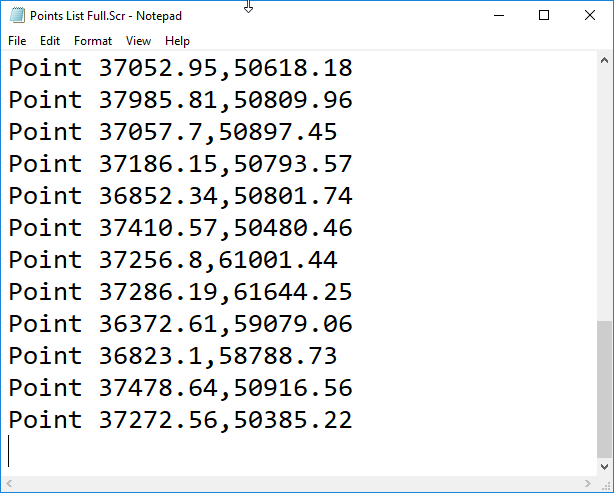
To test this theory, we can use Notepad to manually create a Script file. Type the contents you in the below image and name your file with an “SCR” File extension. You’ll want to make sure Notepad’s “Save as type” drop down list is set to “All Files (*.*)” or else Notepad will append a TXT to the end of the file.
One other thing to also note is that the cursor is after the last line, just below it. This is because there’s an “Enter” after the last point…this is just like hitting Enter on the keyboard to complete a command in AutoCAD.
Use Notepad to Create a Script File
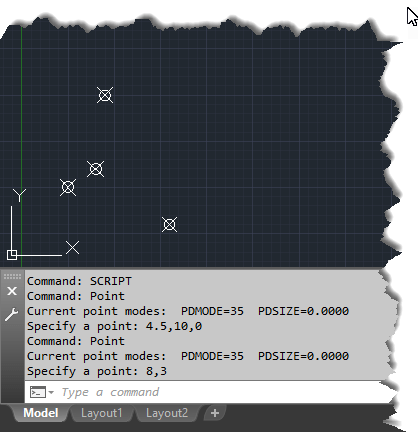
After you’ve created your text file, type the “SCRIPT” command at AutoCAD’s command line and select the Script file you just created. When complete, AutoCAD should have added 2 more points to the drawing.
The Script File’s Input Looks The Same As Manually Typing.
So, now you know how the basis for a script file (same as you’d type manually) and how to create one (using Notepad), the next thing you need to do is convert the CSV file in Excel to a Script file. That’s actually quite simple.
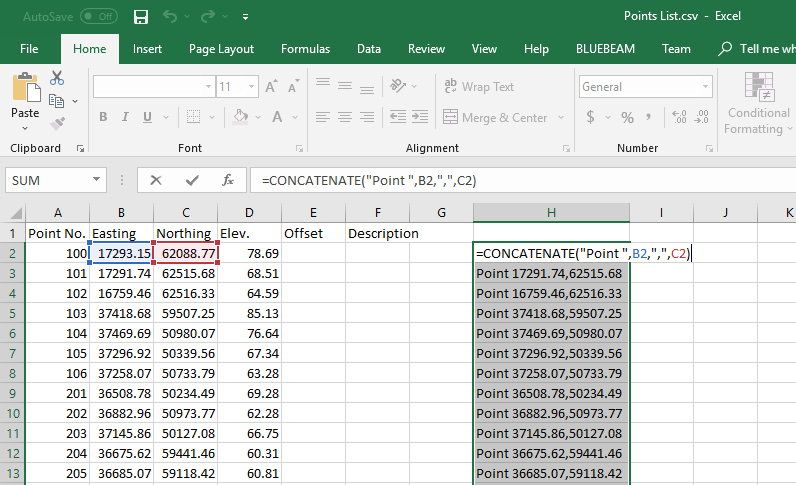
You’ll use Excel’s “CONCATENATE” function which takes several pieces of text and puts them together. In this example, this is the formula we’re using…
=CONCATENATE("Point ",B2,",",C2)
The first piece of text is the Point command. Remember, we can use the SPACEBAR after a command and it’s the same as if we’re pressing the ENTER key. That’s why you see the space after the “POINT“. Each piece of typed text is also contained in double quotes.
=CONCATENATE("Point "
Each piece of text that is concatenated is separated by a comma. After the command, you start typing the X-Coordinate which is the Easting column in the CSV file. Because we’re not explicitly typing text, we can simply use a cell reference like so…
=CONCATENATE("Point ",B2
When typing coordinates in AutoCAD, we separate them with a comma, so we use another comma for Excel’s Concatenate function, then a comma explicitly typed in double quotes.
=CONCATENATE("Point ",B2,","
Finally, we add the Y-Coordinate which is in the Northing column using a cell reference, again, remembering to separate all the pieces of data with a comma and close the Excel function with a closing parenthesis.
=CONCATENATE("Point ",B2,",",C2)
When you’re done, copy the formula to the other cells. You can see in the image, that we have a line of text similar to what we typed in Notepad manually the first time. The below image, I’ve used the F2 key to edit the first cell so you can see the formula and the cell references.
Excel Used to Build a Script File
Now that you’re text in Excel is in a Script File format, you can guess the next step. Copy/Paste the text into Notepad, Save with a TXT extension on the file name.
Make Sure the Cursor is on the Last/Empty Line
The last step is to run the script file in AutoCAD using the Script command. Zoom Extents in AutoCAD to see your points. The CVS file, Excel File and Script files can be downloaded for examination from this link.
Here’s a screen recording of making and running the script file. As you can see, it takes a CSV file, gets converted into a Script file and places the points in AutoCAD in less than 2 minutes.
CSV Points List to AutoCAD Points in Less Than 2 Minutes
Script files are quite easy. You could easily add more text, and use different commands to do the same thing like Insert an attributed block into the drawing and use the point number as the attribute value. You just need to make sure all your system variables are set to prompt you upon insertion for the attribute value.
The only real downside to Script files is they’re not intelligent. They don’t like extra characters or spaces, the don’t work well with commands that prompt for user input or display dialog boxes and they don’t perform conditional logic to do different things depending what they find. They will however call AutoLISP routines so when I have more advanced work I want to do in a script file, I just have the Script call and run my Lisp as well.
I’ve updated some of the Autodesk Fabrication Resources pages. You can find the links below however you should note that none of the information has changed from 2018 to 2019. Non the less, you can review the links here…
Most programming languages have a function to round a number to the closest whole number using standard math rules. Anything fraction of a number < 1/2 typically rounds down and any fraction of a number >= 1/2 rounds up. In Visual Basic, there’s a “Round” function, C# has a “Round” method and Excel even has a “Round” function.
1.0 already a whole number, rounded value remains 1.0
1.25 rounds DOWN to 1.0
1.49 rounds DOWN to 1.0
1.5 rounds UP to 2.0
1.75 rounds UP to 2.0
2.0 already a whole number, rounded value remains 2.0
…etc…
Some languages lisp AutoLISP, doesn’t have a function that behaves like this. Instead, AutoLISP had a “FIX” function that rounds down, regardless of the fractional component.
1.0 already a whole number, rounded down remains 1.0
1.25 rounded down becomes 1.0
1.49 rounded down becomes 1.0
1.5 rounded won becomes 1.0
1.75 rounded down becomes 1.0
2.0 already a whole number, rounded down remains 2.0
…etc…
If you use a language like AutoLISP that only drops the fractional component of a number (essentially always rounding down) to function like real math rules, this is easily accomplished by simply adding 0.5 to the number before rounding. This changes the resulting rounded number to the same as traditional mathematics would round the numbers.
1.0 + 0.5 = 1.5 rounded down becomes 1.0
1.25 + 0.5 = 1.75 rounded down becomes 1.0
1.49 + 0.5 = 1.99 rounded down becomes 1.0
1.5 + 0.5 = 2.0 rounded down becomes 2.0
1.75 + 0.5 = 2.25 rounded down becomes 2.0
2.0 + 0.5 = 2.5 rounded down becomes 2.0
…etc…
So far, this is quite simple. But what if you wanted to round to the nearest 1/8? Or 1/2? Again, many of the rounding functions in programming languages have the ability to round to a certain number of decimal places by specifying the number of decimal places as an argument to the rounding function. This works great on decimal values where you want to round to the nearest 1/10 (0.1), or 1/100 (0.01). However, this doesn’t work in other fraction that are not base 10. Rounding to the nearest 1/8 yields 3 decimals (0.125) but 2/8 (1/4) yields 2 decimal places (0.25) and 4/8 (1/2) yields in 1 decimal place (0.5). So how is this done?
Quite simply actually. You can use another technique which shifts the decimal. This moves the fractional component you want to keep to the left of the decimal and leaves the remaining fractional components to the right of the decimal where you can round them off. It sounds more complicated than it is. Let’s look at how this works by focusing on 1/8 (0.125).
What happens when we multiply 1/8 (0.125) by a factor of 8? We get 1.0 which when rounded, stays 1.0, we then divide by 8 again which shifts the decimal back to where it belongs and we end up with out original number as follows…
The key is…if you want to round to the nearest 1/8, you “MULTIPLY by 8, ROUND, then DIVIDEby 8″. You can also use the inverse formula “DIVIDEby 1/8, ROUND, then MULTIPLY by 1/8″. Either formula works.
The same technique works if you want to round to the nearest 2 (even) or 3 (3, 6, 9, etc.).
0.25 / 2 = 0.125 becomes 0.0 * 2 = 0.0
0.5 / 2 = 0.25 rounded becomes 0.0 * 2 = 0.0
1.0 / 2 = 0.5 rounded becomes 1.0 * 2 = 2.0
1.99 / 2 = 0.995 rounded becomes 1.0 * 2 = 2.0
2.00 / 2 = 1.0 rounded becomes 1.0 * 2 = 2.0
2.99 / 2 = 1.495 rounded becomes 1.0 * 2 = 2.0
3.0 / 2 = 1.5 rounded becomes 2.0 * 2 = 4.0
3.5 / 2 = 1.75 rounded becomes 2.0 * 2 = 4.0
Using these techniques, you can quickly convert numbers into the rounded format of your liking, regardless of the programming language you use.
For those AutoLISP programmers out there using CADmep, the folks at House of BIM just released their Alpha version of a wrapper for the Fabrication .Net API. Â This will expose the functionality of the Autodesk Fabrication .Net API to AutoLISP. You can download both the compiled program as well as the source code if you want to take a stab at modifying it. Check it out here.