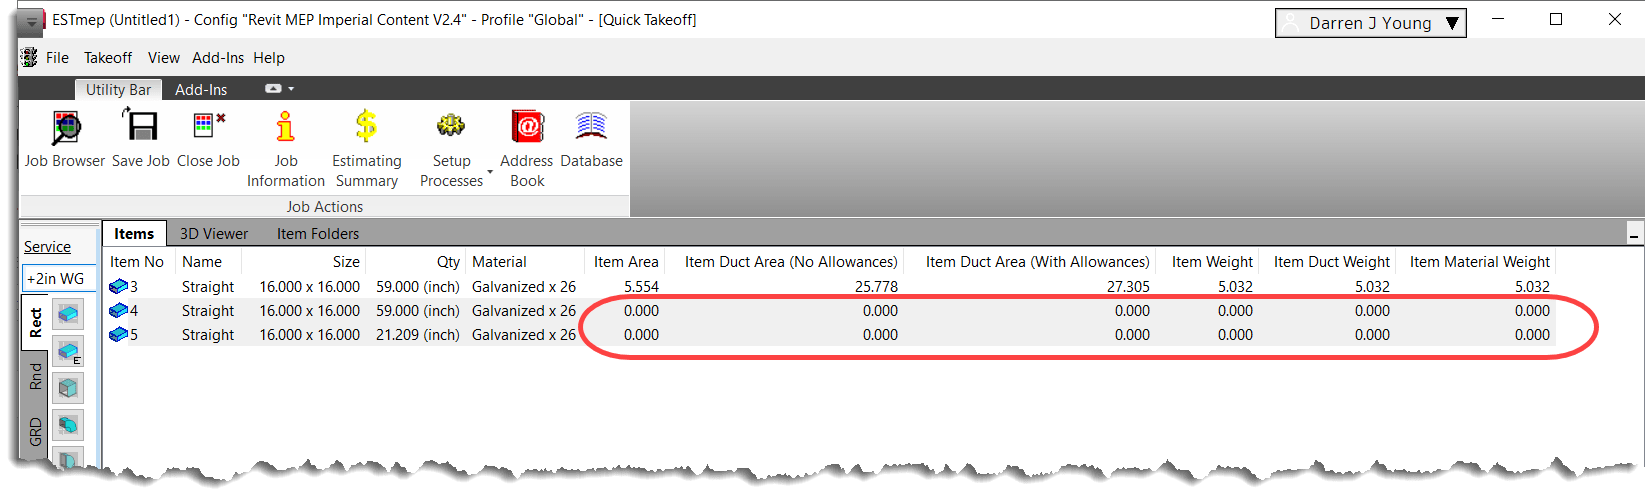
In ESTmep and CAMduct, if you use the 3d View and stretch duct to add pieces, you end up with duct that has zero Area & Weight. This also means you have zero cost for that material.
This is a confirmed issue that’s been around forever. I’ve tested from 2016 thru 2023 and can reproduce in all versions.
Here’s what that looks like…
The Fix
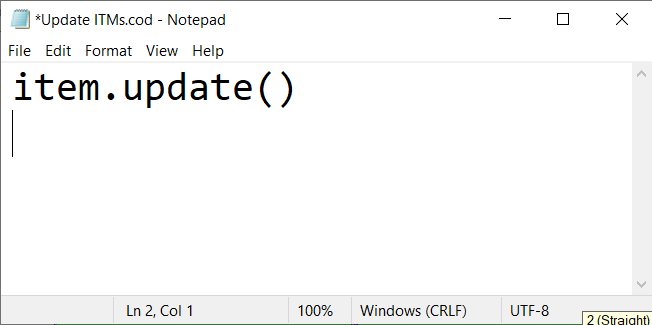
The good news is, there’s a quick fix (workaround) you can deploy to update the weight and area. Using Notepad, you can make a quick COD script that updates the ITM’s. Below is what your script should look like…
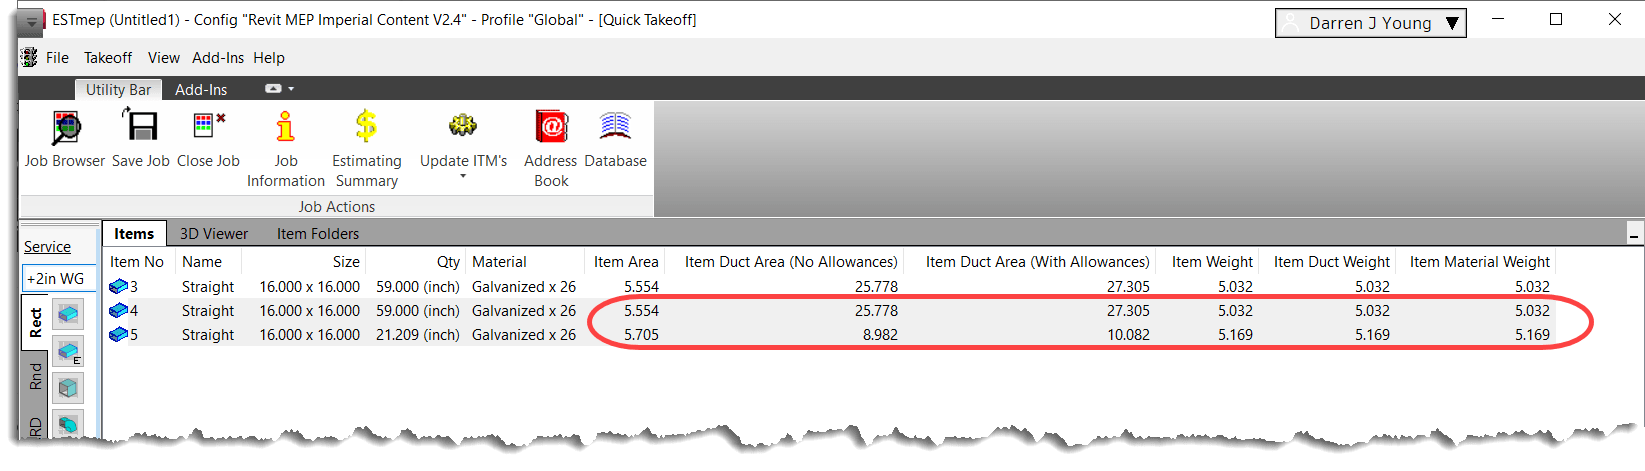
Once you create the COD script, it’s recommended you put it in the SCRIPTS folder of your Fabrication Configuration. From there, you can make a process that calls the script which will update all the ITM’s to their proper Area and Weight. The display on the Item Takeoff may not refresh. If so, just browse to another tab and back. Here’s what that looks like….
So, which this doesn’t “Fix” the issue, it does work around it fairly easily. Just run the process before running and reports or data exports.
COD Script Library was updated for JOB and LIBRARY Scripts. You can download them for free here. Here’s a summary of changes.
Script Consolidation
In the past, there were 69 to 75 COD Scripts to export all the various properties to separate TXT files. Properties that have multiple entries per ITM like Connectors or Seams are still exported to separate files because the data columns don’t line up between them and there are multiple lines per ITM.
All other properties where it’s a single property per ITM like Spool or Material have all been consolidated to a single script and single TXT file. The WriteAllMiscProperties(Job).cod and WriteAllMiscProperties(Library).cod scripts are where you can extract all other properties so no matter what combination of properties you want, there’s less data files to sort through or scripts to run.
Improved Script Properties Display
The properties scripts were displayed script settings before running the script. They still are but additional properties are displayed where appropriate along with some additional properties the scripts now support (both covered later). In addition to the additional items, you’ll note that clicking theNo button no longer cancels the script. Instead, clicking No takes you to the Advanced Configuration (also covered later) where you can change some of those settings.
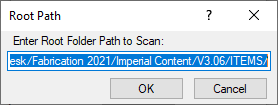
By default, the script looks to the root of your ITM Library folder of your database. This value can now be changed to point anywhere else. You may want to point to a folder of ITM’s outside your Configuration if that’s where you store your ITM’s. You can also scan further down the folder structure so you can perhaps skip exporting Duct ITMs but instead scan and export Piping ITMs.
Here’s what this looks like. Note that the path may use forward slashes ( / ). You can however paste a new path that uses backslashes ( \ ) and it should still work. There’s no option in COD Scripts to allow you to browse to a folder so make sure you type or copy/paste carefully.
Advanced Configuration – Export File (JOB and LIBRARY Scripts)
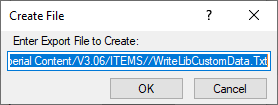
Similar to the Scan folder configuration, you can now also change the default export file name and location. Specifications for specifying paths are the same as above.
Also note that while you CAN specify “CSV” as the file extension, I recommend using “TXT“. When Excel sees a CSV file, it just opens it without giving you the ability to specify how data is interpreted. Using a “TXT” extension makes Excel prompt you for “How” the file should be read like which character is used as the delimiter or defining which columns are Text vs other data types.
Some numerical data or values can be interpreted incorrectly by Excel if you don’t explicitly tell Excel to treat them like Text. A good example of this is the size 1-1/2″ or 1-1/4″. Excel thinks these are dates and will display them as 1/1/2012 or 1/1/2014 respectively if you don’t explicitly tell Excel to treat them as Text. Using that “TXT” extension on the export file is a safe guard against this issue.
A lot more detail that you likely wanted but hopefully it’s helpful, here’s what that looks like….
Note you may see an extra slash character between the path and file name. This is can happen if your MAP.INI (Edit Configuration Utility) includes or doesn’t include an ending slash. I may add code to clean this up later but COD Scripts and Fabrication seem tolerant of this extra slash so no need to worry about it (or edit it out if you like).
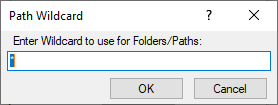
Instead of editing the folder you’re going to scan, alternatively you can specify a wildcard to use to limit which folders to export data from. As an example, you could specify *WELDBEND* and properties will only be extracted for ITM’s within folders containing the name “Weldbend”. Wildcard specification is not CaSe SeNsItIvE. By default, the wildcard is ( * ) to extract from all folders. Here’s what that looks like…
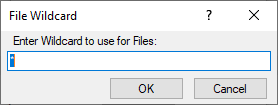
Just like the Folder/Path Wildcard specification, you can specify a wildcard for which ITM files to extract properties from. As an example, you could enter *PIPE* and you would export only from ITM files that contained the work “Pipe”. Again, the wildcard is not CaSe SeNsItIvE. You can use both Folder and File wildcards to very narrowly specify your data export scope. Default wildcard is an ( * ) to extract from all ITM files. Here’s what that looks like…
Advanced Configuration – Delimiter (JOB and LIBRARY Scripts)
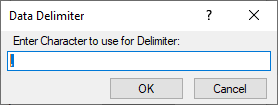
Data exports by default use a Comma ( , ) to create a Comma Separated Value file. If your Fabrication Database uses commas in folder names or ITM file names this can cause data fields to shift in Excel when opening the export file. If this is the case for you, you can specify a different character to use to separate the data fields in the export file. The Pipe ( | ) character is always a good “rarely used” character for this purpose.
As a side note, it’s not a good practice to have commas in folder or file names. You can read more about that here. This option is really here in case you’re stuck with commas and haven’t fixed them yet.
Advanced Configuration – Max Custom Data Index (Only Scripts that export Custom Data)
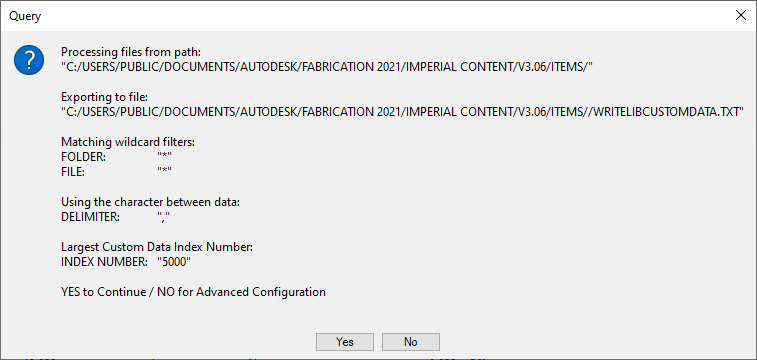
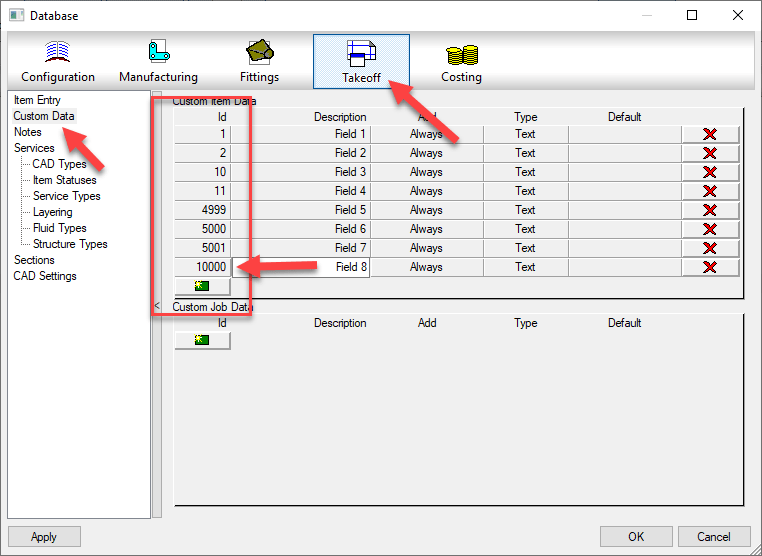
Only used for scripts that export Custom Data, you can specify the maximum Custom Index value. Unfortunately, COD scripts have no ability to determine how many custom data entries you have or which index numbers are used without jumping through some hoops. To work around this, you need to specify the maximum Custom Data Index value. The script will then loop through all those numbers and find which ones contain values and remembers them. It then exports only those custom index values so that the script runs efficiency.
By default the script uses 5000 as the maximum index number. But as you can see from the below example, the maximum index number is 10000 so we need to specify that. We look at all 10000 possibilities (it goes fairly quick) and takes note that there’s only 8 indices used and then extracts only those 8 from the ITM’s. In the past, the script would loop through all 10000 for each ITM really slowing things down. Now, even if your largest number is 6 or 7 digits (not recommended) the script will still be fairly quick.
Here’s what that Delimiter Character configuration option looks like…
Summary
In the past, if you didn’t like the export files names, where they went, or wanted to change the scope of which files or folders you extract data from, you could have always changed the COD script code yourself. You now shouldn’t have to. Hopefully this makes running these scripts a little more flexible and user friendly.
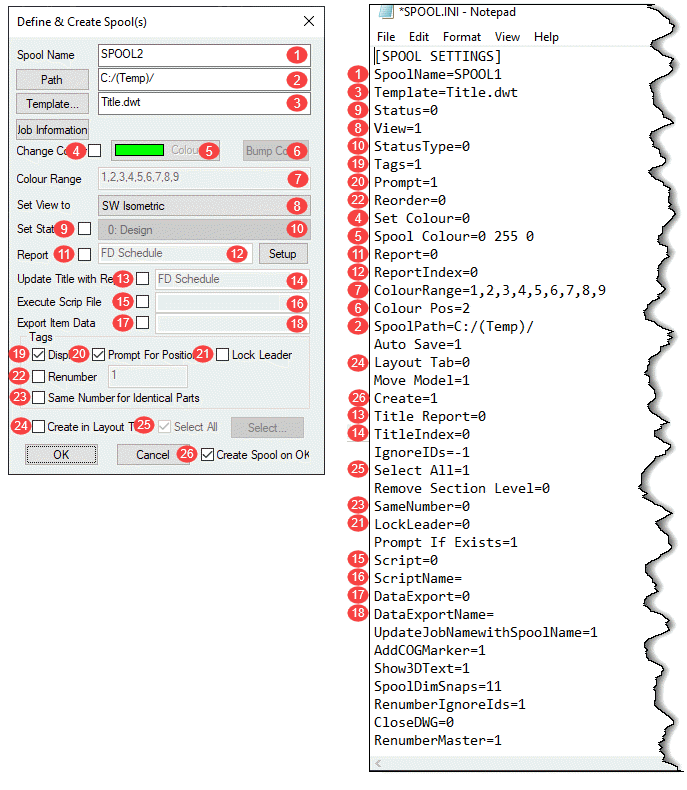
Most (but not all) of the settings in SPOOL.INI relate to the SPOOLDWG command dialog. The following image maps those fields in the dialog with those found in the SPOOL.INI file.
Values and description are listed in the below table along with some additional notes as well as settings related to spooling but not part of the SPOOLDWG dialog.
Ref.
Setting
Value
Description
Note
1
SpoolName
Alpha/Numeric
Name of Spool
3
Template
Path/Template Name
Name or Path & Name of AutoCAD Template for Spool Drawing.
9
Status
0 = Unchecked
1 = Checked
Set Status toggle in Spool Dialog.
8
View
0 = Plan
1 = SW Isometric
2 = SE Isometric
3 = NE Isometric
4 = NW Isometric
5 = None
Sets Spool drawing view type/orientation.
10
StatusType
Status Index Number
Index Number of the Status as defined in your database.
19
Tags
0 = Unchecked
1 = Checked
Set Display toggle in the Spool Dialog.
20
Prompt
0 = Unchecked
1 = Checked
Set Prompt for Position toggle in the Spool Dialog.
22
Reorder
0 = Unchecked
1 = Checked
Set Renumber toggle in the Spool Dialog.
4
Set Colour
0 = Unchecked
1 = Checked
Set Change Colour toggle in the Spool Dialog.
5
Spool Colour
RGB Value
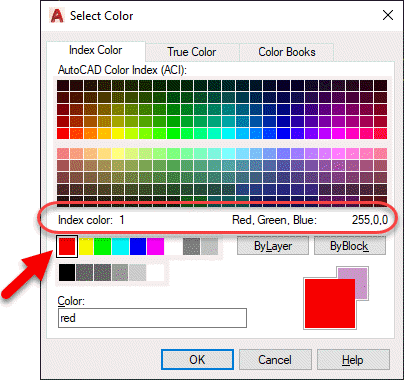
RGB (Red Green Blue) color value of the last spool.
RGB Values are expressed as 3 integers, each between 0 and 255.
Use AutoCAD DDCOLOR command to determine color numbers & corresponding RGB values.
Note 1
11
Report
0 = Unchecked
1 = Checked
Set Report toggle in the Spool Dialog.
12
ReportIndex
Integer
Zero based index as listed in the drop down list in the Spool Dialog.
e.g. 0 = 1st Report, 1 = second report, etc.
7
ColourRange
Comma separated Integer List
List of Integers separated by commas.
Represent the AutoCAD Color Index numbers (ACI) of the colors to cycle through for spool colors.
Use AutoCAD DDCOLOR command to determine color numbers.
Note 1
6
Colour Pos
Integer
Zero based index of color range for the last color used on a spool.
2
SpoolPath
File Path
Folder where created spool drawings are located.
n/a
Auto Save
0 = No
1 = Yes
If Spooling to separate DWG's instead of Layouts should spool drawings should be saved after they are created.
24
Layout Tab
0 = Unchecked
1 = Checked
Set Create in Layout Tab toggle in the Spool Dialog.
n/a
Move Model
0 = No
1 = Yes
Sets if the spool be moved to 0,0,0 when creating the spool DWG's.
26
Create
0 = Unchecked
1 = Checked
Set Create Spool on OK toggle in the Spool Dialog.
13
Title Report
0 = Unchecked
1 = Checked
Set Update Title with Report toggle in the Spool Dialog.
14
TitleIndex
Integer
Zero based index as listed in the drop down list in the Spool Dialog.
e.g. 0 = 1st Report, 1 = second report, etc.
n/a
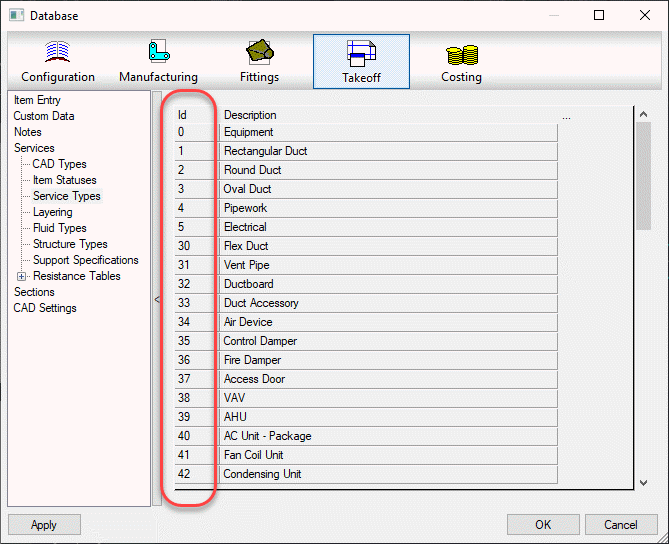
IgnoreIDs
Comma separated Integer List
List of Integers separated by commas. Integers represent the Service Type Index.
Items with these Service Type Indices will not be renumbered or have their item number displayed in the Spool. (Exception: See RenumberIgnoreIds setting)
Note 2
25
Select All
0 = Unchecked
1 = Checked
Set Select All toggle in the Spool Dialog.
n/a
Remove Section Level
0 = No
1 = Yes
Controls moving the Spool to 0,0 (X,Y) if 1/Yes or 0,0,0 (X,Y,Z) if 0/No when the Move Modelsetting is set set to 1.
23
SameNumber
0 = Unchecked
1 = Checked
Set Same Number for Identical Parts toggle in the Spool Dialog.
21
LockLeader
0 = Unchecked
1 = Checked
Set Lock Leader toggle in the Spool Dialog.
n/a
Prompt If Exists
0 = No
1 = Yes
Prompts to overwrite existing Spool DWG if it already exists.
15
Script
0 = Unchecked
1 = Checked
Set Execute Script File toggle in the Spool Dialog.
16
ScriptName
COD Script File Name
Name of COD Script File to execute on the spool.
Script name should be the file name only and NOT include the ".COD" extension.
Script file must exist in the folder specified by SCRIPTS section of MAP.INI.
Note 3
17
DataExport
0 = Unchecked
1 = Checked
Set Export Item Data toggle in the Spool Dialog.
18
DataExportName
IEX Report File Name
Name of IEX Data Export Report to run on the spool.
Report name should be the file name only and NOT include the ".IEX" extension.
Reports must exist in the proper product specific sub-folder under the reports folder specified by REPORTS section of MAP.INI.
Note 4
n/a
UpdateJobNamewithSpoolName
0 = No
1 = Yes
Updates the MAJ Job Name (Job Info) with the spool name prior to running any exports or reports.
n/a
AddCOGMarker
0 = No
1 = Yes
Calculates the Center of Gravity (COG) and inserts the COG Block (with attribute(s)) for the spool.
n/a
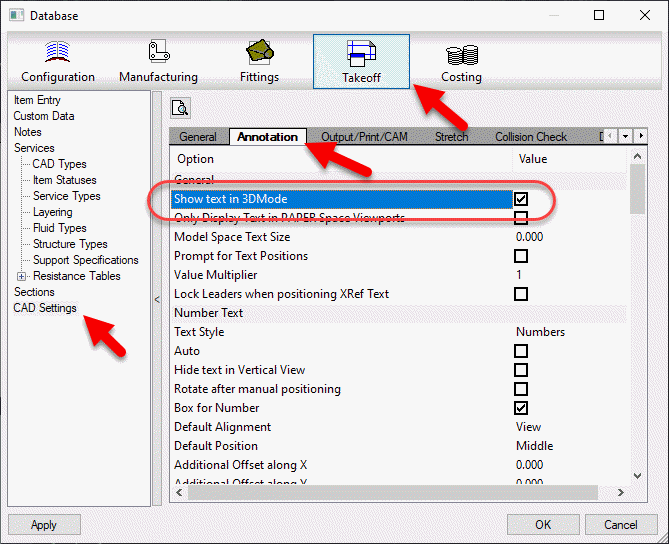
Show3DText
0 = No
1 = Yes
If showing annotations and the view is a 3d view, ensures that the database option is enabled to display in 3d.
Note 5
n/a
SpoolDimSnaps
Integer
Enumeration (Bitwise) value for which OBject Snap Modes are set when using the SPOOLDWG command.
Note 6
n/a
RenumberIgnoreIds
0 = No
1 = Yes
Renumbers the list of Ignored parts specified in the IgnoreIDs setting and stores the setting in the Alias field.
If the Alias already contains a value, the number will be appended to the value as a suffix.
n/a
CloseDWG
0 = No
1 = Yes
When spooling to separate DWG's instead of Layouts, will close the DWG after creation.
n/a
RenumberMaster
0 = No
1 = Yes
If renumbering, apply the new numbers to the Master DWG.
Note 1:
The DDCOLOR Command in AutoCAD can be used to determine ACI (AutoCAD Color Index) and/or RGB (Red Green Blue) values.
Note 2
Service Types can be found in the database editor. Use the Index Numbers in the Spool.ini settings.
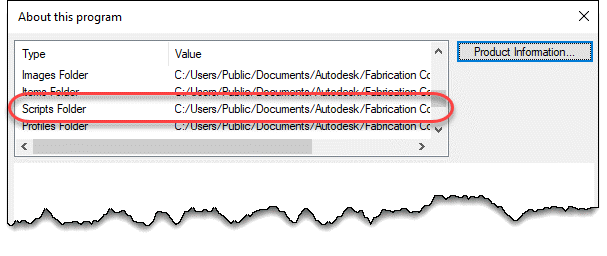
Note 3
COD Scripts must be located in the folder specified by the MAP.INI file.
Type the command APPINFO in CADmep to display a dialog which will show where the Scripts should be located.
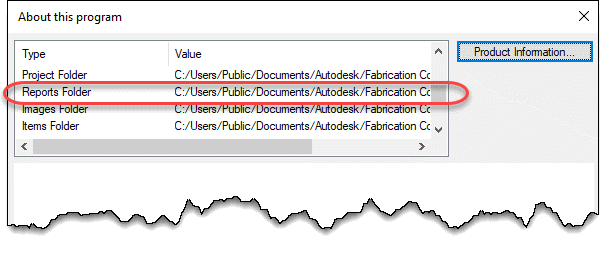
Note 4
IEX Data Export reports must be located in the software specific folder specified by the MAP.INI file. MAP.INI specifies the root folder for reports which are then found in a subfolder named based on the product using the reports. This makes knowing the exact reports folder a little difficult when looking in the MAP.INI file.
Tp more easily find the exact report folder, type the command APPINFO in CADmep to display a dialog which will show where the Scripts should be located.
Note 5
The database setting this option controls can be found in the database editor under Takeoff -> CAD Settings -> Annotation.
Note 6
To understand how bitcoded values work for the Snap modes, look up the OSMODE system variable in AutoCAD’s Help system.
Not only is DOS still relevant, its often one of the quickest ways to get some things done.
On XtraCAD.com, someone recently asked how to get the system Date and Time in an Autodesk Fabrication COD script. I provided a solution that uses DOS commands inside a COD script. That solution is explained in more detail here.
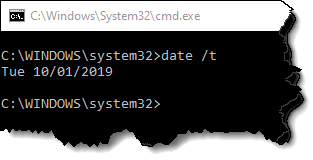
DOS’s “Date” Command
Using DOS, we can use the “DATE” command with the “/T” Switch to output the current date to a DOS prompt.
The information given by this simple command is all we need. A script can easily read the data if the output is redirected to a data file.
We’ll get a little more ambitious and get particular on the formatting. We’ll remove the “Tue” and format the date in the format “yyyy.mm.dd”.
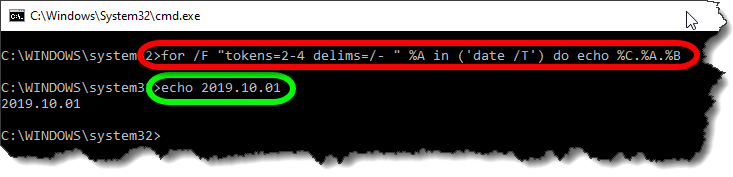
To do this, we can use the “FOR” command in DOS.
for /F "tokens=2-4 delims=/- " %A in ('date /T') do echo %C.%A.%B
The Red circled area is the command. It takes the data from the Date command and breaks it apart by the delimiters (DELIMS) which is spaces ( ), forward slashes (/) and dashes (-). You’ll note that the Date doesn’t actually contain any dashes so it’s just ignored.
The TOKENS specifies we want the 2nd thru 4th items of data. They will be assigned sequentially to variables starting with “%A”. The Green circled area is the resulting output ECHO’d to the DOS Window in the format we want.
%A = 2nd piece of data (month)
%B = 3rd piece of data (day)
%C = 4th piece of data (year)
Sending Data to a File
Now that have our DOS command, the next step is to send the output to a file on disk. Doing this will allow the COD script to read it back later.
For this purpose, we use a re-director to pump the data to a file. We simply append a suffix like this…
for /F "tokens=2-4 delims=/- " %A in ('date /T') do echo %C.%A.%B>"C:\Temp\COD Data.Txt"
A few notes about redirecting data to a file….
We use double quotes around the file path and name in case it contains spaces. This way, DOS doesn’t interpret the space as a separator between commands.
The Greater-Than (>) symbol is used to redirect output to a file. If the file already exists, it will be overwritten.
Double Greater-Than (>>) symbols can be used to “append” to the end of an existing file. This is handy if you want to add more data to the same file. If the file doesn’t already exist, it will be created.
We Have DOS, Now for the COD Script
Now that we have our DOS syntax down, we can start writing out COD Script. To start, I typically generate a few variables that help me format things.
REM ------------------------------
REM DQ = Double Quote Character
REM CR = Carriage Return Character
REM ST = Single Tab Character
REM WF = Working File
REM ------------------------------

DIM DQ = ascii(34)
DIM CR = ascii(10)
DIM ST = ascii(9)
DIM WF = "C:\Temp\COD Data.Txt"
Because some of our syntax contains double quotes, and because strings (text) in a COD script also contain double quotes, having multiple double quotes in a row can be confusing. Additionally, sometimes the script has trouble understanding where one string ends vs what’s a string containing a double quote.
To handle this, I set a variable (DQ) that will represent any double quote within a COD Script string. I also use a Carriage Return (CR) variable and a Single Tab (ST) variable for formatting purposes that you’ll see later.
Lastly, I also set a variable for the data file. It’s at the beginning, it’s easy to find and change without having to get in the middle of a lot of confusing formatted string data later.
Executing DOS From the Script
To execute an external command from a script, we can use the EXEC function.
<command> = “CMD.EXE” This is the DOS Command Interpreter
<execution mode> = exec_wait + exec_show_min These are a couple variables that tell the external program to “Wait” until finished before proceeding with the rest of the script and to minimize the Window.
<command/arguments> = The Prior DOS Syntax (with modifications) goes here.
The CMD.EXE program takes an argument of “/C” followed by the command it’s going to execute which is our DOS Syntax. Pay close attention, because here’s where we’re going to have to break up the DOS commands and embed our variables for the embedded double quotes.
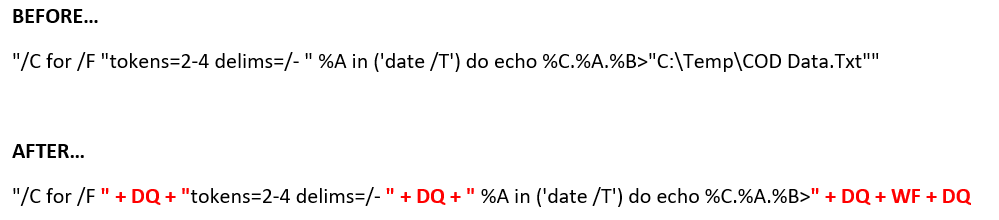
The below is a single “String” with double quotes on each end. It also has a lot of double quotes inside the text which will confuse you and your script. This below syntax is WRONG and needs to be corrected….
"/C for /F "tokens=2-4 delims=/- " %A in ('date /T') do echo %C.%A.%B>"C:\Temp\COD Data.Txt""
To do this, it’s easier to illustrate in color. We’re going to take one very long complicated string, and break it into several smaller strings when there’s double quotes within the string.
That is, where ever there’s a double quote within the string, we’re going to make a smaller string before and after, and piece them back together and use our DQ variable to embed the double quote between them.
This works for the first two double quotes. But at the end of the string, we’re going to do something a little different. Here, we want to remove file name and use the WF variable we set earlier to store the file name. And because the filename may have a path, we surround it with DQ variables to embed it in double quotes.
The next piece of code should look like this when we’re done. This will run our DOS command and dump the date to a file,
REM ---------------------
REM Get Date (yyyy.mm.dd)
REM ---------------------

Exec("cmd.exe", exec_wait + exec_show_min, "/C for /F " + DQ + "tokens=2-4 delims=/- " + DQ + " %A in ('date /T') do echo %C.%A.%B>" + DQ + WF + DQ
Reading Our Data File
Now that we’ve dumped the data file to disk, we can read it back in from the COD script using the following code…
DIM myDate
Object myFile as File (WF, forinput+istext)
myDate = myFile.Readline()
myFile.Close()
This code opens the file and reads its data and saves it to a variable. You’ll also note that this code doesn’t add extra double quotes around the WF “Working File” variable. That’s because they aren’t needed here, and will in fact cause problems. The COD Script language is actually better at handling files with and without spaces because it uses a comma (,) as it’s data separator between the file name and file read modes.
Displaying Our Data
Last, we can display the data in a simple debug dialog. Here, you’ll see I make use of the ST variable to place a single tab between the data purely for formatting purposes.
Debug "Date:" + ST + myDate
The Bigger Picture
The following code takes all the above principals and goes a little further. With everything you’ve learned, you should be able to figure out what it’s doing and how. It’s doing all the same things plus a little extra…
Also writing TIME and the USERNAME of the currently logged in Windows User to the data file.
It’s “Appending” the TIME and USERNAME using “>>” instead of “>” that DATE uses.
It’s reading 3 lines of our data file
The data file is deleted after it’s read leaving our system clean of temporary files.
The data is displayed by also using the CR (Carriage Return) variable to start new lines for the additional pieces of data.
REM ------------------------------
REM DQ = Double Quote Character
REM CR = Carriage Return Character
REM ST = Single Tab Character
REM WF = Working File
REM ------------------------------

DIM DQ = ascii(34)
DIM CR = ascii(10)
DIM ST = ascii(9)
DIM WF = "C:\Temp\COD Data.Txt"

REM ---------------------
REM Get Date (yyyy.mm.dd)
REM Get Time (hh:mm)
REM Get User (login name)
REM ---------------------

Exec("cmd.exe", exec_wait + exec_show_min, "/C for /F " + DQ + "tokens=2-4 delims=/- " + DQ + " %A in ('date /T') do echo %C.%A.%B>" + DQ + WF + DQ)
Exec("cmd.exe", exec_wait + exec_show_min, "/C for /F " + DQ + "tokens=1-2 delims=: " + DQ + " %A in ('time /T') do echo %A:%B>>" + DQ + WF + DQ)
Exec("cmd.exe", exec_wait + exec_show_min, "/C echo %username%>>" + DQ + WF + DQ)

REM ---------
REM Read Data
REM ---------

DIM myDate
DIM myTime
DIM myUser

Object myFile as File (WF, forinput+istext)

myDate = myFile.Readline()
myTime = myFile.Readline()
myUser = myFile.Readline()
myFile.Close()

REM ----------------
REM Delete Data File
REM ----------------
Exec("cmd.exe", exec_default + exec_show_min, "/C DEL " + DQ + WF + DQ)

REM ------------
REM Display Data
REM ------------

Debug "Date:" + ST + myDate + CR + "Time:" + ST + mytime + CR + "User:" + ST + myUser