Autodesk Product Install Order

Back in the day, I briefly worked for an Autodesk reseller. This particular reseller was classified as an “Education Reseller”. In short, this meant they were one of a few resellers that sold Autodesk products into the educational market (high schools, universities etc.).

As you can imagine, a school would likely have most of not all the products. Back then, Autodesk provided a complete list of all the products and their recommended install order. Fast forward to today, they’ve either gotten incredibly lazy or in all their massive layoffs over the years, the domain knowledge is gone. I suspect both.

Autodesk’s Recommendation

Take a look at Autodesk’s current recommended install order from this link. which was last updated 6/6/2018 at the time of this writing. In the event the link changes, here’s what they say…

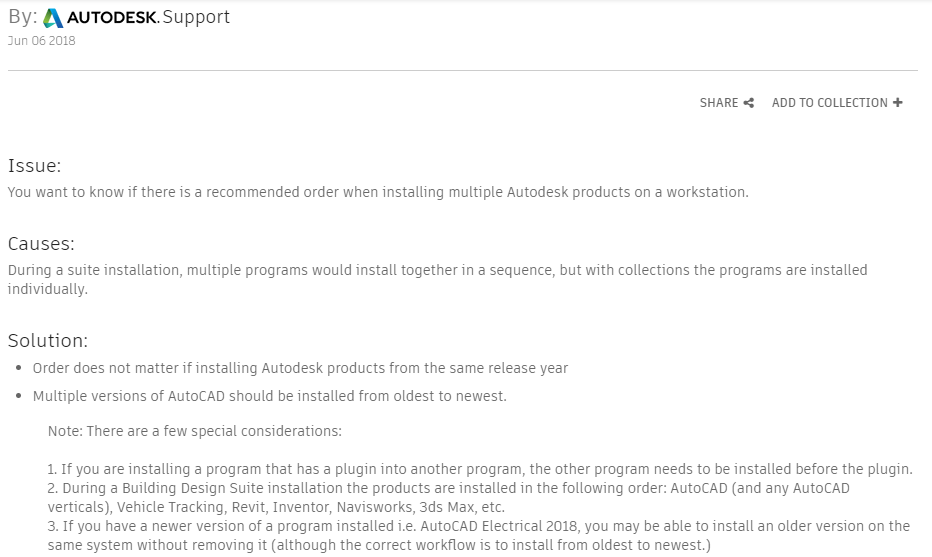
What’s wrong is that they tell you within the same product year, the install order doesn’t matter. This is outright false for many reasons. They try to note a couple “exceptions” stating that if there’s any add-ins, the base product should be installed first. But which products have add-ins to what other products?

CADmep is obviously running on top of AutoCAD so AutoCAD should be installed first. That seems obvious. But Navis also installs Exporters depending which products it finds and it doesn’t always show up in an Add-ins tab. So this is less obvious. Buy there’s also other dependencies that are even more obscure. Should you install Revit or Inventor? Should either go before or after 3ds Max? This is less obvious to most users.

This is really why someone would ask that question. It’s a real dis-service then to start out telling them it doesn’t matter. In fact, it matters most of the time, and it doesn’t matter as the “Special consideration”.

Determining The Real Install Order

There’s a few ways to handle this. If you’ve been around a while and had one of the old “Design Suites”, install in the same order as the Design Suite did. But note that this did change between product years and types of Suites. Plant Deign Suite 2013 for instance installed Autodesk before Revit where as Building Design Suite 2016 installed Revit before AutoCAD.

One of the other ways is to look at the install media folders to see if you can find any dependencies. Take for example 3ds Max. Look in the x86 or x64 folders and you’ll see references to Revit and Inventor.

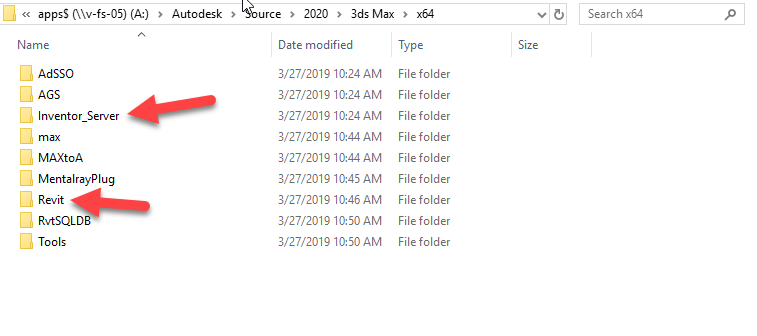
This means we should install Revit and Inventor before installing 3ds Max. But what if we’re using both Inventor and Revit? Which of those goes first?

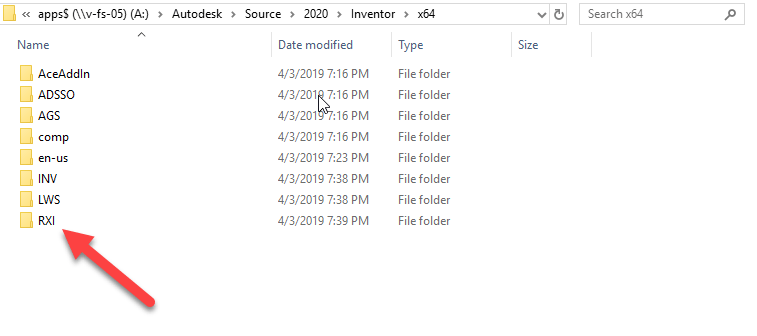
You’ll see the RXI folder in the install files. Hard to tell what it is. When you drill into the folder, there’s just a single MSI. If you right-click on it and select Properties and do to the Details tab, you can see it’s Revit Interoperability for Revit. Other folders deeper in the structure also confirm this by their naming,

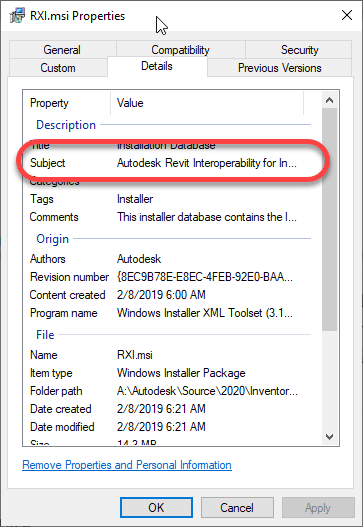
Based on this findings, it suggests installing Revit first so Inventor can see it and install the Interoperability tools.

Here’s My Order

So, if you’re an Autodesk Fabrication user, here’s what I typically do (and why)….

  1. Revit (doesn’t seem to depend on anything else)
  2. AutoCAD (I can’t find a dependency for AutoCAD. But anything with an Object Enabler will want it here and it’s a core product so as a matter of safety, I install it early just in case)
  3. AutoCAD based Verticals like MEP, Arch, etc. (These use AutoCAD as its core. I’ve not checked dependencies between verticals but it’s likely safe to install them in any order. I usually do Arch first if I’m going to include it as MEP is built on top of Arch but it’s really not needed as MEP installs what it needs)
  4. Inventor (because of the Revit dependency covered earlier)
  5. 3ds Max (because of the Revit/Inventor dependencies)
  6. Navis – Freedom/Simulate/Manage (Navis exporters only install for products already installed so we install this toward the end)
  7. Fabrication CADmep (allows CADmep Object Enablers to install for Acad, Navis, etc.)
  8. Fabrication – EST/CAM/etc. (order doesn’t matter)

If there’s anything on the list you don’t use, just skip it. If you happen to install Navis before some of the dependent products, just use “Add/Remove Programs” in Windows Control Panel to modify the install to include new exporters or download the Exporter installs separately from Autodesk’s web site.

Fabrication 2020 Resources Updated

Resource information for Autodesk Fabrication has been updated. They now include information on the 2020 version of CADmep, ESTmep and CAMduct. In short, nothing has changed.

The FabViewer Command Reference did have one new command added. However, this was not new to the 2020 version. The CADmep 2019.1 update added a command which was missed previously.

Pages that were updated are the following…

Disabled Material & Specification in Revit Fabrication Parts

Fabrication Parts in Revit don’t always allow editing of their Material or Specification properties. Look at the below side by side images. Revit’s properties can be seen grayed out on the left but those on the right are not.

Material & Specification Properties – Left Read Only, Right = Read/Write

Revit can obscure the reason for this because you have no access to edit your Fabrication Database within the Revit environment. The answer however is quite simple.

Fabrication Parts with the “BoughtOut” property set do not allow editing of Material or Specification. After all, a bought item is typically static and can’t be easily changed. Non-BoughtOut items do allow editing of the Material and Specification properties.

The following is another side by side image of Fabrication Part properties. The properties on the left have the BoughtOut property set. The properties on the right do not have the BoughtOut flag set. While not accessible from Revit, any of the other Autodesk Fabrication products can display and edit the BoughtOut property.

BoughtOut Property / Left = Set, Right = Not Set

Autodesk Fabrication: Best Practice #9

Use the Same Version of software to Admin your Database

Consistently use the same version of software for all administration work. You can draw/model/estimate/etc using any version. Just make sure your users don’t have administrative permissions on their login. But for administering your database, always use the same version. Here’s why…

You can work in multiple versions of CADmep, ESTmep, CAMduct and even Revit (w/Fabrication Parts) using the same database configuration. In other words, the configuration itself is “Version Agnostic“.

For Revit Fabrication Parts, database compatibility starts with version 2016. The other Fabrication products like CADmep, ESTmep and CAMduct, compatibility goes back to at least the version prior to 2013, before Autodesk acquired the software.

What’s the problem?

You often get new functionality in newer versions of software. Versions of the software that require new data, automatically adds the new data to the database tables. When you only Use older versions of the software without administrative permissions, it ignores that extra data when it encounters it. This is why old versions work with configurations edited with newer versions,

When you try to use an older version to Administer your database, it rewrites those tables but doesn’t see the added data so it gets overwritten. This is why you should stick to the same version when editing your database.

You do not have to use the latest version to maintain your database. You can continue to use an older version for administration. Just don’t use a newer version then go back to the old. You’re perfectly fine to stick with an older version. You just won’t be able to take advantage of new features that rely on added data the new version offers. When you are ready to start using a newer version for Administration, you can make that change anytime but you should also stop using the older versions for administration.

Let’s Demonstrate the Issue

You can watch the video at the end of this article to see an example. In 2019 Autodesk added a new Connector setting for “Connector Matching”. We won’t go into what this does here but you can see in the following image the difference in the right-click menu of connectors.

Fabrication 2019 Added ‘Connector Matching

When you watch the video, you’ll see me switch between 2 different versions of ESTmep. I could use any product but ESTmep lets me quickly open and close a database so I can move between versions quickly.

If you look at the configuration icons, you can see which version of software is being used. ESTmep 2019 has all BLUE icons. You can see ESTmep 2018 uses RED icons except the one BLUE 2019 configuration.

ESTmep 2018 has RED Configuration Icons, 2019 uses BLUE Icons

The video starts with “A Test Config” loaded in ESTmep 2019. I select one of the Connectors and change its ‘Connector Matching‘ value. Next, I exit and go back into the same configuration again in 2019 to show the value remains the same. At this point, everything is working as planned.

After exiting the database in 2019, I then switch to ESTmep 2018 and load the same “A Test Config” database. I make a copy of a completely different connector. This is where the problem starts. ESTmep 2018 has no knowledge of this ‘Connector Matching‘ data. Your “Connector Matching” data is over written as soon as ESTmep writes the Connector tables using the format it knows.

Finally, I go back into ESTmep 2019 and verify the data is gone. The default value for the Grooved Coupling’s “Connector Matching” data changes back to “Same“.

You can see for yourself by watching this video.

Updated Revit Roadmap

Interested in what’s planned for future versions of Revit? Autodesk updated the Revit “Public Roadmap” in January of this year.

Follow this link to look what’s planned.

http://blogs.autodesk.com/revit/2019/01/23/revit-public-roadmap-january-2019/

Note: If you’re in the Mechanical Contracting business like myself, don’t hold your breath. Not much has changed in the last year. With all the talk from Autodesk about industrialized construction, we still see very little. Most of the contractors I know are starving for better tools and efficiency. We’re employing extra man hours and people continuing to develop “workarounds” for Autodesk’s lack of investment in our industry.

Revit 2019.2 Update Released

Revit 2019.2 Update was released today. Of particular interest in 2019.2 is the addition of Revit Cloud Models which allows users to host Revit models in the BIM360 platform even if not collaborating. Kind of a BIM360 Design/C4R “LITE” so to speak. That description of Revit Cloud Models is likely a little misleading so I recommend a more robust (but still not entirely clear) explanation on the Revit Blog.

You can download the update from your Autodesk Accounts Portal…

Or you can download and install from the Autodesk Desktop App…

You can see a list of issues fixed and new features from this link.

Revit Hardware Benchmark

Every CAD or BIM user I talk to is in the same boat. The struggle and fight with their IT department to spend for adequate hardware. IT departments, tasked with keeping down budgets and slowing hardware refresh times simply go to the software vendors web site and look at minimum and recommended specs. Take for example, Autodesk’s requirements for Revit 2019…

https://knowledge.autodesk.com/support/revit-products/troubleshooting/caas/sfdcarticles/sfdcarticles/System-requirements-for-Autodesk-Revit-2019-products.html

What most don’t know is that these specifications are typically based on what most customers are using. If most customers are using low quality hardware, the recommendations will also be low quality hardware. Requirements and recommendation also typically don’t reflect what you’re doing….2d drafting or rendering for example.  

Autodesk has gotten better about listed recommendations for large and small data sets, but it’s still doesn’t give you a good picture of what’s going on.

One this you can do is run some bench marking on your systems. This is typically an automated process that runs your system through various activities and ranks it based on the time to perform those tasks.

For Revit, a sharp guy named Gordon Price has helped develop a set of Benchmarking utilities for Revit. They’re posted to https://www.revitforum.org for free download and posting feedback. 

You can download the utilities from this page…

https://www.revitforum.org/hardware-infrastructure/35955-rfo-benchmark-v3-x.html

I’ve got to say, I anticipated having to fuss a bunch, re-configuring support folders, repathing files and such. To my surprise, it was very simple. Like, extract the files to a folder, read the README.TXT file to understand what the various benchmark options were then click the shortcut. 

You can get a little more advanced and have the benchmark assemble the results to a network location so you can benchmark all your machines and keep all the data on one place. But if you want to just run a simple benchmark, it’s very easy to do so although running the Expanded benchmark can take hours as it’s pretty exhaustive.

When you’re done, you get a text file summary of your particular systems results, Here’s a sample of data from my laptop….not very impressive but it’ not my primary system, just for home.travel use.

RVT 2019 - Full_Simplified set - 2018.10.06 @ 08.23.24 on MYCOMPUTER.txt
RFO Benchmark v3.2 (build 01.05.2018)
RevitForum.org

All times are in seconds, lower is better.

Run on Revit 2019.1
____________________________________________________ Model creation benchmark
16.46 opening and loading the custom template
20.78 creating the floors levels and grids
32.13 creating a group of walls and doors
52.27 modifying the group by adding a curtain wall
19.79 creating the exterior curtain wall
15.05 creating the sections
6.79 changing the curtain wall panel type
25.36 creating area plans
3.61 creating and applying view template
192.24 TOTAL
____________________________________________________ Graphics
7.99 activate View Styles view
4.17 change view to Wireframe
0.21 change view to Hidden
0.67 change view to Shaded
0.87 change view to Consistent Colors
0.66 change view to Realistic
3.01 refresh Wireframe Line view x10
9.24 refresh Hidden Line view x10
9.50 refresh Shaded view x10
8.91 refresh Consistent Colors view x10
10.77 refresh Realistic view x10
0.84 activate View Cube view
5.96 rotate view x1
62.80 TOTAL
Notes:
Graphics benchmark measures the entire graphics stack, which includes CPU and memory.
To meaningfully compare graphics cards, test all cards in the same
machine and use the 'Graphics - expanded' benchmark.
TEST CONDITIONS:
____________________________________________________ Mfr: Dell Inc.
Model: Latitude E5470
OS: Microsoft Windows 10 Enterprise64-bit
____________________________________________________ CPU: Intel(R) Core(TM) i5-6300U CPU @ 2.40GHz
Max Clock Speed: 2.496Ghz
Number of Processors: 2
Number of Logical Processors: 4
Total Physical Memory: 8GB @ 2133Mhz
____________________________________________________ Drive Type: local Disk (NTFS)
Drive Model: SanDisk X400 M.2 2280 128GB
____________________________________________________ Graphics Card: Intel(R) HD Graphics 520
Graphics RAM: 1GB
Driver version: 22.20.16.4836
____________________________________________________ Screen Resolution: 1366x768x32bit @ 59Hz
DPI Scaling: 100%