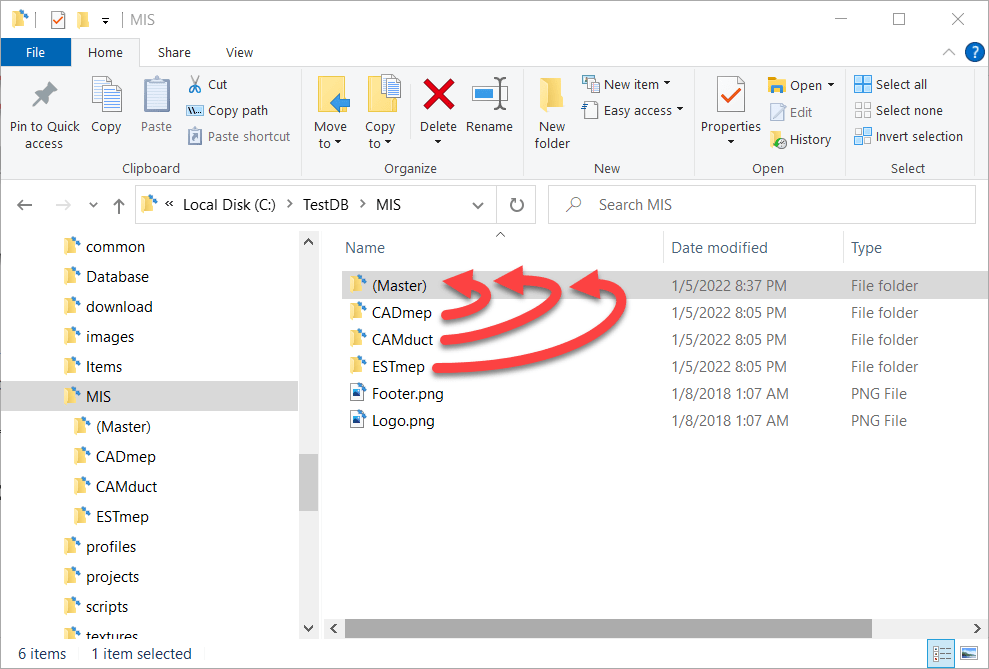
Fabrication Reports – All One Folder

Those of you who used CADmep, CAMduct or ESTmep prior to it’s acquisition by Autodesk remember when all the reports were in one folder. Once Autodesk took over, they moved to a system where each product used a separate subfolder for their reports. After all, ESTmep is likely using different reports than CADmep and yet different than CAMduct. Here’s what your configured reports folders now look like (you may not have all products/folders). Notice how each product has it’s own older.

The reality is, many reports are helpful across products. This means you need to make the same report multiple times or copy it from one folder to the others. This leads to duplication of data and a chance than one of the copies gets changed different from the others.


Consolidating All Report to a Single Folder

It’s commonly asked if it’s possible to configure the different Fabrication product to use the same folder. The answer you always hear is No. Technically that’s correct. You can’t configure Fabrication products to look at the same folder. However….

You CAN configure Windows to make multiple folders look at the same folder. It’s just done at the Windows level with a feature called Junction Links.

So lets walk through how to configure CADmep, CAMDuct and ESTmep to all look at the same reports.


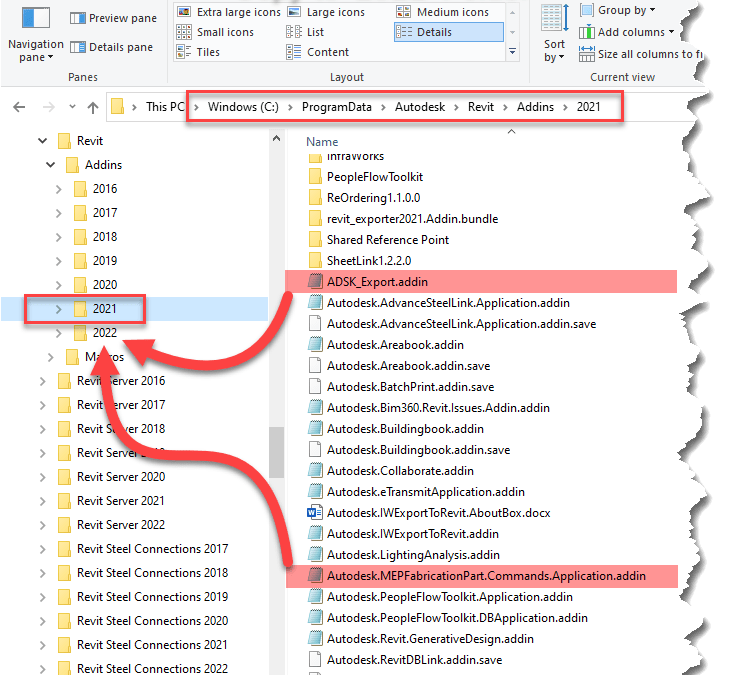
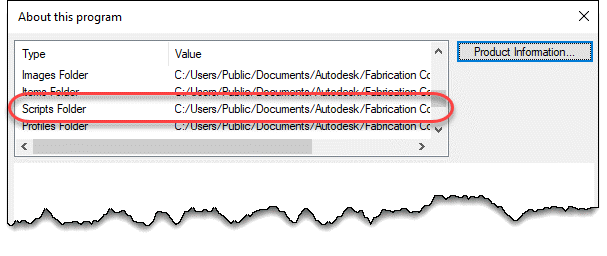
Step 1: Find Where Your Reports Are Located

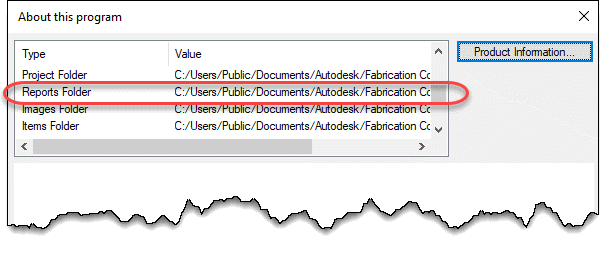
Using CAMduct or ESTmep you can pick Help -> About or type AppInfo at the command line in CADmep. You can then scroll through the window to see where the Reports are located. Alternatively, you could use the Edit Configuration utility to find this folder as well.

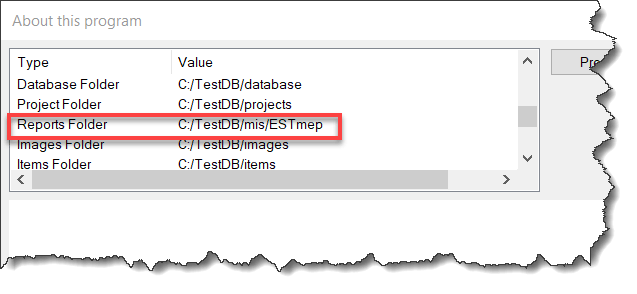
Note that this screencap was done in ESTmep so you see the ESTmep subfolder. The mis folder is actually the root where all your reports are.


Step 2: Copy All Report Folders to a New Folder

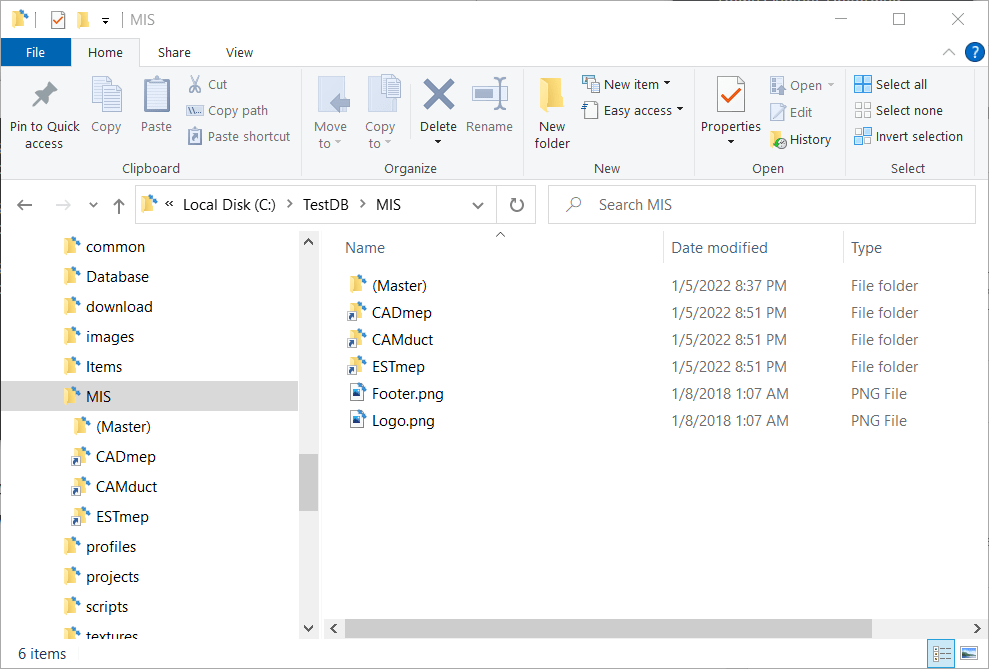
The next step is to copy all the reports from the various product specific folders to a new master folder location to store the reports. In this case, we’ll call it (Master) just to make it super obvious. Notice we also deleted the folders for CAMductComponents, Tracker and RemoteEntry because I’m not using them. You can choose to include them if you need them,


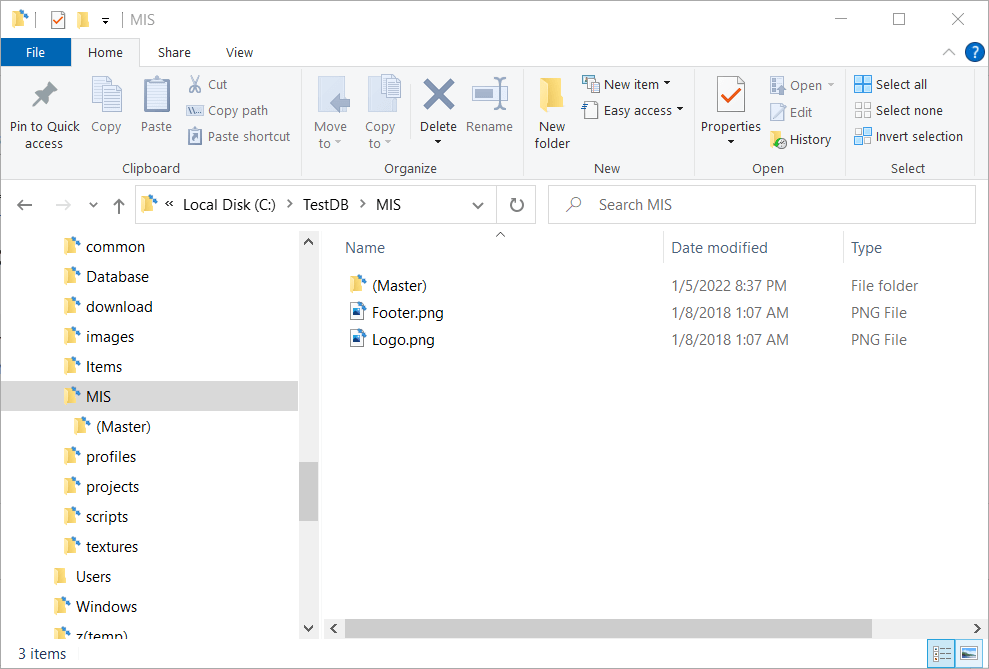
Step 3: Backup and Delete the Original Reports Folders

When you’re done, you should back a backup of the product specific reports folders elsewhere incase you want to go back to the original config. Once backed up, you need to delete the original product specific reports folders. When you’re done, your reports folders will look like this…


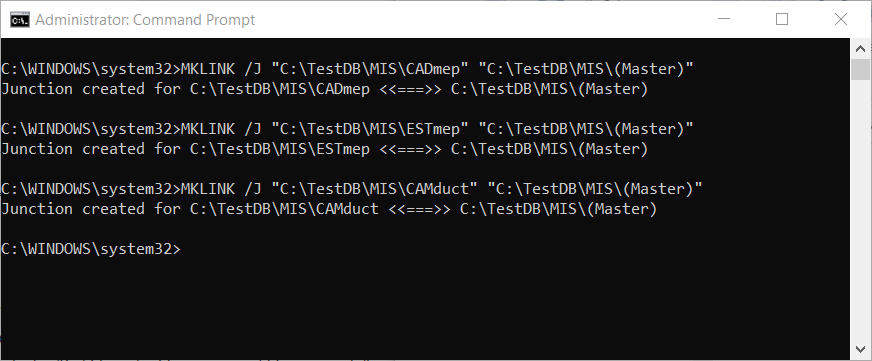
Step 4: Create Junction Links for the Product Folders

Here’s where we do the magic. Windows allows you to create what’s called a Junction to other folders. A Junction is just another virtual folder that looks at the contents of another. Junctions are how Windows has a “My Documents” folder that really points to “C:\Users\<Username>\Documents“.

To create a Junction you need to open a Command Prompt with Administrative permissions. One that’s done, you use the MKLINK command to make a Junction Link to a Junction Target. The syntax looks something like this….

MKLINK /J "link folder" "target folder"

Here’s a screencap of my DOS Command Window where I make Junction Links to the (Master) reports folder…

When done (if Successful) you’ll see those product specific folders again for CADmep, ESTmep and CAMduct. But this time, you’ll notice the icons are slightly different and look like a shortcut icon even though the folder acts like a regular folder.

Here you can see a side by side recording of the process happening in real time…


Step 5: Use Fabrication As Normal

Once you have the junctions created, you can use your products as normal. Each fabrication product looks to the folder specific to it, which Windows redirects to the file in the (Master) folder.

One thing to note, is that when browsing the (Master) and product specific folders, the only clue that these are Junction Links is the Shortcut looking arrow on the icon. If you don’t know what’s going on, it would appear that you have 4 folders each with the same files. But if you try to delete the files in one, they will indeed disappear from the other folders too. After all, these folders are Links back to the Target.

Here’s a recording of all 4 folders show at the same time. You’ll see that changes to any one also happen to the others. You may need to Refresh the views to see the changes but they indeed are seen from the Target and all Junction Links. This means that while there’s 4 folders showing the same files, they only take up the size on disk in one folder.


Summary

Junction Links work well for letting all (or some) of your Fabrication products use the same list of Reports. But there are a few noteworthy items to be aware of….

  • Junctions Links and Point to Targets on a different DRIVE or FOLDER as long as it’s on the SAME machine. You can’t make a link to a target from a computer to a server for example.
  • If you access your database from a network location, you need to make make the links from the server so your IT Department may need to get involved. Your local software when accessing the server share will honor the junctions it sees on the server.
  • If you don’t know what’s going on or look closely, it appears you have duplicate data. Make sure you don’t delete things from one folder thinking they’ll still be in the others.
  • If you want to undo this setup, you should delete the Junction Links FIRST just like any other folder before deleting the Target folder. If you delete the Target first, the you’ll have trouble deleting the links.
  • IF you Sync your database from a master source location like Dropbox or using a utility like Robocopy, the Junctions are NOT copied, but are instead copied like regular folders. There may be some special utilities that copy the junctions but I’ve not found them. So what is 4 views of 1 copy of a file on a network, when synced to your local system becomes 4 copies of the files in 4 folders. For the most part, it’s not an issue as you manage from the master source location. None the less, this nuance is worth mentioning. Most Sync utilities do NOT recognize the special nature of a junction and treat them just like a folder.
  • If you want to read more about Junction Links check out this article…https://www.addictivetips.com/windows-tips/create-delete-a-junction-link-on-windows-10/

Revit 2022 – Missing Fabrication Addins (temporary fix)

Update (2020.04.08): Autodesk released the Extension for MEP Fabrication 2022 on April 8th. You can get it from the Autodesk Desktop App or from your Autodesk Accounts Portal (manage.autodesk.com). This restores the MAJ Import/Export functionality and access to Fabrication Reports. It does NOT install the RME to FAB add-in. So part of the below guidance is still needed. You’ll want to copy the ADSK_Export.addin file per the below instructions. The other file is no longer needed and Autodesk’s newly released Extension will overwrite what’s needed if you used the below guidance.


If you’re an Autodesk Fabrication user and loaded up Revit 2022, you may have noticed some key Fabrication Add-ins are missing. It happens most every release. Deadlines for product releases always trump add-ins. This year, all the installers were reworked too so there was extra work I’m sure.

Don’t fear, they’ll get to them eventually. Just keep an eye on the Desktop App for when the updated Add-ins are release. In the mean time, here’s a temporary fix…

Enabling Fabrication Add-ins

To get the Fabrication Add-ins, you’ll need Revit 2021 installed and have those add-ins loaded in there. From there, there’s 2 files you’ll need to copy to a different folder.

Autodesk.MEPFabricationPart.Commands.Application.addin
ADSK_Export.addin

The first file enables MAJ Import/Export and Fabrication Reports. The second file enables the Fabrication RME Extension in the Add-ins Ribbon.

You copy them from this folder…

C:\ProgramData\Autodesk\Revit\Addins\2021

…to this folder…

C:\ProgramData\Autodesk\Revit\Addins\2022

Here’s what that looks like in Windows Explorer….

What This Looks Like in Revit

Once you copy those files, restart Revit to see the changes. Here’s a review of what that looks like…

MAJ Exports

MAJ Import

Fabrication Reports

A Parting Word

It should be noted that this work around should be considered “temporary”. You’re running 2021 Add-ins in 2022. The files you coped should be removed once the official 2022 Add-ins are released. This will ensure you get any fixes they may have added to the 2022 versions.

SPOOL.INI Explained

Most (but not all) of the settings in SPOOL.INI relate to the SPOOLDWG command dialog. The following image maps those fields in the dialog with those found in the SPOOL.INI file.

Values and description are listed in the below table along with some additional notes as well as settings related to spooling but not part of the SPOOLDWG dialog.

Ref.SettingValueDescriptionNote
1SpoolNameAlpha/NumericName of Spool
3TemplatePath/Template NameName or Path & Name of AutoCAD Template for Spool Drawing.
9Status0 = Unchecked
1 = Checked
Set Status toggle in Spool Dialog.
8View0 = Plan
1 = SW Isometric
2 = SE Isometric
3 = NE Isometric
4 = NW Isometric
5 = None
Sets Spool drawing view type/orientation.
10StatusTypeStatus Index NumberIndex Number of the Status as defined in your database.
19Tags0 = Unchecked
1 = Checked
Set Display toggle in the Spool Dialog.
20Prompt0 = Unchecked
1 = Checked
Set Prompt for Position toggle in the Spool Dialog.
22Reorder0 = Unchecked
1 = Checked
Set Renumber toggle in the Spool Dialog.
4Set Colour0 = Unchecked
1 = Checked
Set Change Colour toggle in the Spool Dialog.
5Spool ColourRGB ValueRGB (Red Green Blue) color value of the last spool.

RGB Values are expressed as 3 integers, each between 0 and 255.

Use AutoCAD DDCOLOR command to determine color numbers & corresponding RGB values.
Note 1
11Report0 = Unchecked
1 = Checked
Set Report toggle in the Spool Dialog.
12ReportIndexIntegerZero based index as listed in the drop down list in the Spool Dialog.

e.g. 0 = 1st Report, 1 = second report, etc.
7ColourRangeComma separated Integer ListList of Integers separated by commas.

Represent the AutoCAD Color Index numbers (ACI) of the colors to cycle through for spool colors.

Use AutoCAD DDCOLOR command to determine color numbers.
Note 1
6Colour PosIntegerZero based index of color range for the last color used on a spool.
2SpoolPathFile PathFolder where created spool drawings are located.
n/aAuto Save0 = No
1 = Yes
If Spooling to separate DWG's instead of Layouts should spool drawings should be saved after they are created.
24Layout Tab0 = Unchecked
1 = Checked
Set Create in Layout Tab toggle in the Spool Dialog.
n/aMove Model0 = No
1 = Yes
Sets if the spool be moved to 0,0,0 when creating the spool DWG's.
26Create0 = Unchecked
1 = Checked
Set Create Spool on OK toggle in the Spool Dialog.
13Title Report0 = Unchecked
1 = Checked
Set Update Title with Report toggle in the Spool Dialog.
14TitleIndexIntegerZero based index as listed in the drop down list in the Spool Dialog.

e.g. 0 = 1st Report, 1 = second report, etc.
n/aIgnoreIDsComma separated Integer ListList of Integers separated by commas. Integers represent the Service Type Index.

Items with these Service Type Indices will not be renumbered or have their item number displayed in the Spool. (Exception: See RenumberIgnoreIds setting)
Note 2
25Select All0 = Unchecked
1 = Checked
Set Select All toggle in the Spool Dialog.
n/aRemove Section Level0 = No
1 = Yes
Controls moving the Spool to 0,0 (X,Y) if 1/Yes or 0,0,0 (X,Y,Z) if 0/No when the Move Modelsetting is set set to 1.
23SameNumber0 = Unchecked
1 = Checked
Set Same Number for Identical Parts toggle in the Spool Dialog.
21LockLeader0 = Unchecked
1 = Checked
Set Lock Leader toggle in the Spool Dialog.
n/aPrompt If Exists0 = No
1 = Yes
Prompts to overwrite existing Spool DWG if it already exists.
15Script0 = Unchecked
1 = Checked
Set Execute Script File toggle in the Spool Dialog.
16ScriptNameCOD Script File NameName of COD Script File to execute on the spool.

Script name should be the file name only and NOT include the ".COD" extension.

Script file must exist in the folder specified by SCRIPTS section of MAP.INI.
Note 3
17DataExport0 = Unchecked
1 = Checked
Set Export Item Data toggle in the Spool Dialog.
18DataExportNameIEX Report File NameName of IEX Data Export Report to run on the spool.

Report name should be the file name only and NOT include the ".IEX" extension.

Reports must exist in the proper product specific sub-folder under the reports folder specified by REPORTS section of MAP.INI.
Note 4
n/aUpdateJobNamewithSpoolName0 = No
1 = Yes
Updates the MAJ Job Name (Job Info) with the spool name prior to running any exports or reports.
n/aAddCOGMarker0 = No
1 = Yes
Calculates the Center of Gravity (COG) and inserts the COG Block (with attribute(s)) for the spool.
n/aShow3DText0 = No
1 = Yes
If showing annotations and the view is a 3d view, ensures that the database option is enabled to display in 3d. Note 5
n/aSpoolDimSnapsIntegerEnumeration (Bitwise) value for which OBject Snap Modes are set when using the SPOOLDWG command. Note 6
n/aRenumberIgnoreIds0 = No
1 = Yes
Renumbers the list of Ignored parts specified in the IgnoreIDs setting and stores the setting in the Alias field.

If the Alias already contains a value, the number will be appended to the value as a suffix.
n/aCloseDWG0 = No
1 = Yes
When spooling to separate DWG's instead of Layouts, will close the DWG after creation.
n/aRenumberMaster0 = No
1 = Yes
If renumbering, apply the new numbers to the Master DWG.

Note 1:

The DDCOLOR Command in AutoCAD can be used to determine ACI (AutoCAD Color Index) and/or RGB (Red Green Blue) values.


Note 2

Service Types can be found in the database editor. Use the Index Numbers in the Spool.ini settings.


Note 3

COD Scripts must be located in the folder specified by the MAP.INI file.

Type the command APPINFO in CADmep to display a dialog which will show where the Scripts should be located.


Note 4

IEX Data Export reports must be located in the software specific folder specified by the MAP.INI file. MAP.INI specifies the root folder for reports which are then found in a subfolder named based on the product using the reports. This makes knowing the exact reports folder a little difficult when looking in the MAP.INI file.

Tp more easily find the exact report folder, type the command APPINFO in CADmep to display a dialog which will show where the Scripts should be located.


Note 5

The database setting this option controls can be found in the database editor under Takeoff -> CAD Settings -> Annotation.


Note 6

To understand how bitcoded values work for the Snap modes, look up the OSMODE system variable in AutoCAD’s Help system.

Fabrication Print Objects

Duplicate Objects = Different Results

Autodesk Fabrication reports can be tricky. It’s not always clear what’s happening with the data you’re trying to report or where it’s coming from. To make matters worse, some print objects are listed more than once.

These duplicate print objects are not just in multiple categories for you’re convenience when building reports. In fact, they don’t even report the same information.

In this example, we’ll look at Item Connector Fabrication Time as it applies to a Tee duct fitting, Each Tee fitting has 3 connectors which we’ve set to a Ductmate connection. We’re using this connector because it has labor attached to it in the default Imperial configuration that Autodesk ships with Fabrication CADmep, ESTmep and CAMduct.

The following image shows our report editor for an Item report. The Red and Green shows the same name for the print objects. One is located in the Costing group and the other in the Connector group.

Red and Green Print Objects are the Same Name but from Different Groups

The Costing: Item Connector Fabrication Time” print object returns the time for ALL the connectors on the fitting.  The Connector: Item Connector Fabrication Time” print object on the other hand return the fabrication time for each connector individually. 

The next image shows the preview of our Item report. Costing Print object is in the top table (red) and the Connector print object is in the bottom table (green).

Top (red) Table is Showing 3x the Fabrication Time as the Bottom Table.

Now, there’s nothing really wrong with the top (red) table that uses the Costing print object except one thing. The Connector Name print object is located in the Connector print objects group which is based in “each” connector”. Using the Connector Name will list the connector 3 times, but it;’s mixed with the print object from the Costing group. This means that the table, shows 3 rows, one for each connector (Name) but the Fabrication Time for each connector listed, is the total for the entire fitting. When totaled, this results in a Fabrication Time 3x more than what it should be for the Tee fitting we used as an example. 

You can download a Zipped copy of the IRP used for this test here. Just unzip the *.IRP file and copy it to the folder for your reports in your Fabrication configuration.

To recap, be very cautious about grabbing the first print object you see in a report when you scroll through them. There may be duplicates and they could yield different results. Once added to your report, it’s very difficult to know where that print object was from without intimately knowing the differences between them.

Autodesk Fabrication Resources

I’ve posted a number of Autodesk Fabrication resources for anyone using Autodesk Fabrication CADmep, EDTmep, CAMduct or Fabrication parts in Revit. You can find them using the Resources menu or by following the link here. You can also find this same information on the site XtraCAD.com. In the future, I’ll be compiling and posting additional resources that I’ve collected over the last several years in the course of administering Autodesk Fabrication databases for some large MEP firms.

Fabrication Resources…
  • History of Autodesk Fabrication build numbers for all the versions, service packs and product updates.
  • Pattern/CID Number history lists which Pattern Numbers (CID’s) are supported in which versions of the Fabrication products.
  • Revit Support history lists which Pattern Numbers (CID’s) are supported by which Revit versions.
  • CADmep command history lists which commands where added/removed from the different CADmep versions.
  • AutoLISP function history lists which versions of CADmep support which CADmep specific AutoLISP functions.
  • FabViewer command history lists the commands supported for the FabViewer in each version of Fabrication products.
  • Post Processor history lists which post processors are supported in each version and/or servicepack/update of the Fabrication Products
    • Decoiler/Coil Line Posts (DPL’s)
    • Plasma/Laser/Router/Waterjet Posts (VPL’s)