Fabrication Job Contains No Parts – Possible Fix?

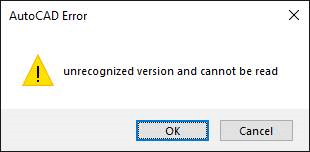
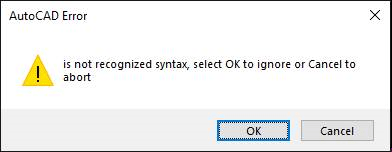
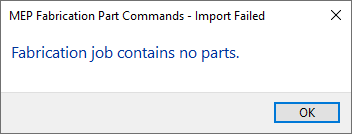
Have you ever tried importing an MAJ into Revit and received the following error….Fabrication Job Contains No Parts.

There’s a lot of reasons this can occur and it’s NEVER because there are no parts. So much for Autodesk’s QA/QC and Error checking.

You may see this most commonly because parts used in the model contain data that’s no longer in your database. You’ve likely noticed from time to time database entries with curly braces around parts of the name like the following…

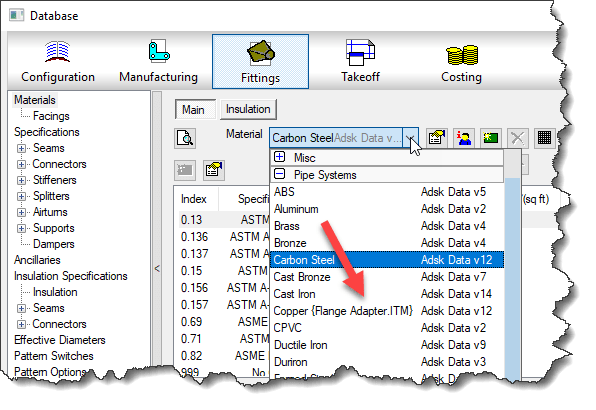
This happens when an entry in the database is used by an ITM but the database entry itself later gets deleted. Information is cached within the ITM so when it’s accessed, it creates a Proxy entry in your database if it was missing. Within the {Curley Braces} is the name of the object that created the entry.

While CADmep, ESTmep and CAMduct handle this fairly gracefully, Revit on the other hand does not. When it attempts to load an MAJ, it sees these entries and notices they’re missing from your database and prohibits you from importing the MAJ file. Revit thinks the database doesn’t match the MAJ and stops you cold!

A Possible Fix

If this is cause for the import error, you can use the following COD script to potentially work around the issue….

Take the following script and run in in CADmep, ESTmep or CAMduct. You should be logged in with Administrative Permissions while doing this. This script isn’t fixing Revit or the MAJ. What it’s doing is loading ALL the ITM’s from your Database Library into memory.

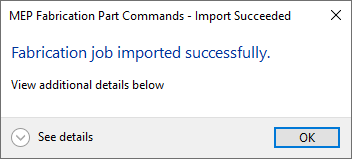
The process of loading all these ITM’s into memory creates all these proxy entries in your database. This way, when Revit attempts to import the MAJ, the data associated with those ITM’s are most likely present in your Database configuration. In many cases then results in a successful import of the MAJ.

If the Revit file you are importing the MAJ into already points to a Fabrication Configuration, you should reloaded the configuration FIRST before attempting to import the MAJ.

If for some reason this process still doesn’t work, verify that Revit is reading from the same database location as the version of CADmep, ESTmep or CAMduct where you ran the COD script.

In the event it still doesn’t work, there may be other reasons for the failure but this is often the most common, especially with MAJ’s created recently.

If it does work, you’ll want to use the other scripts I provide on this site to help analyze your database. You likely deleted those database entries in the first place for a reason. You either didn’t realize they were needed, or you didn’t know where they were used to repoint those ITM’s to a proper substitute. Those scripts can help you find which ITM’s use which database entries.

Hope this helps.

More Fabrication Scripting Updates

Autodesk Fabrication Scripting resources have had a few updates more updates. Believe it or not, the 22 ADD/REMOVE functions that apply to ITM Product Lists have been on my “Undocumented Functions To Research” list for over a decade. I’ve finally gotten around to figuring out how they work and documenting. Here’s a summary of the changes…

  • Global Miscellaneous Functions
    • Added ERROR function
  • Item Function Reference
    • Added function ADDALIAS()
    • Added function ADDAREA()
    • Added function ADDBOUGHTOUT()
    • Added function ADDCADBLOCK()
    • Added function ADDCUSTOMDATA()
    • Added function ADDDATABASEID()
    • Added function ADDDIM()
    • Added function ADDFLOW()
    • Added function ADDOPTION()
    • Added function ADDORDER()
    • Added function ADDWEIGHT()
    • Added function REMOVEALIAS()
    • Added function REMOVEAREA()
    • Added function REMOVEBOUGHTOUT()
    • Added function REMOVECADBLOCK()
    • Added function REMOVECUSTOMDATA()
    • Added function REMOVEDATABASEID()
    • Added function REMOVEDIM()
    • Added function REMOVEFLOW()
    • Added function REMOVEOPTION()
    • Added function REMOVEORDER()
    • Added function REMOVEWEIGHT()
    • Added function SETDONOTCUTFLAG()
    • Added function ADDLINK()
    • Added function DELETELINK()
  • File Object Function Reference
    • Added function SEEKENTRY()
    • Added function SEEKLINE()

Intolerance of Tolerances

In a recent LinkedIn post, the topic of Tolerance Stacking was brought up. I’m not a machine designer, but I’ve spent a lot of my past life in Manufacturing. In that world, the term was used frequently. If the term was used in Construction, it certainly wasn’t when I was listening.

Tolerance Stacking can be described (in my mind) as the accumulation of allowable tolerances to a point where the design is no longer suitable for it’s intended purpose. Errors resulting from Tolerance Stacking are caused by a few things…

  • Lack of tolerance awareness
  • Poor annotation and documentation of tolerances
  • Both of the above

Tolerance Stacking Explained

The best way to understand Tolerance Stacking is from a few examples. In our first example, we see a part 10 Units long with 9 holes, equally spaced 1 Unit apart. Take note of the RED dimension on the right.

10 Unit Long Part with 9 Holes Spaced 1 Unit apart

You may have seen parts dimensioned like this. Looks pretty normal. Now lets consider this same part and assume the dimensions have a tolerance of +/- 0.0625 (1/16 Inch). Now lets also assume that all the dimensions are in the negative -0.0625. The following graphic illustrates this condition. Again, notice the RED dimension on the right.

Tolerance Stacking using the an allowed -0.0625 on each dimension.

Is the overall length really have enough tolerance to compensate for the accumulation of those tolerances?

Now lets look at the same part, same tolerances but annotated/documented differently. It’s not as “pretty” and takes up a lot more real estate on your drawing.

Same part as before but dimensioned differently.

But lets look at that same -0.0625 extreme case tolerance in this scenario. Once again, keep an eye on that RED dimension to the right.

Using an alternate annotation approach solves the Tolerance Stacking problem.

This latest example solves the Tolerance Stacking issue by clearly outlining where the tolerances are allowed. In fact, in construction, we’re already doing this. We just don’t call it Tolerance Stacking.

In construction, one of the ways we eliminate Tolerance Stacking is by dimensioning to gridlines and columns. Dimensions in relation to known fixed points minimized Tolerance Stacking.

Are you old enough to remember when rafters were layed out by hand on the job site and cut individually? You would cut one and use it as a template and use that to mark the others. You never installed the template and used the next cut as your template for another. This minimized Tolerance Stacking as well.

Geometric Dimensioning and Tolerancing – GDT

What’s less familiar, is another concept used heavily in automotive and other precision manufacturing. It’s called Geometric Dimensioning & Tolerancing or “GDT” for short.

Traditional linear tolerances have flaws. GDT on the other hand more accurately describes “features” and allowable deviation from the desired location using a more complex form of graphics and symbols.

Once again, the best way to explain this is with some illustrations. The following example shows a square part with a hole in the middle. Pay close attention to the RED dimensions.

Top Left – Perfect Part (not real world)
Top Right – Hole moved 0.0625 to the right
Btm Left – Hole moved 0.0625 up
Btm Right – Hole moved 0.0625 in both directions

In this example, you see when the hole is moved to the maximum tolerance in both directions, it’s actually further away from it’s desired position than 0.0625.

This is where GDT comes in. In this last example, GDT is used to “Describe” the allowable deviation from it’s ideal position.

GDT can more accurately describe tolerances.

There’s actually an ASME Standard for GDT (Y14.5.2) and a full explination of GDT is not only beyond the scope of this blog but my knowledge, There’s a lot of courses out there specifically for this but a good “101” description can be found here.

Given trends in Prefab, Modularization, and Construction becoming more like Manufacturing….Makes you wonder….should there be a “GDT” style of documentation for construction?

Autodesk Fabrication 2020 Installer Issues

If you use network licenses or create network deployments of CADmep, CAMduct or ESTmep you may encounter errors. Autodesk incorrectly pathed the Network License Manager files in the SETUP.INI files.

Even if you are using Stand Alone or User Based Subscription licenses but build Network Deployments, if you configure the deployment to include all components in the deployment (recommended if you plan on modifying the deployment later) you can encounter errors.

To correct the errors, you can replace the SETUP.INI files that are part of the installation with the ones provided in the following ZIP file…

Before you overwrite your installation’s SETUP.INI file, it’s a good idea to backup the original. The root of my installation folder looks like this…

At some point, I would expect Autodesk will update their download data and provide the proper files. Because of this, I would highly recommend NOT replacing the SETUP.INI files unless you encounter issues.

What’s Different?

If you’re curious what’s different between the two, you can open the INI files in Notepad or other text editor and view them there.

The original file contains this at the end of one of the entries…

Third-Party Component Open Source EULAs:x64\en-US\Tools\NLM.msi

The new SETUP.INI files have updated it to this…

Third-Party Component Open Source EULAs:x86\AdskLicensing\NLM\x64\NLM.msi

AutoCAD Error: “unrecognized version and cannot be read”

If AutoCAD has ever given you an error “unrecognized version and cannot be read” error, it’s likely a corrupt CTB/STB file. An image of the error can be seen below…

You can also see this followed by another error dialog, “is not recognized syntax, select OK to ignore or Cancel to abort“. This error also shown below, is likely related to the same corrupt CTB/STB file.


Where Are CTB/STB Files Located?

To find where your plot style tables are located, type “OPTIONS” in AutoCAD”s command line. In the “FILES” tab, expand the “PRINTER SUPPORT FILE PATH” node as shown below.

A few things to note and the plot style tables support path….

  • Support paths are specific to the AutoCAD profile that’s loaded. Load a different AutoCAD profile and the path may be different.
  • AutoCAD profiles are user specific, if other users log into the system, they may also be pointed to a different path.
  • Support paths for the plot style tables will follow nested folders. That is, if you have folders under the configured path, AutoCAD will look in all those sub-folders for additional CTB/STB files too.
  • Shortcuts are followed. IF you have shortcut placed in the support path, AutoCAD will also follow and look for CTB/STB files in the location the shortcut points to as well as any sub folders there too.