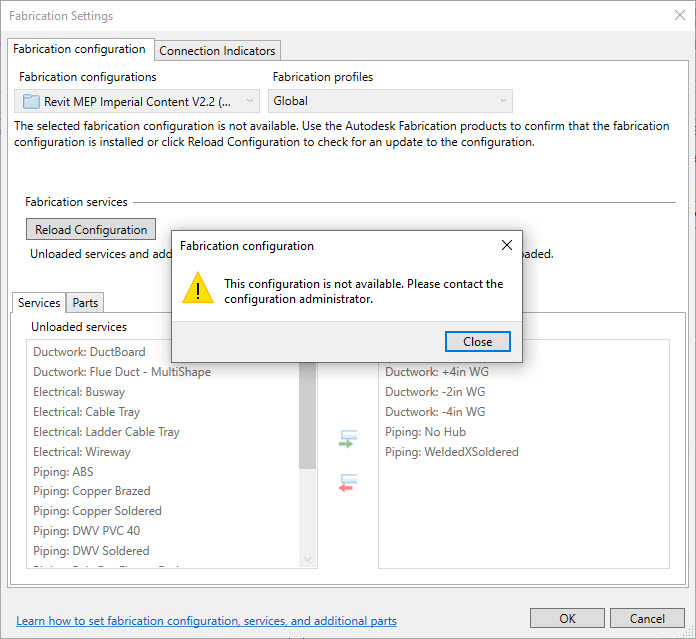
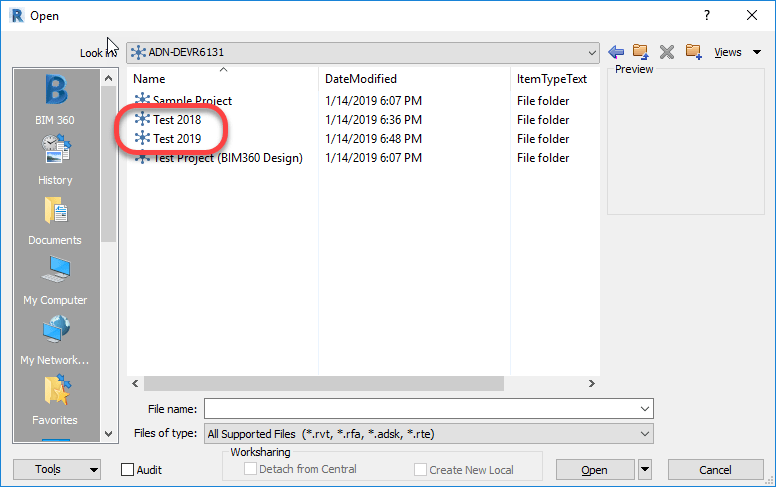
Every once and a while, a Fabrication Configuration can lose data or become corrupt which leaves Revit unable to access it. This after you’ve already been working in a model and using the configuration without issue.
When this happens, it’s likely a result of the Fabrication Configuration loosing it’s GUID or “Global Unique Identifier”. You really only notice when attempting to reload the configuration in one of your existing models. The error will look like the following image…
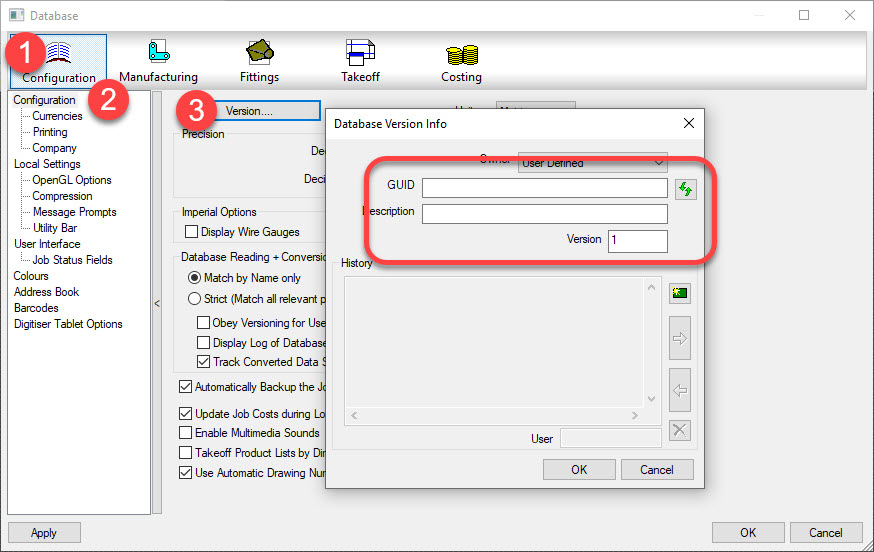
When you launch of the other Fabrication products (CADmep, ESTmep or CAMduct) you can view the data from the database editor. In the image below, you can see the data is missing.
Retrieving Lost Data
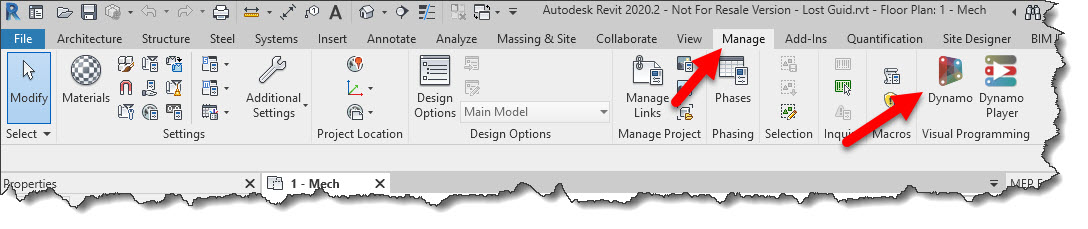
The good news is that you can the data back. For this, we’ll use Revit and Dynamo, Revit’s visual programming environment.
Start Revit and open up one of your existing project that already had a Fabrication Configuration loaded. From the Manage ribbon, click the Dynamo button.
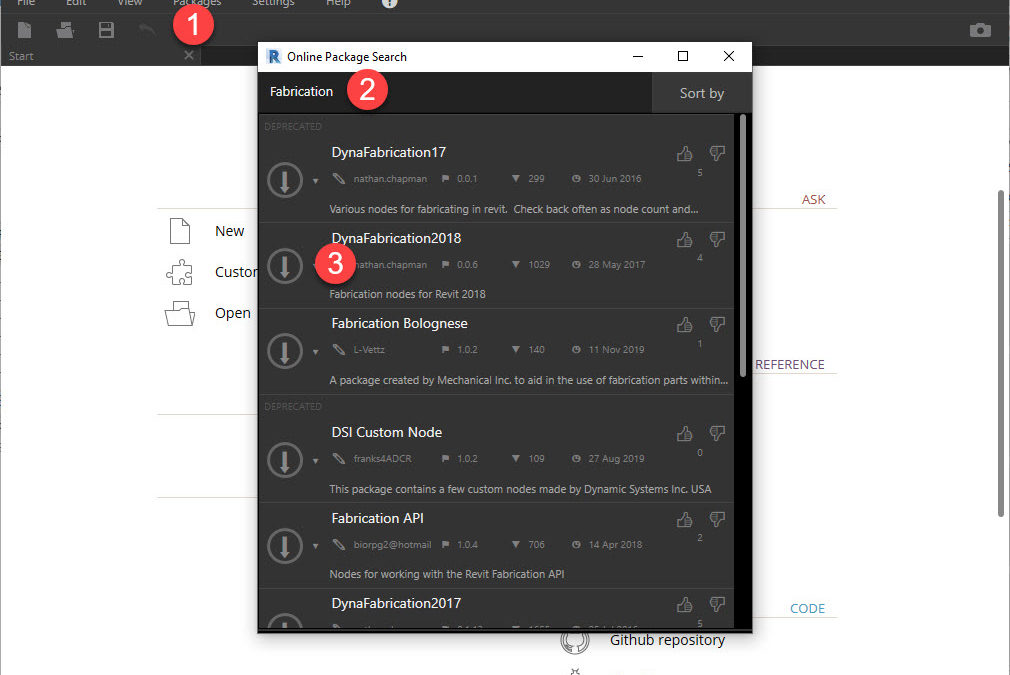
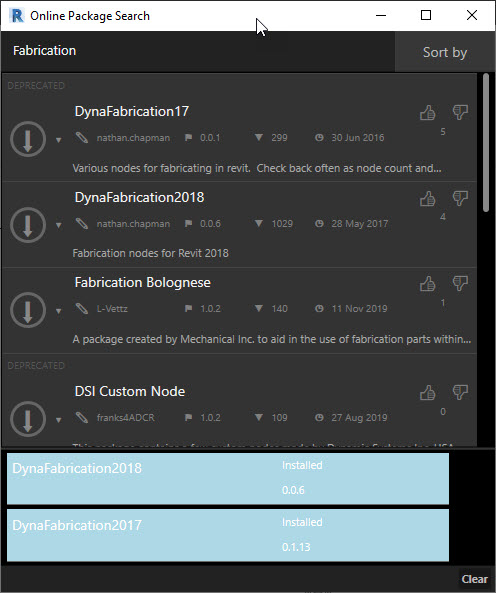
Once in Dynamo, you’ll need to load a Fabrication Dynamo package. Click the Package menu to display the Online Package Search dialog. You’ll need to wait a little while for the dialog to populate. Once populated, you can type Fabrication in the search box. In the results, select the DynaFabrication2018 package. Next, click the down arrow button on the left to install it as shown in the following image…
Once installed, the dialog will show the loaded modules at the bottom. It should look like the following image…
After the Dynamo packages are installed, you can build a Dynamo program that will extract the needed data. But instead of walking you through that, simply download, unzip and open the Dynamo program I’ve already created.
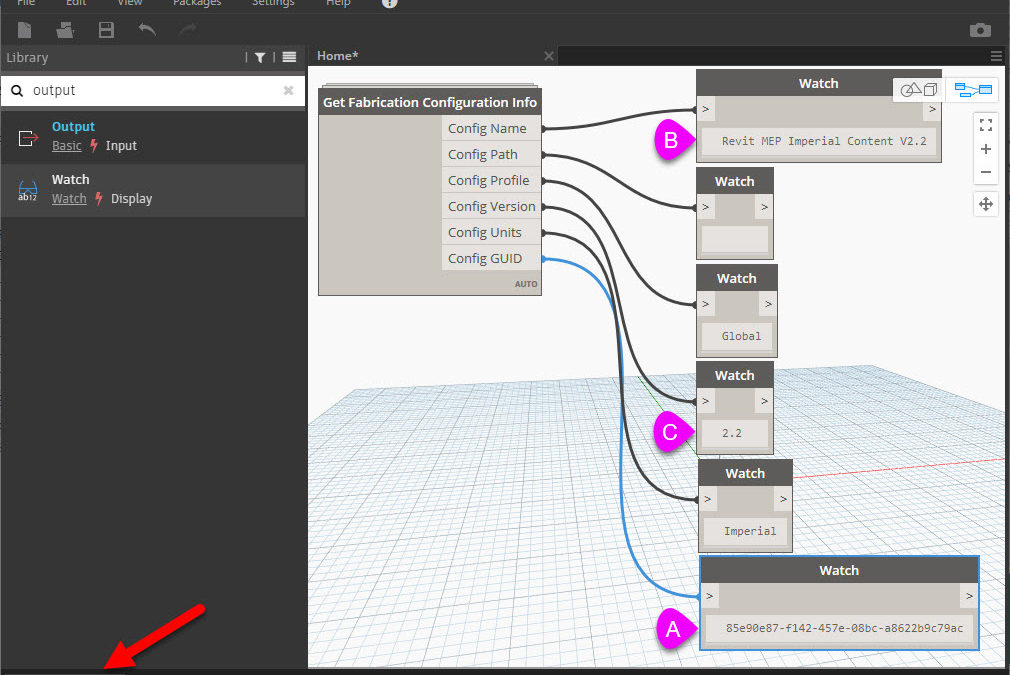
One Dynamo program Get Missing Fabrication GUID.dyn is loaded, your Dynamo screen should look like the following image…
In the lower right corner, if the button says Manual click the Run button otherwise if it’s set to Automatic, the information you need is already populated. Record the data in the fields marked A, B & C. This is what you’ll enter back in the database.
Add Data Back to the Fabrication Configuration
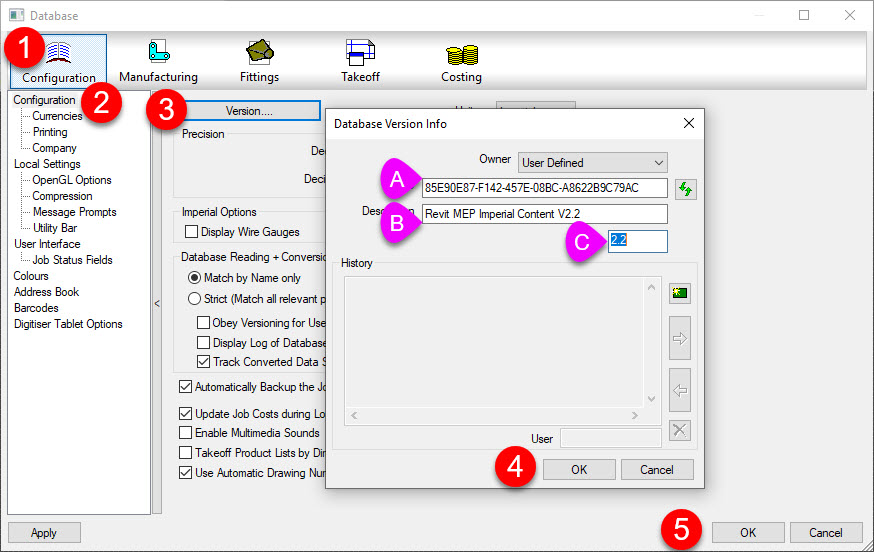
Launch of one the Fabrication products (CADmep, ESTmep or CAMduct). In the database editor, enter the information from Dynamo into the fields marked A, B & C as shown below…
Exit the database editor and exit from the Fabrication product you launched. If you still have Revit/Dynamo loaded, close both. Now, relaunch Revit again and open the model you opened before.
When you go to reload the configuration again, Revit should successfully find and reload your configuration.
AutoCAD was famous for it’s command line. It was easy to move items and type locations, distances or coordinates. Revit isn’t quite as intuitive for those coming from AutoCAD.
There’s a lot of reasons you need more control of Fabrication Parts in Revit. You may want to align the ends of pipe for a rack. Or perhaps you want to control the spacing between pipes in a run of parallel pipes.
At first it appears like the best you can do is drag items close. Eyeball them up so to speak. The traditional methods used in AutoCAD just won’t work. Methods like drawing construction geometry and using point filter and/or object snaps.
You can precisely control placement and location when moving to Revit from CADmep. In Revit, you simply place dimensions and edit them. Seems easy enough but there’s a couple nuances that can leave users frustrated. We’ll cover how to do this below.
Adding Dimensions in Revit
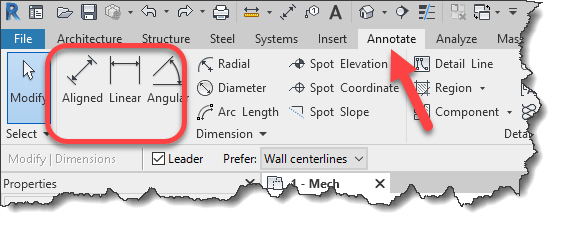
You can use the Annotate tab on the Ribbon in Revit. You’ll use the Linear, Aligned and Angular dimensions the most.
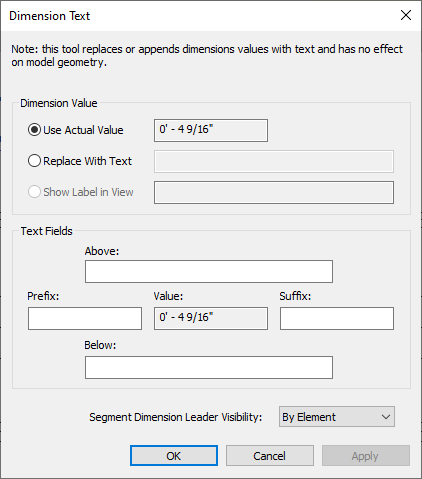
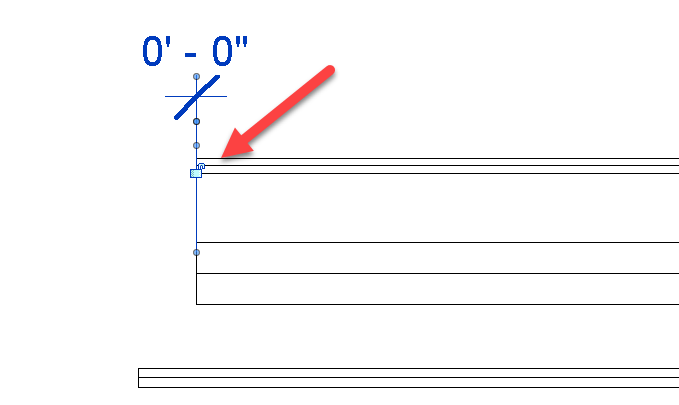
When you place a dimension between parts in Revit, the obvious thing would be to double-click the dimension to edit it. You’ve likely seen the following dialog…
If you see this dialog, you’re on the wrong path. This is not where you’d edit a dimension to control part placement. For controlling parts with dimensions in Revit, you actually select one of the parts you dimensioned.
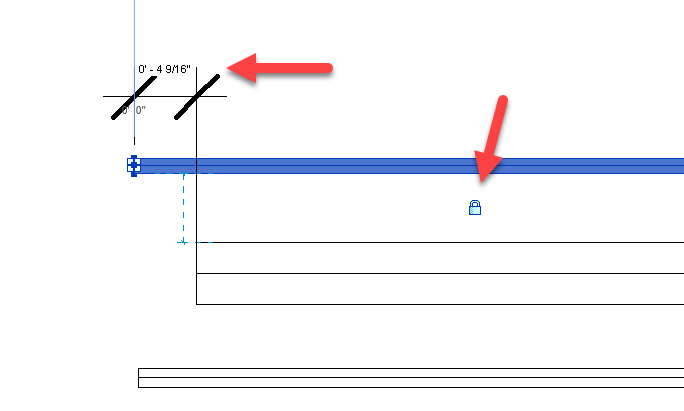
The following image shows a Fabrication Part selected. But there’s still a problem. If the dimension text is black, you can not edit it. This is because one of the parts are over constrained. If you find a Lock icon on one of the parts, try unlocking it.
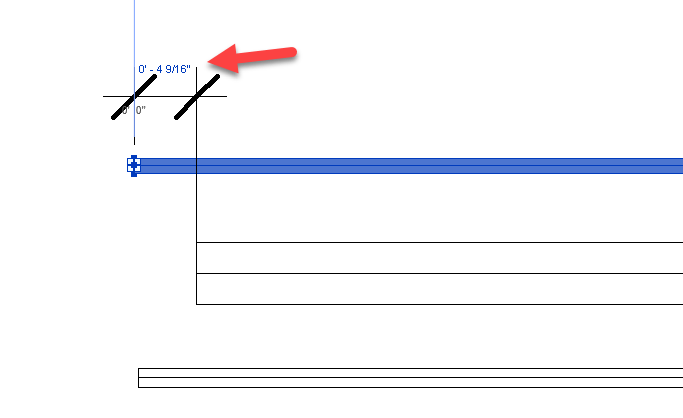
After unlocking the part, you may need to deselect and re-select the part for the dimension text to be editable. In the following image, you’ll see the dimension text is now Blue.
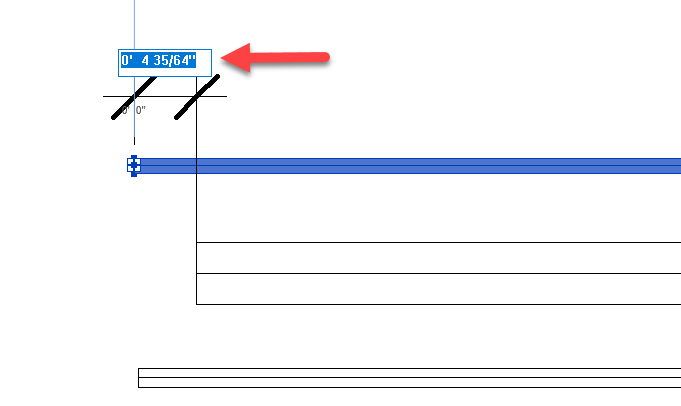
With the dimension text Blue, you can now click on the text to edit it as shown in the following image.
With the edit box for the dimension text activated, simply type the desired value and press <Enter> or click out of the edit box.
You’ll see the part move to the dimension you entered. The key to determining which part moves when editing a dimension is based on the part you select. If you just wanted to align the parts, you can delete the dimension afterward. On the other hand, if you want to maintain that relationship, highlight the dimension. You’ll see a unlocked Lock icon as shown in the below image.
If you click to Lock the icon, this relationship between parts will be maintained going forward.
The below video shows three pipes modeled with various end lengths. We’re using dimensions to align the ends of the pipe. We also delete the dimensions afterward. Moving one of the pipe ends later will not move the ends of the other.
Pipe spacing is set using dimensions just like before only this time, the dimensions are retained and the lock icon locked When one pipe later moves, the other moves to maintain the spacing.
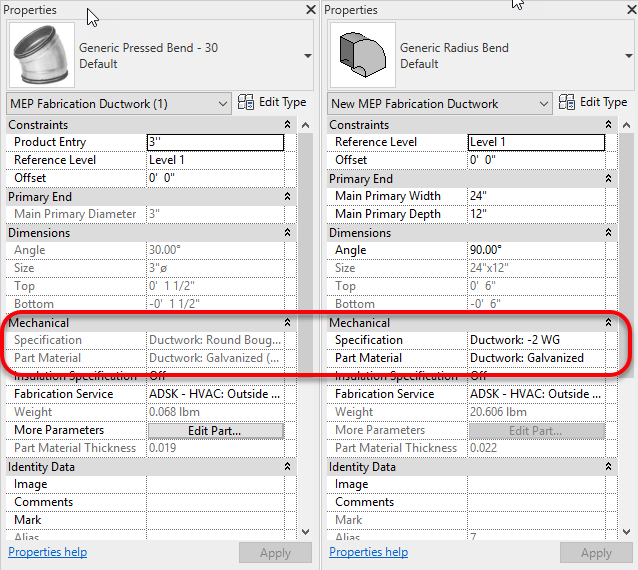
Fabrication Parts in Revit don’t always allow editing of their Material or Specification properties. Look at the below side by side images. Revit’s properties can be seen grayed out on the left but those on the right are not.
Material & Specification Properties – Left Read Only, Right = Read/Write
Revit can obscure the reason for this because you have no access to edit your Fabrication Database within the Revit environment. The answer however is quite simple.
Fabrication Parts with the “BoughtOut” property set do not allow editing of Material or Specification. After all, a bought item is typically static and can’t be easily changed. Non-BoughtOut items do allow editing of the Material and Specification properties.
The following is another side by side image of Fabrication Part properties. The properties on the left have the BoughtOut property set. The properties on the right do not have the BoughtOut flag set. While not accessible from Revit, any of the other Autodesk Fabrication products can display and edit the BoughtOut property.
For Autodesk Fabrication Part users, this is a Hotfix you’ll want to get applied. Since the first release of Fabrication Parts in 2016, there’s been ongoing issues with MEP Systems modeled with Fabrication Parts.
The issues is that to add/remove or update Fabrication services, you need to reload your configuration. This often would cause “disconnects” between parts. Often this would happen for no good reason or explanation as the parts involved may not have even had changes to them.
This has been a difficult issue for Autodesk to resolve because it’s been difficult to reproduce. Since the 2016 until now, Autodesk has slowly made the issue better but it’s still not eliminated. With this hotfix in 2019, Autodesk is taking another stab at it and hopefully it’ll be eliminate. IF not fixed once an for all, hopefully it’ll be another small incremental step better.
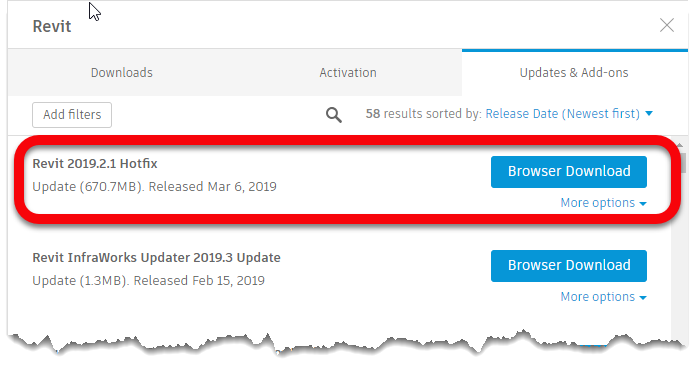
You can review the release notes for all Revit 2019 updates here. Look for the notes under 2019.2.1 Hotfix and you’ll see the following note…
“Resolved an issue that could cause MEP Fabrication elements to disconnect when reloading a Fabrication configuration.”
Downloading The Update
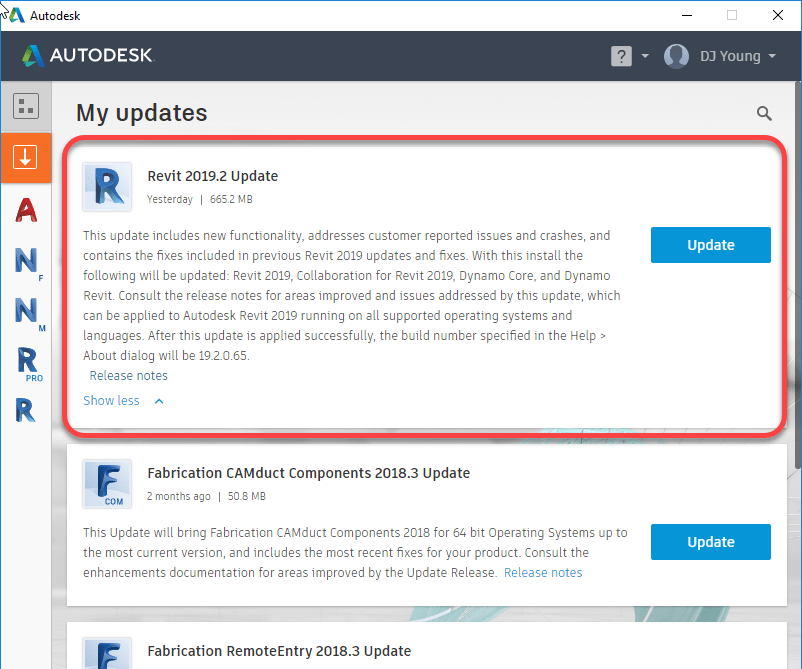
The Update is available from the Autodesk Desktop App provided it’s working for you. (Note: Mine seems to lockup or crash repeatedly since installing the Autodesk Desktop Connector. Uninstalling and reinstalling the Desktop App seems to only resolve the issues for a short while)
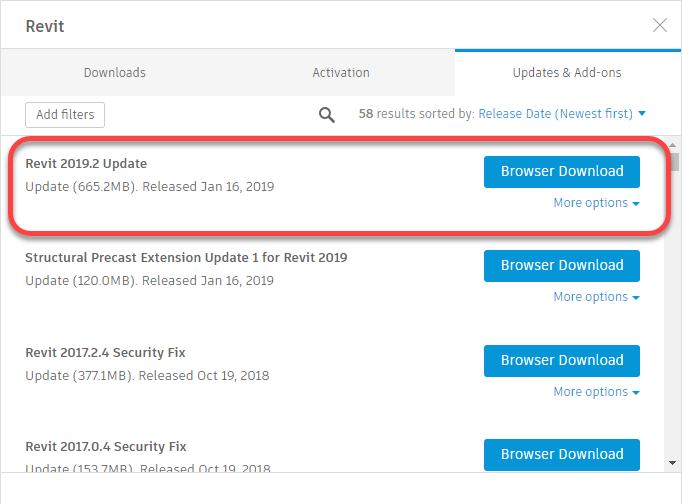
Alternatively you can download from the Autodesk Accounts portal if you have download permissions given to you from your contract administrator.
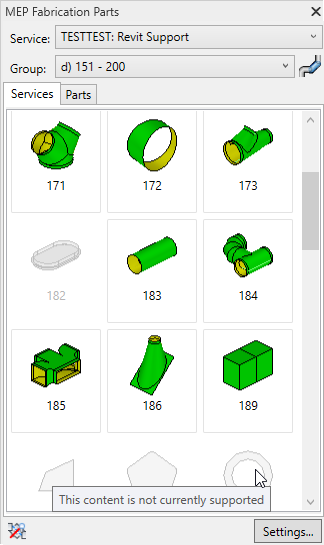
It no secret that not every Autodesk Fabrication pattern is supported in Revit. I’ve recently finished a more in-depth analysis of which patterns are and are not supported in Revit. Each of the 703 different pattern types were tested in each version and each update of Revit.
On the Fabrication COD Scripts page, you can find a Revit Support Report script. That script will analyse your ITM library and generate a CSV report of the status of every ITM in your Fabrication Configuration.
You can also find the complete results of my testing on the Revit Support page. Here’s a summary of the the testing…
Tested Version
Each of the below versions of Revit were tested with all the the 704 different patterns:
2016
2016R2
2061R2SP7
2017.0
2017.1
2017.2
2018.0
2018.1
2018.2
2018.3
2019.0
2019.1
2019.2
Testing Criteria
“Supported” for purposes of this testing is based on whether Revit allows a particular pattern to be used in the Fabrication Part Browser.
Testing Results
Testing results will have one of the following status descriptions.
No – No Revit support
Varies ({verison}) – Revit support varies between Revit version
Yes (Risk) – Revit does support but use NOT recommended due to issues
New ({version}) – New Pattern supported in later Revit versions
Yes – Pattern is supported in all Revit versions with no significant issues
Support Status = No
No – Parts not supported by the Parts Browser are obviously listed as having “No” support. There are a total of 84 different patterns listed in this category. They are as follows…
125
126
127
128
129
130
141
158
202
203
204
205
206
207
208
209
210
211
212
213
215
216
218
220
221
228
230
301
302
308
503
505
521
530
764
765
803
804
805
806
833
873
910
913
928
960
961
964
966
969
974
980
983
985
994
996
999
1049
1102
1106
1114
1142
1150
1152
1157
1161
1162
1165
1168
1169
1181
1194
1196
1198
2185
2189
2190
2191
2192
2199
2200
2873
3108
3873
Support Status = Varies
Varies(version) – In some cases, Fabrication Parts were initially allowed or supported in earlier versions and later were restricted. These parts have a status of “Varies” followed by the version where the change occurred. It’s recommended you avoid use of these patterns even in versions where they work as they will not be supported in later versions. There are 17 patterns that once worked in Revit but are no longer supported. They are as follows…
0
182
222
381
845
853
855
864
876
898
903
912
915
971
1105
1170
1175
Support Status = Yes (Risk)
Yes (Risk) – Patterns that list “Yes (Risk)” are technically supported in Revit but I highly recommend avoiding their use. Patterns with this status have issues like inserting at the Revit’s Project Base Point and not the cursor location. They also have a tendency to crash Revit if you attempt to grip or edit them. As a result, I highly recommend avoiding their use. There are 29 patterns in this category. They are listed here…
119
189
317
346
347
348
349
350
351
352
353
368
369
390
392
397
398
415
810
828
922
930
962
963
968
973
1159
1160
1176
Support Status = New
New (version) – Some patterns were not around in earlier versions of Revit but later added and supported in Revit. These patterns are listed as “New” followed by the version of Revit they became available in. These patterns are generally safe to use for Revit. There are 19 patterns in this category which are listed here…
217
1206
1207
1238
1239
1240
1241
1242
1243
1244
1245
1246
1247
1248
1249
1250
2197
2198
2217
Support Status = Yes
Yes – Parts allowed by the browser that work across all versions of Revit are listed with e “Yes” status. There are 555 patterns in this category. They are listed here…
Note: If you’re in the Mechanical Contracting business like myself, don’t hold your breath. Not much has changed in the last year. With all the talk from Autodesk about industrialized construction, we still see very little. Most of the contractors I know are starving for better tools and efficiency. We’re employing extra man hours and people continuing to develop “workarounds” for Autodesk’s lack of investment in our industry.
It’s not a lot, but there are some improvements in Revit 2019.2 for Mechanical Contractors using Fabrication Parts. Martin Schmid, MEP Product Manager with Autodesk, explains more with some great video examples on the Revit Blog.
If you use BIM360 Design (formerly “Collaboration for Revit” a.k.a. C4R) along with the Autodesk Desktop Connector, you should be aware of a common mistake that can lead to data loss.
BIM360 Design or C4R as the older version is called, is used to store Revit models in the cloud on Autodesk’s BIM360 platform. BIM360 Design using the BIM360 Docs platform as storage platform. C4R on the other hand uses the older BIM360 Teamfor storage of the Revit models.
While you could (can) upload your Revit models via the web interface to either storage platform, Revit would not see these files. They needed to be enabled for Collaboration and uploaded through Revit. This process made changes to the Revit files which enabled collaboration from BIM360 Design/C4R.
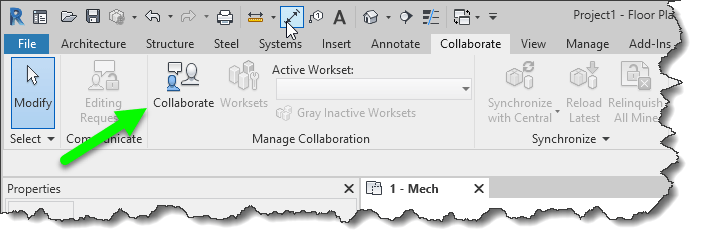
BIM360 Design/C4R collaboration is enabled and files uploaded using the Collaborate ribbon in Revit.
while Revit models need to be uploaded this way, there was no other way to upload other files types besides the web interface. Even if you did upload AutoCAD, IFC, Navis or other files types that Revit can link, there was no way to link these files into Revit from the BIM360 platforms. If you linked them from your server, the other members of your team without access to your server would not have access.
Autodesk Desktop Connector was created for this purpose. While you can’t link a non Revit file type into Revit directly from BIM360, you can use the Autodesk Desktop Connector to sync those other files types locally to your computer. Any other team members also using the Autodesk Desktop Connector would then also have access to those same files and the links would be identical.
What’s the problem?
The common problem that comes up when using BIM360 Design/C4R along with the desktop connector is Autodesk’s unfortunate choice in using the same icon for both products.
Depending where you see the icon, you get different results. If you click the one that references BIM360 collaboration services you’re good. If you click the one that references the Autodesk Desktop Connector, bad things can happen.
When a file is enabled for Collaboration and you open it through the Autodesk Desktop Connector, Collaboration is disabled and the file is configured as a local file or central file like you’d typically use of a file server. When this happens, the file is seen as being different and will not sync back to the BIM360 platform.
What this means then if that you have two different version of the file. One stored locally from the Autodesk Desktop Connector and another cached locally when opened from BIM360 Collaboration service (BIM360 Design / C4R) When you look at BIM360 Docs or BIM360 Team portals, you only see one version.
How do I know I’m using the correct Icon to open my Revit file?
Depending on the particular versions of Revit and their update versions, your install of Revit may appear different but the underlying concepts are the same. For these images, Revit 2018.3.2 and 2019.1 were used.
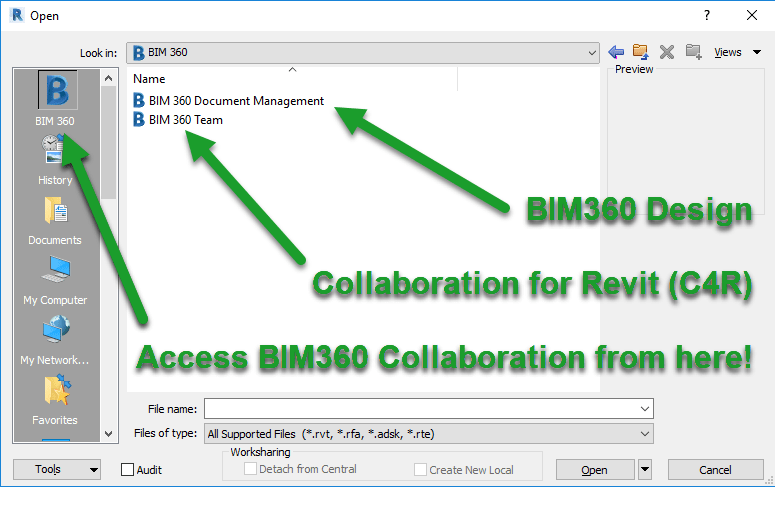
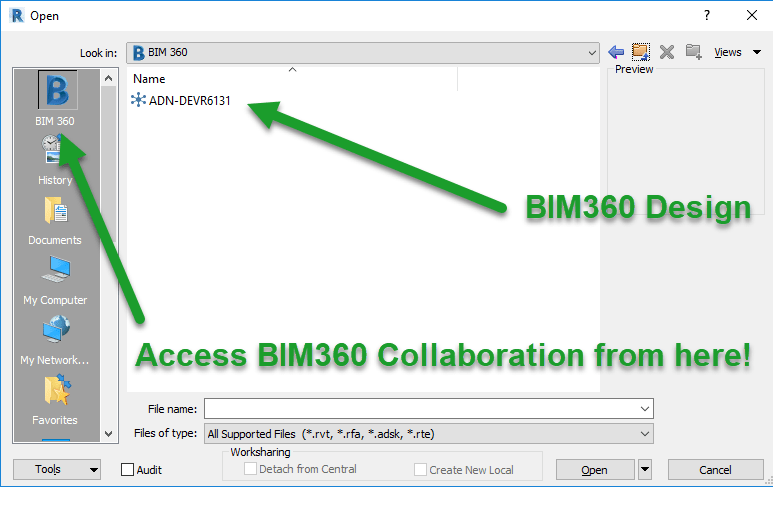
When opening a Revit model from 2018, you’ll see the “B” shortcut in the left. This is the proper way to open BIM360 Design/C4R enabled files. BIM360 Design and/or C4R sites will be listed depending if you have been given access to projects within those sites that use 2018 version of Revit.
Revit 2018 Open Dialog when accessing BIM360 Collaboration models.
When opening a Revit model from 2019, you’ll also see the “B” shortcut in the left. The same as with 2018 versions, this is the proper way to open BIM360 Design enabled files. BIM360 Design only will be listed because 2019 doesn’t use BIM360 Team/C4R. If nothing is displayed here, you may not have been given access to projects within those sites that use the 2019 version of Revit.
Revit 2018 Open Dialog when accessing BIM360 Collaboration models.
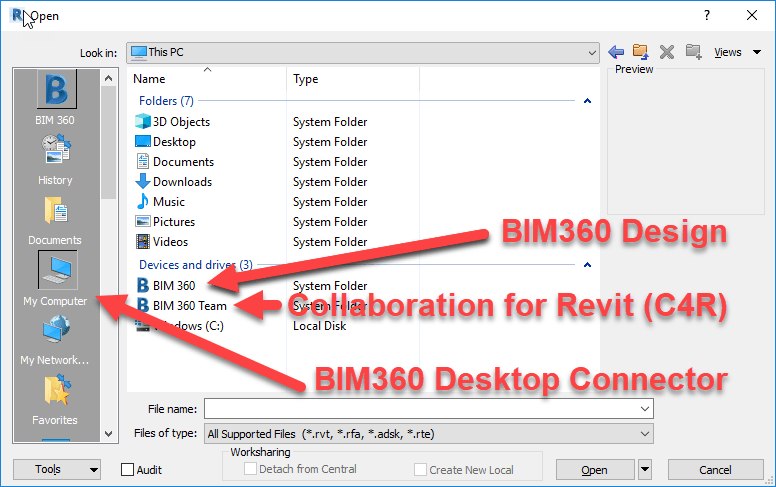
The other place you may see the BIM360 icon is from My Computer or other shortcuts that look at your local system. The following image shows 2018 when using the incorrect shortcut because it instead points to the Autodesk Desktop Connector drive on your computer.
Revit 2018 Open Dialog when accessing the Autodesk Desktop Connector Drive
And once again, 2019 versions of Revit are similar. On clue is that here, even though 2019 doesn’t support C4R, they are listed here. This is because you’re not accessing via Revit’s collaboration tools, you’re simply accessing a special local drive on your computer that’s syncing everything in the BIM360 platform completely independent of Revit.
Revit 2019 Open Dialog when accessing the Autodesk Desktop Connector Drive
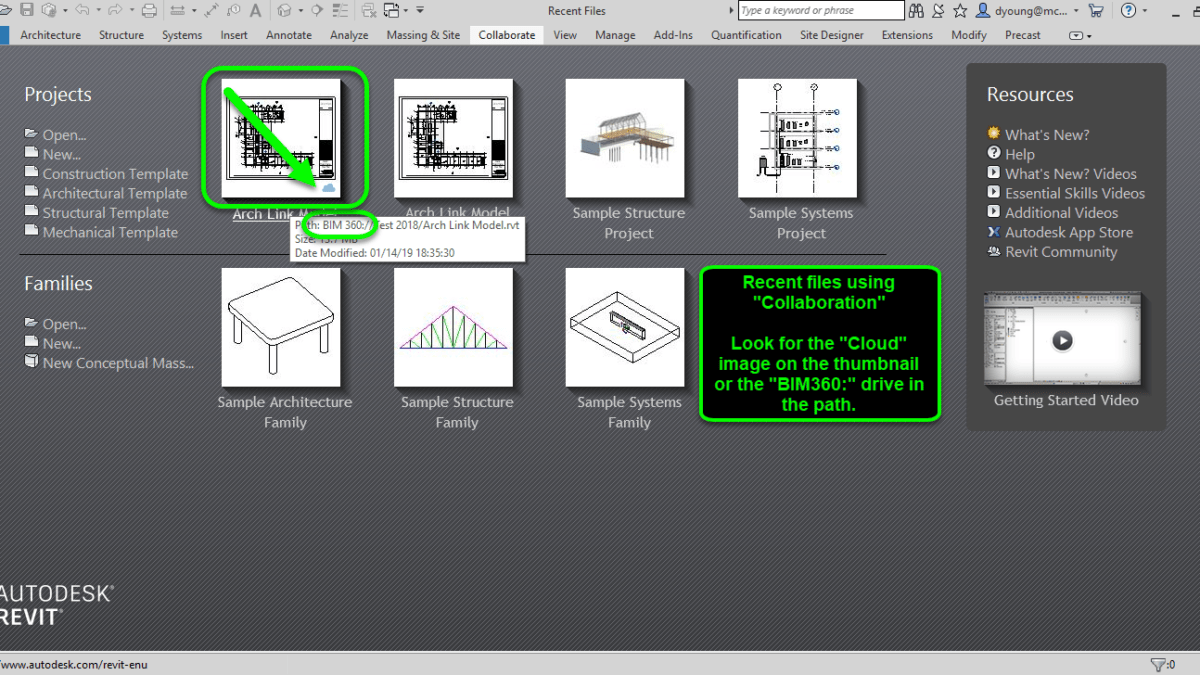
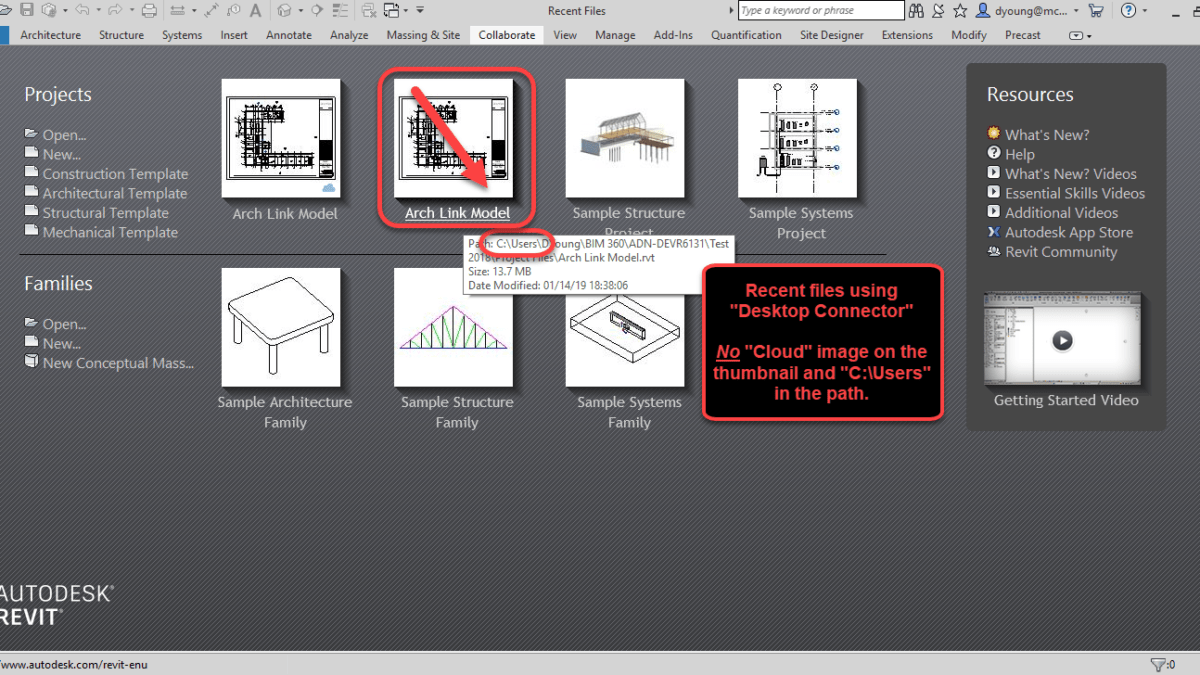
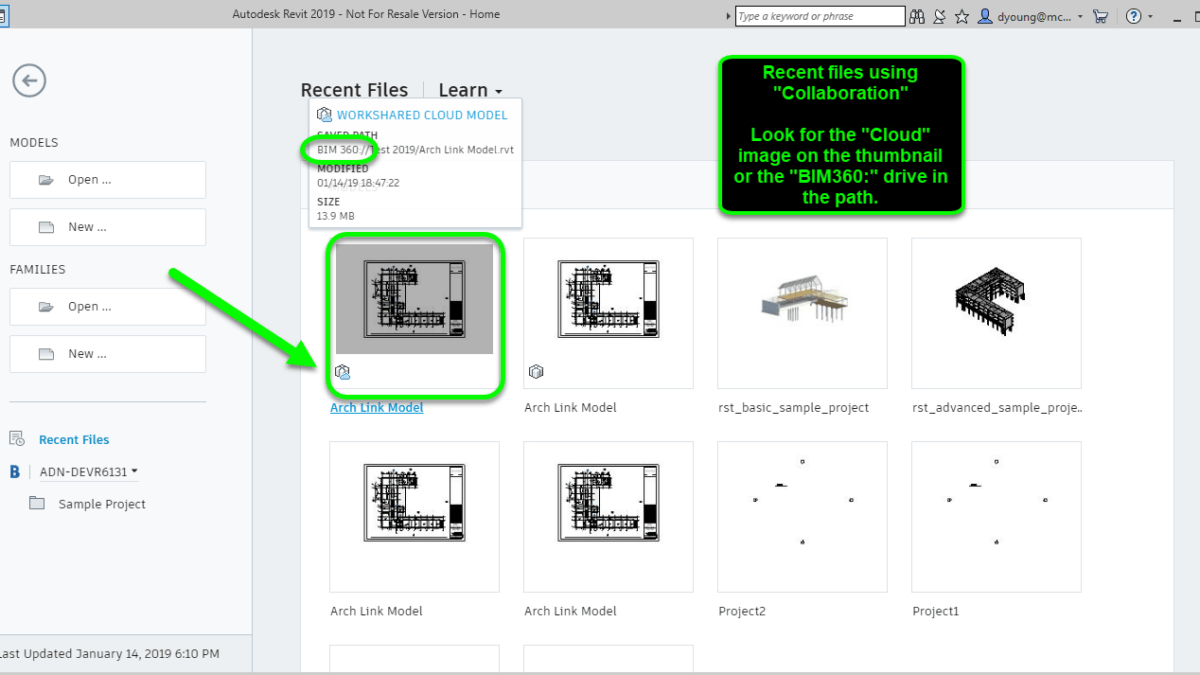
More clues when opening Models from the Recent Files List
If you’re trying to open Revit models using the Recent Files list, there’s a few subtle clues that tell you if you’re opening a collaboration enabled BIM360 model or simply opening a model from the Autodesk Desktop Connector drive.
The following image shows Revit 2018 with a BIM360 Design/C4R model correctly. Notice the drive letter in the path as well as the “Cloud” image in the thumbnail.
Revit 2018 with a Recent File that uses BIM360 Collaboration
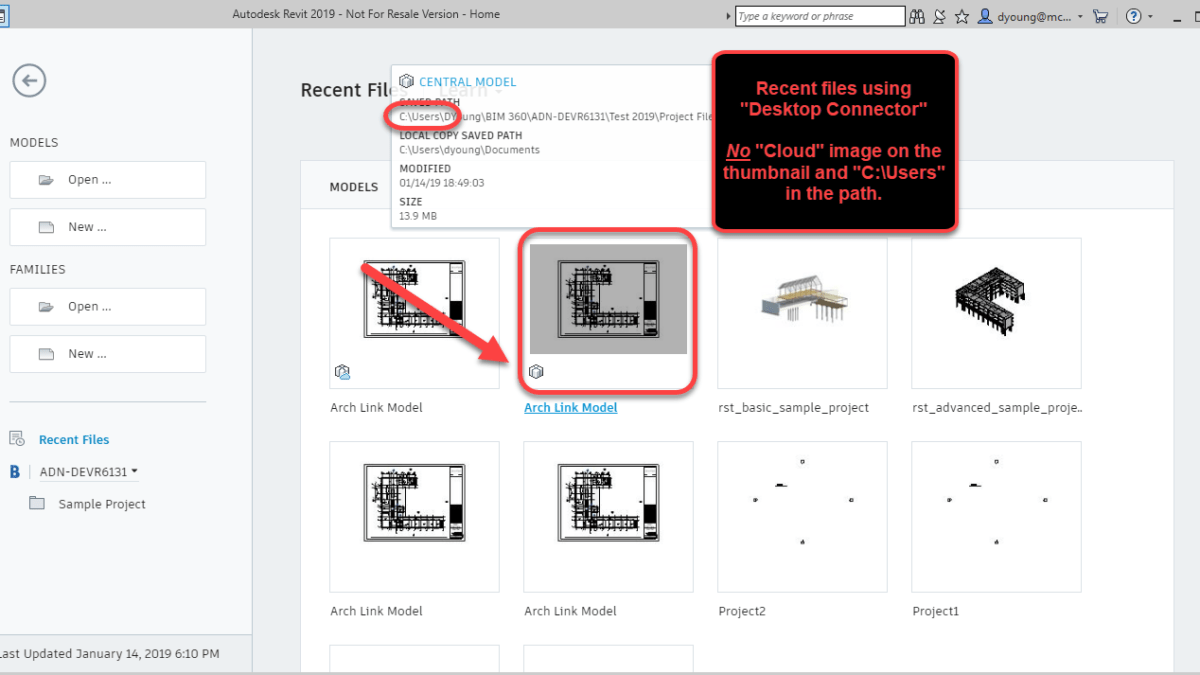
The following image shows Revit 2018 with a Recent File that was accessed incorrectly from the Autodesk Desktop Connector. Notice the path will point to your Users folder on your computer and there’s no “Cloud” image on the thumbnail.
Revit 2018 with a Recent File that uses Autodesk Desktop Connector
Similar to 2018 but formatted differently, Revit 2019 displays the same details in it’s Recent Files. The following image is 2019 showing a recent file opened correctly through BIM360 Collaboration tools.
Revit 2019 with a Recent File that uses BIM360 Collaboration
And one more image below that shows a recent model opened incorrectly from the Autodesk Desktop Connector.
Revit 2019 with a Recent File that uses Autodesk Desktop Connector
Additional Clues
Looking at some of those subtle options can easily be overlooked or forgotten. Especially in the daily stress of production and deadlines. There are a few more obvious clues that can tell you if you’re opening your Revit models correctly.
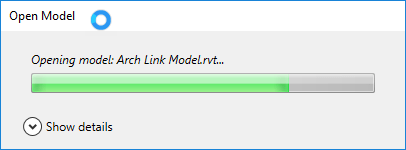
For starters, when you open a BIM360 Design or C4R model properly in Revit, you’ll see a nice status dialog indicating that the files is being opened and sync’d locally.
Opening BIM360 Models Properly Displays A Status Dialog
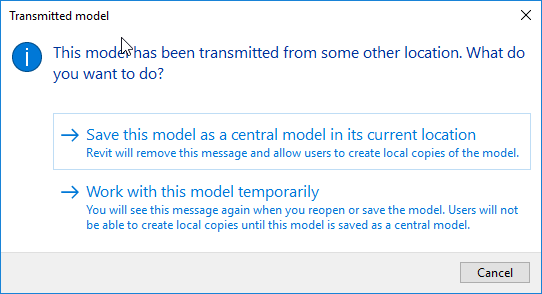
On the other hand, there’s a major red flag when you open the files incorrectly though the Autodesk Desktop Connector. When you open the files incorrectly, you’re prompted to work on the model temporarily or save it locally as a Central Model. If you see this dialog, you know you opened the file incorrectly and should click the Cancel button.
Revit Model Opened Incorrectly from the Autodesk Desktop Connector
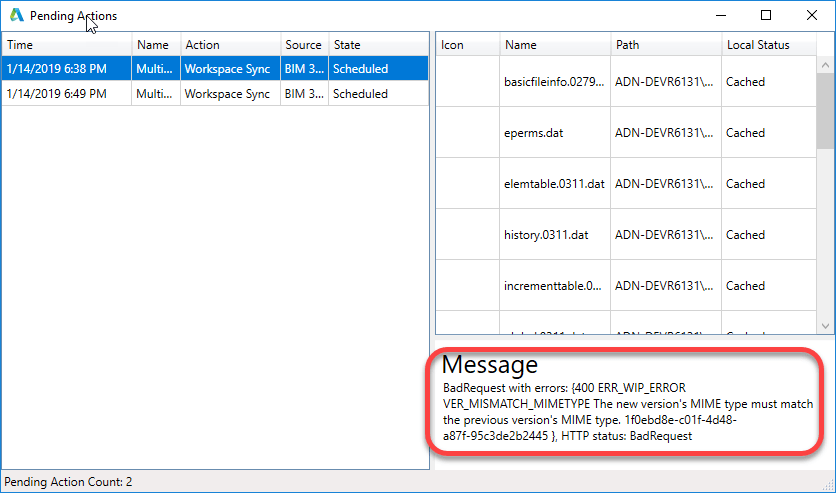
If for some reason you or another user did open the file incorrectly, you can use the Autodesk Desktop Connector icon in the Windows System tray to review the pending actions. There will likely be warnings when reviewing the connector’s syncing status tasks. Note however that that lack of pending tasks with errors does not mean a file can’t been opened incorrectly. Any number of other actions could have overwritten the local copy or cleared those actions.
Autodesk Desktop Connector Pending Actions With Errors
Another subtle clue is that if you look at the collaboration hubs and you see multiple projects that use different versions of Revit between them, you know you’re opening the models incorrectly. The Autodesk Desktop Connector display all projects, regardless of Revit version being used because it;s independent of Revit. When opening files correctly for BIM360 collaboration, Revit 2018 will only see 2018 project versions and Revit 2019 will only see 2019 project versions.
Again, if you don’t see differently projects that use different Revit versions, that does not mean you’re opening them properly. You merely may have been granted to projects of only one Revit version. But if you do see multiple projects you know are using different versions of Revit, it;s a sure sign you’re opening the files wrong.
Two Projects Using Different Versions of Revit Listed Together is a Red Flag
Best To Avoid Using The Dropdown
The last word of warning is with using the drop down list in the Open dialog. Depending when and how you’ve accessed Models, neither BIM360 icon may be present, one or the other may be present, or both BIM360 icons may be present. Because they have no description, its hard to tell wich does which.
The following image shows the Dropdown list expended with both BIM360 icons displayed. One will take you to the proper BIM360 collaboration tools and the other, incorrectly to the Autodesk Desktop Connector.
BIM360 Collaboration and Autodesk Desktop Connector Icons Look Similar.
Because of this very subtle difference, it’s likely a best practice to not use them ever. If they don’t show up on your system, don’t worry. They typically won’t display until you’ve first accessed the corresponding My Computer or BIM360 shortcuts on the left side of the dialog.
Revit 2019.2 Update was released today. Of particular interest in 2019.2 is the addition of Revit Cloud Models which allows users to host Revit models in the BIM360 platform even if not collaborating. Kind of a BIM360 Design/C4R “LITE” so to speak. That description of Revit Cloud Models is likely a little misleading so I recommend a more robust (but still not entirely clear) explanation on the Revit Blog.
You can download the update from your Autodesk Accounts Portal…
Or you can download and install from the Autodesk Desktop App…
You can see a list of issues fixed and new features from this link.
Every CAD or BIM user I talk to is in the same boat. The struggle and fight with their IT department to spend for adequate hardware. IT departments, tasked with keeping down budgets and slowing hardware refresh times simply go to the software vendors web site and look at minimum and recommended specs. Take for example, Autodesk’s requirements for Revit 2019…
What most don’t know is that these specifications are typically based on what most customers are using. If most customers are using low quality hardware, the recommendations will also be low quality hardware. Requirements and recommendation also typically don’t reflect what you’re doing….2d drafting or rendering for example.
Autodesk has gotten better about listed recommendations for large and small data sets, but it’s still doesn’t give you a good picture of what’s going on.
One this you can do is run some bench marking on your systems. This is typically an automated process that runs your system through various activities and ranks it based on the time to perform those tasks.
For Revit, a sharp guy named Gordon Price has helped develop a set of Benchmarking utilities for Revit. They’re posted to https://www.revitforum.org for free download and posting feedback.
I’ve got to say, I anticipated having to fuss a bunch, re-configuring support folders, repathing files and such. To my surprise, it was very simple. Like, extract the files to a folder, read the README.TXT file to understand what the various benchmark options were then click the shortcut.
You can get a little more advanced and have the benchmark assemble the results to a network location so you can benchmark all your machines and keep all the data on one place. But if you want to just run a simple benchmark, it’s very easy to do so although running the Expanded benchmark can take hours as it’s pretty exhaustive.
When you’re done, you get a text file summary of your particular systems results, Here’s a sample of data from my laptop….not very impressive but it’ not my primary system, just for home.travel use.
RVT 2019 - Full_Simplified set - 2018.10.06 @ 08.23.24 on MYCOMPUTER.txt
    RFO Benchmark v3.2 (build 01.05.2018)
    RevitForum.org

All times are in seconds, lower is better.

Run on Revit 2019.1
____________________________________________________
Model creation benchmark
   16.46   opening and loading the custom template
   20.78   creating the floors levels and grids
   32.13   creating a group of walls and doors
   52.27   modifying the group by adding a curtain wall
   19.79   creating the exterior curtain wall
   15.05   creating the sections
    6.79   changing the curtain wall panel type
   25.36   creating area plans
    3.61   creating and applying view template
  192.24   TOTAL

____________________________________________________
Graphics
    7.99   activate View Styles view
    4.17   change view to Wireframe
    0.21   change view to Hidden
    0.67   change view to Shaded
    0.87   change view to Consistent Colors
    0.66   change view to Realistic
    3.01   refresh Wireframe Line view x10
    9.24   refresh Hidden Line view x10
    9.50   refresh Shaded view x10
    8.91   refresh Consistent Colors view x10
   10.77   refresh Realistic view x10
    0.84   activate View Cube view
    5.96   rotate view x1
   62.80   TOTAL

Notes:
    Graphics benchmark measures the entire graphics stack, which includes CPU and memory.
    To meaningfully compare graphics cards, test all cards in the same
machine and use the 'Graphics - expanded' benchmark.

TEST CONDITIONS:
____________________________________________________
Mfr: Dell Inc.
Model: Latitude E5470
OS: Microsoft Windows 10 Enterprise64-bit
____________________________________________________
CPU: Intel(R) Core(TM) i5-6300U CPU @ 2.40GHz
Max Clock Speed: 2.496Ghz
Number of Processors: 2
Number of Logical Processors: 4
Total Physical Memory: 8GB @ 2133Mhz
____________________________________________________
Drive Type: local Disk (NTFS)
Drive Model: SanDisk X400 M.2 2280 128GB
____________________________________________________
Graphics Card: Intel(R) HD Graphics 520
Graphics RAM: 1GB
Driver version: 22.20.16.4836
____________________________________________________
Screen Resolution: 1366x768x32bit @ 59Hz
DPI Scaling: 100%