I didn’t plan up updating scripts again so soon but I found a couple more undocumented properties. I thought I’d post them sooner rather than later.
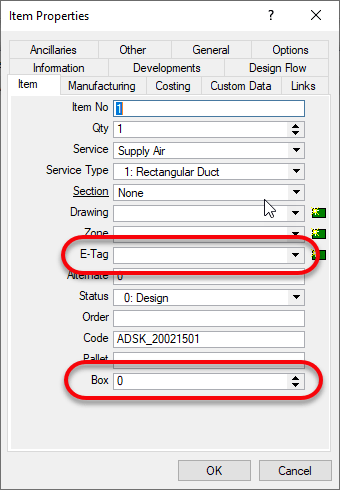
The two ITM properties I found are “BOX” and “E-Tag“.
BOX is only visible from CAMduct. It’s intended purpose appears to be for specifying a “Box” for the ITM in question for shipping purposes but you could use it or anything. Despite it being visible only in CAMduct, using COD Scripts, you can read and write it from ESTmep or CADmep too.
E-TAG is visible from any of the Fabrication products. It’s used for Equipment Tags. You can see both properties from here if in CAMduct or only E-Tag is ESTmep or CADmep.
Scripts Updated
All Debug Scripts – Nothing major, just formatting in the comments section.
WriteAll_Props (Job).cod – Updated to support BOX & E-TAG properties.
WriteAll_Props (Library).cod – Updated to support BOX & E-TAG properties.
I’ve made a couple updates to the Autodesk Fabrication script libraries. If you use them, you can download updated versions from here.
Scripts Updated
Debug
Debug ITEM Library.cod
Debug ITEM Sealant.cod
Job Items
WriteAllLibrary (Job).cod
WriteAllSealant (Job).cod
WriteAll_Props (Job).cod
Library Items
WriteAllLibraries (Library).cod
WriteAllSealant (Library).cod
WriteAll_Props (Library).cod
Issues Corrected
Issue 1: Scripts accessing the “Library” property were failing on CID/Pattern 2199. Scripts have been updated to watch for this and report it as an ‘Unknown‘ Library.
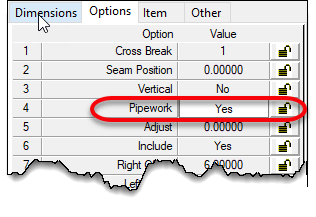
Issue 2: Some CID/Patterns can be configured to be pipework or duct work depending on the “Pipework” option’s “Yes/No” status. Scripts were updated to properly report or ignore this property depending on the Sealant value being present.
If the option is set to “Yes“, the pattern is a pipework item. If set to “No”, the pattern is a sheet metal item. Sheet metal items contain the “Sealant” property where as Pipework items do not.
This condition is present in the following CID/Patterns…
149
838
902
1101
1238
1239
1240
1241
1242
1247
1248
Special thanks to Kyle Speropoulos of MMC Contractors in Kansas City for alerting me to this issue.
My apologies for misleading headline, but I feel the issue is important enough to grab your attention with.
To start, I’m not aware of any upcoming enforcement action by Autodesk regarding their BIM360 Docs service. But that doesn’t mean it’s not coming. Project teams may get hit like a ton of bricks if they are not prepared. When it’s about to happen, nobody knows.
Dude! Why The Alarmist Tone?
If you’ve been around the Autodesk ecosystem long enough, you’ll know Autodesk has always supported enforcement of software licensing. It’s speculated the rise of AutoCAD’s popularity was because of the ease of pirating back in the day. But as Autodesk grew, so did their enforcement activities. These activities include software licensing audits of which I’ve participated in two (100% compliant I might add)
I’m a firm believer in Intellectual Property rights (IP) and applaud Autodesk’s efforts to protect their investment. With this I have no problem.
Times Have Changed
Things have changed in recent years. Typical pirating of desktop software was either an intentional or negligent act. With current subscription models and cloud based services, piracy is a much smaller issue now that it once was. This new economy of subscription licenses and cloud services should render licensing concerns a thing of the past right? Wrong!
If you were a user of the old A360 based Collaboration for Revit platform (C4R), you might recall about October 2017 (if I recall correctly) many project teams across the US were unable to work. Call it an “oversight” or “defect”, call it what you want. The issue was C4R was not properly enforcing licensing. To be clear, it wasn’t enforced at all…until it was.
To make matters worse, your company could assign licenses to your users, or another partner on the project could provide the licenses. It’s not real clear where you’re ability to “use” C4R was coming from because even without a license, you could view the files on the web. Inquires to Autodesk would always result in no help citing privacy concerns.
Needless to say, once Autodesk “flipped the switch“, project teams all over had users unable to work until they procured more licenses. Autodesk responded that a notice was posted in the public Autodesk forums. It also wasn’t possible to Email everyone involved despite having Autodesk ID’s be the user’s Email address. Not sure how they said that with a straight face.
In short, Autodesk has a confusing licensing model, was not helpful to customers trying to understand their compliance, allowed easy inadvertent over usage and then pulled the plug. Oops. Guess we won’t do that again.
Looks Like Déjà Vu(All Over Again)
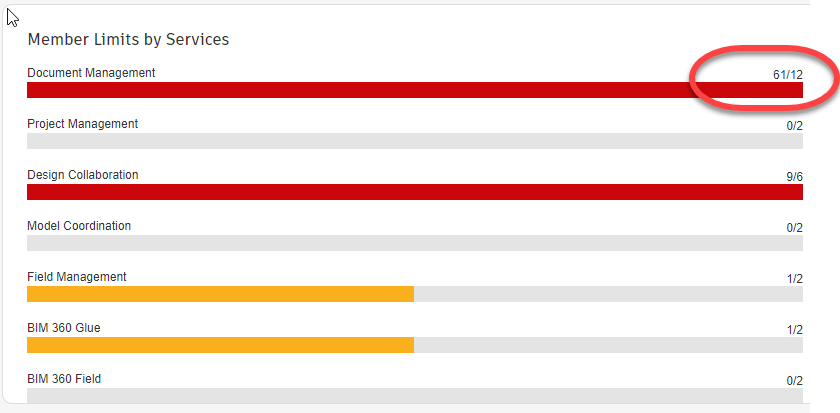
Did you know, BIM360 Docs licensing is also NOT being enforced currently. Additionally, license usage and counts are not available in your accounts portal either like your other products. Simply put, BIM360 Docs licenses are automatically assigned/unassigned as you add or removed project members on your BIM360 Docs account.
The only place to find your current status is from the Account Admin page and clicking on the Analytics menu. Here, you can see I clearly added 61 users when there’s only 12 licences available. Each users had NO functional limitations.
61 of 12 BIM360 Docs Licenses Used.
And it only gets worse from here. Any Project Administrator can add anyone to your account they want. In fact, you Want project administrators so they can efficiently on-board your team members. You may even make other trade partners outside your firm Project Administrators so they can on-board their own staff. The issue is, Project Administrators have no access to view licensing usage, only the Account Administrator which you don’t want to give wide access to.
So here you have a situation where you can easily become over consumed and not realize it. Autodesk assures me they do routine audits and allow people to “true up” or they shut the licenses down. But given past history, are you confident the right person will get notice? Are you confident enforcement won’t be turned on and your project won’t get shut down for a couple of days while your order is placed?
The Bigger Issue
For such a large company so focused on software compliance (historically), it seems very odd to me that this is the second “oops“. And it seems ironic that for something that should be so simple like Cloud Service licensing, that it can be so horribly confusing.
“BIM360 Docs licenses are automatically assigned. They don’t stay with the user. However, you get one for free with BIM360 Design which a user can take with them.”
Does the person managing your licensing know what that means?
And it’s just disappointing that it’s so easy to become “over-licensed” with very little visibility. They let everyone into the concert with no security, shut the door and just as the band start playing, announce they you all didn’t have enough tickets.
Call me a conspiracy theorist but it is starting to appear like this is an intentional deployment and utilization strategy. Get teams dependent on the product, then pass around the collection plate.
One Final Complaint
If you’ve heard enough, you may not want me to point out that Autodesk likely collects revenue for multiple of the same licenses for the very same users. Seriously, stop reading if you’d prefer to remain in the dark.
BIM360 Docs licensing (to be “legal”) requires licenses for every active member in an accounts membership list. If I host a BIM360 project for the entire team and the team wants to use BIM360 Docs, I need licenses for the entire project team. Sounds reasonable. But there are other projects hosted by other firms. My team needs access to those as well. Those firms are paying for licenses (if they’re legal) for my team…who already has licenses from my account.
The Conclusion – I Promise
In my opinion, there is no excuse for the confusing, sloppy mess that is BIM360 licensing. It’s not hard. Others like Adobe and Microsoft have figured it out.
I’m not someone who’s against BIM360. It’s done great things for project teams and workflow. Seriously! But somebody really needs to start raising awareness to these types of issues. While we’re all giddy little nerds with a cool new toy doing neat things, as an industry, we’re neglecting the legal terms and other business risks. It’s not as fun but it’s just as important. I hope others start raising these types of issues or I’d expect more of the same from Autodesk.
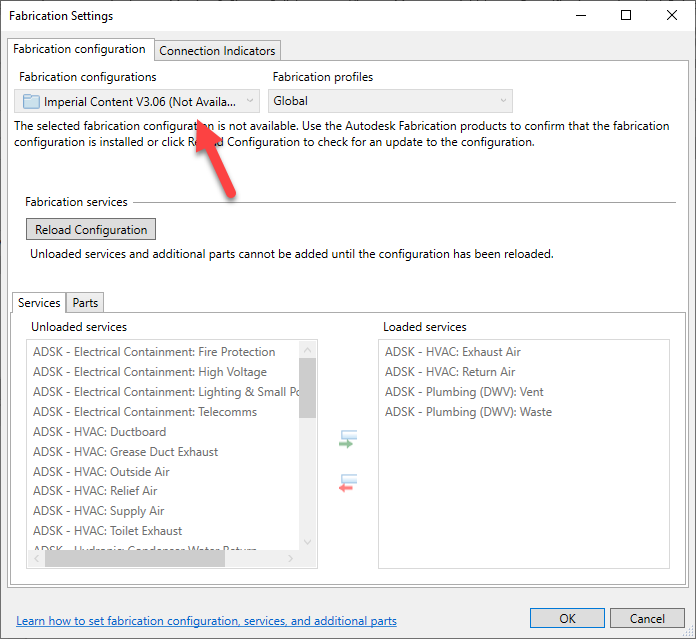
If you’re a user of ESTmep and Revit Fabrication parts, consider yourself warned. I’ve recently had some dialog with an industry colleague and the discussion of Cost data in Revit came up.
We know that that a Revit file which uses Fabrication Parts contains a copy of your Fabrication Configuration (Database). We also know that the Fabrication Extension for Revit now allows you to run reports. Those reports can also report on Cost data. That’s generally a good thing in most firms using ESTmep, exposing that Cost data to Revit users can be very helpful.
Now when you send someone your Revit model, they do NOT have access to your database (Unless you send that to them a well). Without your database, the Fabrication Add-In will not find the reports and the option is grayed out.
You also can’t change the configuration either because the drop down is disabled. They need your database to do anything….maybe.
So this sounds like we’re OK but let me assure you that’s not the case. Your database isn’t “available” to the person who had your Revit file but it is contained within the Revit file itself. And even though the Revit API’s don’t give you access to the costing data, it can be extracted.
I won’t go into details for the sake of security in our industry but rest assured, there is a process where as a user can extract your cost data. This includes being able to figure our your vendor pricing multipliers.
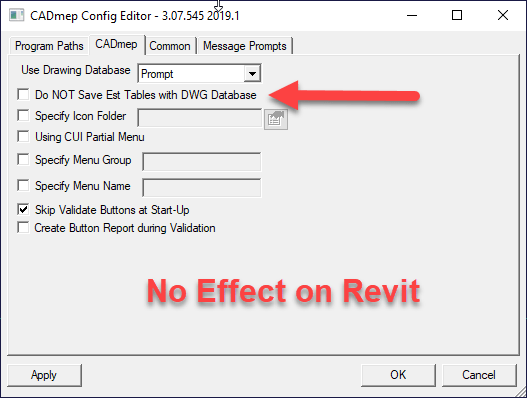
What To Do?
That leaves the question about what to do. Some may be familiar with the option in Edit Configuration that disables the storing of EST tables in DWG files. This has NO effect or control of Revit. Sure would be nice if it did nit that’s not the case.
So there’s really 2 options that I can see….
Remove or Rename the COST.MAP, ETIMES.MAP, FTIMES.MAP and SUPPLIER.MAP tables from your database. These are where labor rates, times and costs are stored. Without these tables,, Revit can not store this information in the model. If you’re previously had a Revit model with this information saved, rename/remove the files and reload your configuration and the data will be removed. The down size is you’ll no longer be able to use ESTmep.
Make a copy of your database without the COST.MAP, ETIMES.MAP, FTIMES.MAP and SUPPLIER.MAP tables and have Revit point to that. Each time you update your Fabrication database, you’ll need to refresh this copy. It’s fairly easy to script this process and have those files removed. The down side is you’ll no longer have access to Cost data in Revit but at least you can keep using ESTmep internally.
If you feel this is unacceptable, please submit a support ticket with Autodesk. The more people that raise the issue, the more likely that it will be addressed in a future release or update. To date, all they told me is the option I’ve outlined are the ONLY way to address the issue.
How many times have you had to reconfigure a system because a server changed? Remapped Drive letters? Links that used UNC paths? It’s downright annoying when IT needs to replace a server and it’s name is different. But it is understandable…systems get old and outdated and need upgrading or replacing.
What I don’t understand is why we use server names at all. Most Ethernet networks use IP addresses to route traffic, not server names. But nobody can ever remember all those numbers. When you type a server name, it pings the DNS server to locate the IP address of that server. Makes sense right.
But we don’t have to use server names…or IP addresses. DNS can be configured with a CNAME Alias (CNAME – Canonical Name). A CNAME Alias is just another human friendly piece of text that’s used to point to another Server Name, IP address or even another CNAME Alias.
What a CNAME Alias do for us?
To understand what a CNAME Alias can do for us, lets take the example of license server. All your client software points to the server name…let’s say is’s something like “P-LA-LIC01“. Now your IT rolls out a new server for licensing…it’s not going to be “P-LA-LIC02“. All your clients need to be updated to the new server name. Depending on the sophistication of your IT and the software they mightbe able to push an update. But more often than not, the local CAD/BIM Manager is left updating clients.
With a CNAME Alias, you could create a nice user friendly name like “ADSK-LICENSE“. All your software would use this name instead of the server name.
This CNAME Alias is setup on your DNS server. Most IT groups won’t give you access but if you know how it works, you can request and have them set it up for you. Just tell them you want a CNAME Alias named “ADSK-LICENSE” that points to “V-LA-LIC01” (ADSK-LICENSE -> V-LA-LIC01). Now when you’re ready to cut you users over to the new license server, have them update the DNS record for the alias to the new server overnight. The next morning, everybody is pointed to the new server, no reconfiguration required.
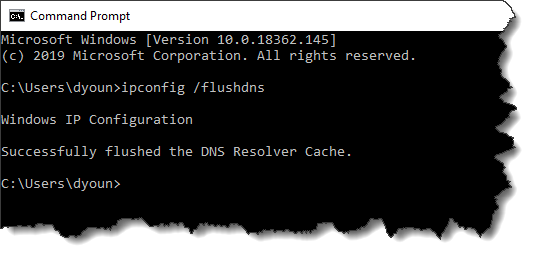
If someone has left on their computer, they may need to reboot to see the changes. In the unlikely event is still doesn’t work, they can open a DOS prompt and flush the DNS cache with the command line “IPCONFIG /FLUSHDNS“
Where does this work?
Just about where ever and ever where you would type a server name. You can make a drive letter using an Alias. You can use an Alias in a UNC path. We can even specify them to point to the IP address of network printer or other equipment.
The only real down side to using a CNAME Alias is that it doesn’t show up when browsing your network, But all things considered, that’s not a bad idea. If it were up to me, no user anywhere would ever know the names of the servers…only the Aliases. I really don’t know why this trick isn’t used more often. IT uses it for their own purposes, it just rarely gets implemented to affect the users. Using this approach, I’ve migrated hundreds of users in multiple locations to new servers with a 3 second DNS update in the evening. I suggest you give it a try.
Autodesk has always offered software discounts. There’s typically always a promotion running that your reseller can ell you all about.
Back in the day, discounts made sense. Software was sold as a perpetual license with a high upfront cost. It didn’t matter if you needed the software next week or 10 months from now. You always had that large, upfront cost. With this pricing model, it typically made sense to but before you needed to get a discount. This was particularly helpful during the end of Autodesk’s Quarter or their Fiscal Year End (Jan 31).
Subscription Changes Everything
Since Autodesk moved to a subscription pricing model, software discounts…”The Deal”…is in large part irrelevant now. With subscription software, there is no large upfront cost. You pay an annual fee. You can also prorate your purchase so it expires and renews with all your other Autodesk software.
To put in another way, in the old days, if you needed an additional license 6 months from now, you’d still pay the entire full price…leveraging the discount saved you money. With a subscription, if you don’t need your license for 6 months, you can buy it prorated so it’s 1/2 the cost. At 50% price to buy for the last half of a year, it makes no sense to but early to get only a 20% discount.
When Does a Discount Make Sense
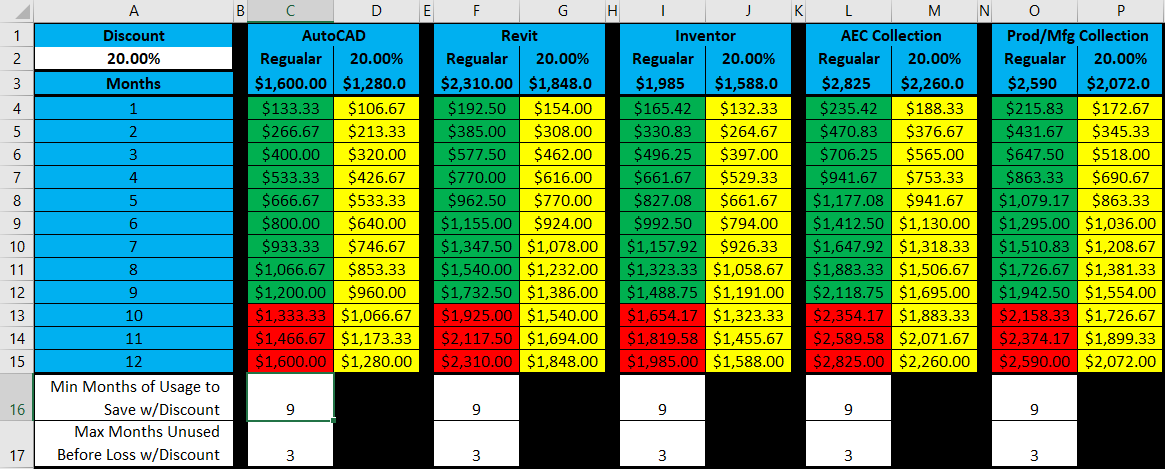
To better understand when a discount makes sense, I’ve put together a spreadsheet listing full price and discount price of several different products. The below image shows the cost breakdown between various packages with and without as discount. Looking at a 1-Year subscription term…
We add the discount in cell A2. Here its 20%, which is what a recent Autodesk promotion offered.
Looking at the last row (Row 17) this lists the maximum number of months you can sit in your license without using it before you loose money with the discount. In this example, if you don’t use your software for more than 3 months, you’ve lost money using the discount.
Row 18 shows the inverse. It shows the minimum number of months of usage you need to save money. Again, in this example, 9 months.
So, a 20% discount, your 12 month breakdown in 3/9. For a 3-Year term (not shown) the breakdown for 36 months is 8/28. If you don’t stat using your software within 8 months, you’re going to loose money on the discount.
If you want to do your own analysis, I’ve attached the spreadsheet below. It contains a tab for 1-Year and 3-Year Subscription terms. Simply enter the discount in Cell A2. You can also update with your own products that you may use however, it really doesn’t matter the product or cost, the saving/cost breakdown is the same.
We’ve all been there. Moving our mouse around trying to find the pointer on the screen. This can be especially troublesome in a shop floor environment. Computer screens are small. Full of dust and dirt. Poor lighting and perhaps even a poor mouse surface. All of these factors can make use of a computer on as shop environment annoyingly painful.
Beyond the obvious improvements like a larger, regularly cleaned monitor and improved lighting, there’s a couple simple tweaks you can make to keep your staff providing value as opposed to looking for a mouse pointer.
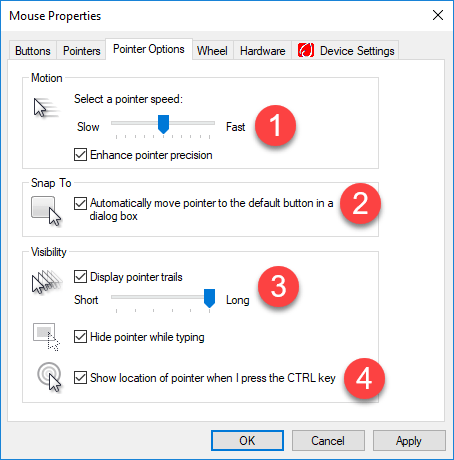
Advanced Mouse Options
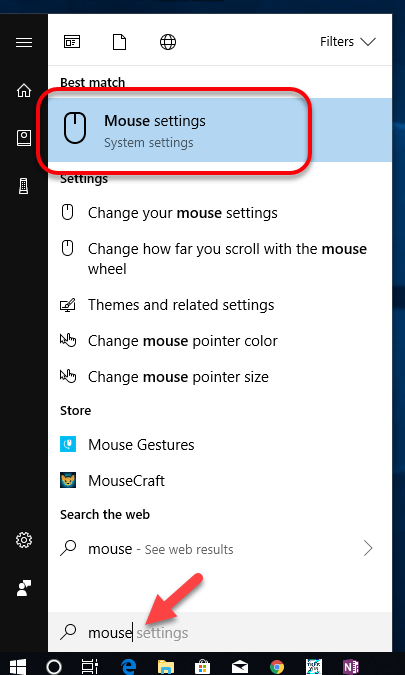
Using your Additional Mouse Settings, you can make a couple quick changes that will significantly improve the usability of a shop floor system. Simply press the Windows key on your keyboard and type Mouse.
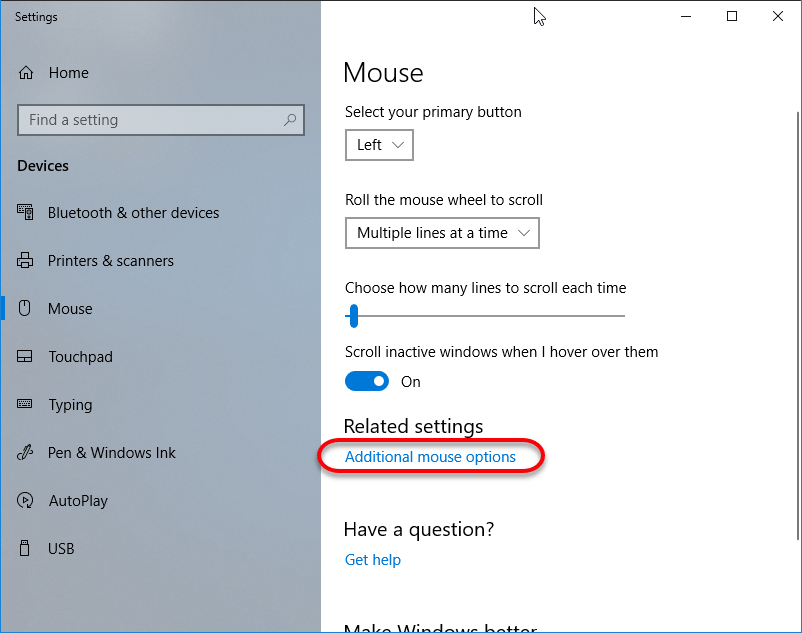
This should display the Mouse Settings option in the search results, that’s what you’ll want to click. This will bring up the Mouse Settings window. Here you’ll want to click the Additional Mouse Options link.
Now from the Mouse Properties dialog, there’s a few things, you should make adjustments to.
Select a pointer speed – You may want to turn down your pointer speed. It can be hard to find and track a mouse if it’s moving really fast.
Automatically move pointer to the default button in a dialog box – This setting may help depending on the software used on the shop floor. It may also be annoying. However, every time a dialog or window is opened, you’re cursor will be in a predictable location.
Display pointer trails – This leaves a few images of your cursor trailing around as you move your mouse. The longer the trail, the easier it will be to spot your mouse as you move it. Longer trails will have the most visibility.
Show location of pointer when I press CTRL key – You’ve likely seen this trick in software presentations. Press and release the CTRL key and a series of circles will radiate out from your mouse position.
A Word About Machine Controls
A lot of machines now are using Windows based controls. If these systems rely on the use of a Mouse instead of a touch screen, you may want to make these same changes. However these systems can often launch upon startup and make it appear you have no access to the Standard Windows interface. You can often simply plug in a keyboard and mouse into a USB port for quick access. You can then use standard Keyboard tricks to get you to a more familiar interface.
Press the Windows key on the keyboard to bring up the standard Windows menu.
Press Alt-Tabto gain access to other running or hidden applications.
If the control is running in Kiosk mode, you may not have access to the standard Windows options. In this case, press CTRL-ALT-DELETE to bring up the Task Manager. From the Task Manager, you can launch a new process or run a new program. You can simply type Explorer.exe and this will reload the Windows interface you’re use to allowing you to make the mouse changes.
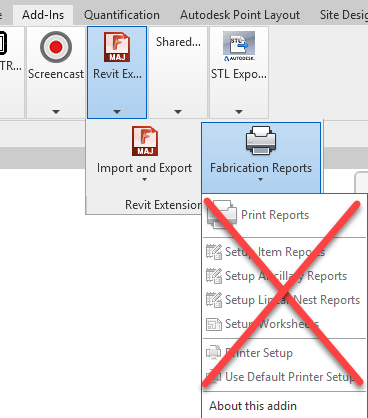
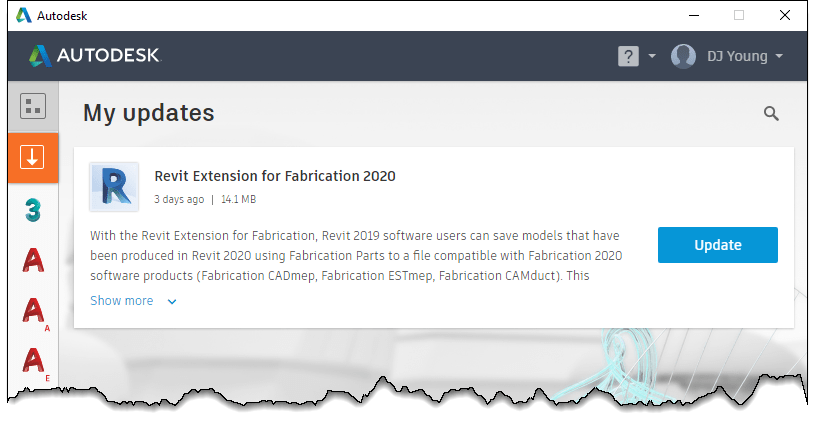
For MEP fabricators using Revit, Autodesk has finally released the Fabrication Extension for Revit 2020. This extension allows you to Export and Import MAJ files from Revit. Imports have always been problematic and prone to issues but Exports typically work well.
You can download the extension 3 different ways…
1: Autodesk Desktop App
Likely the easiest way, check your Autodesk Desktop App for available updates and download/install from there.
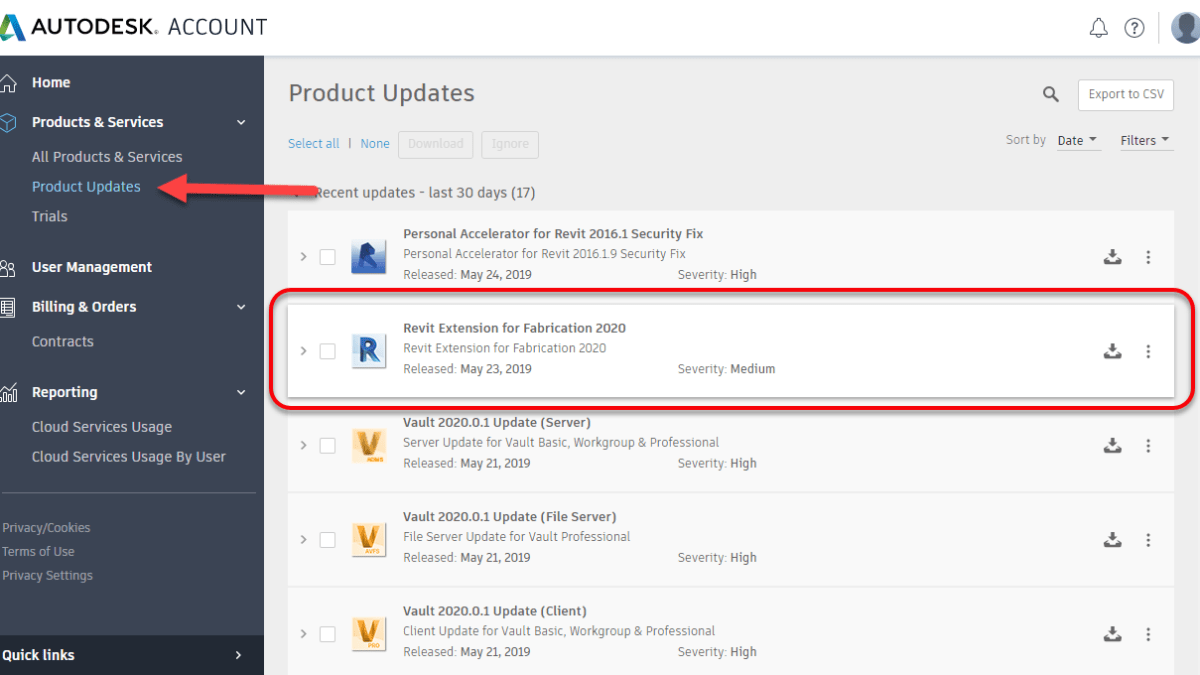
2: Autodesk Accounts – Updates
The second easiest way is to log into your Autodesk Accounts portal and click the Product Updates button on the left. This lists all the available product updates associated with the products you have.
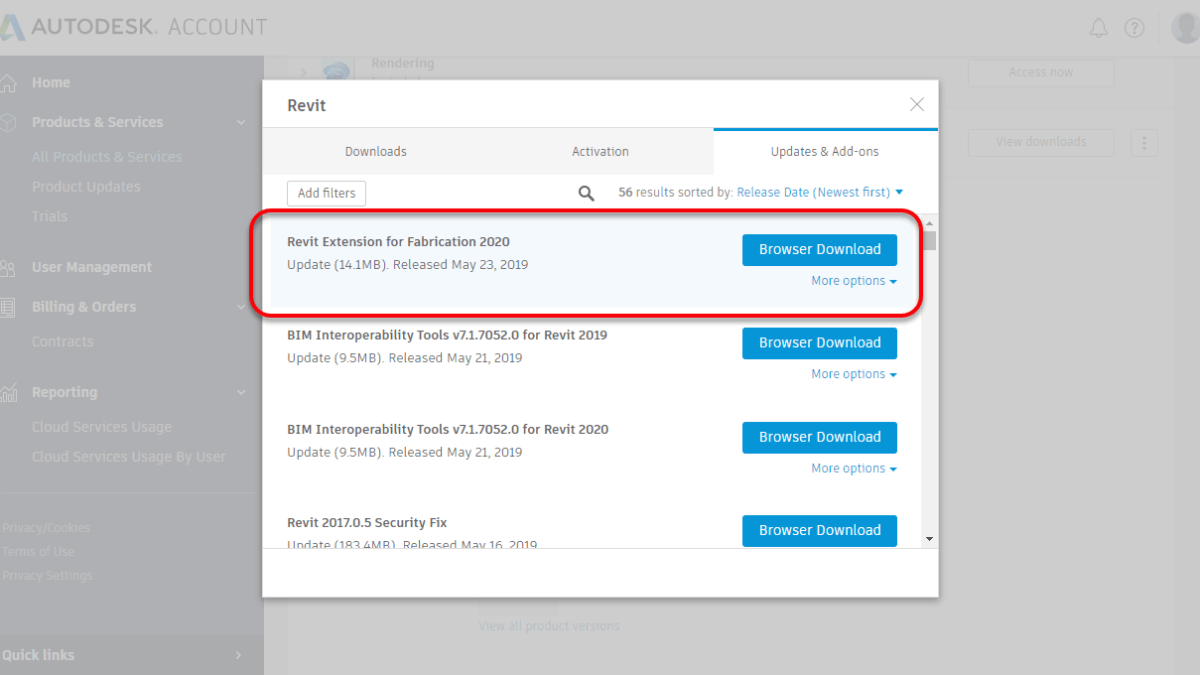
3: Product Download Page – Updates
The least easy way to get product updates is to do to the Revit product downloads and look at the Updates section. Takes a little longer to get here but all the updates associated with a single product can be found here.
If you’re using 2017 or older Autodesk products, your software may stop working on June 15th, 2019. Newer versions will continue to work but may have intermittent issues with any of their cloud related services. Exact services and product versions vary.
Many products and services use Transport Layer Security (TLS) 1.0/1.1. Due to known vulnerabilities, on June 15, 2019, Autodesk will be updating their systems to no longer support this protocol. This service is what’s used for Autodesk to determine your “Identity” when providing access to your products and services.
You can read more about the affected products and versions here. This article is specific to which older products will stop working completely. It does not cover newer products that have services which may stop working.
Newer products (2018-2020) Not mentioned in the Autodesk articles are also affected subject to the following….
Ancillary related services and newer products have their own security updates
Access to core product is Not an issue
Ancillary cloud connected services May be affected such as…
Revit Cloud Worksharing
Personal Accelerator (PAC) for Revit Cloud Worksharing
Communicator
Energy Analysis
Dynamo Package Search/Upload
P&ID Modeler
Licensing type of product does NOT matter
Most products have updates available however there are a few that do not. Autodesk Fabrication products in version 2014 or 2015 do not have updates. So unless you’re using those version with a Single User Subscription, you don’t need to worry. If you are using a product that does not have an update, you will need to upgrade to continue working.