Configuring Fabrication Configurations

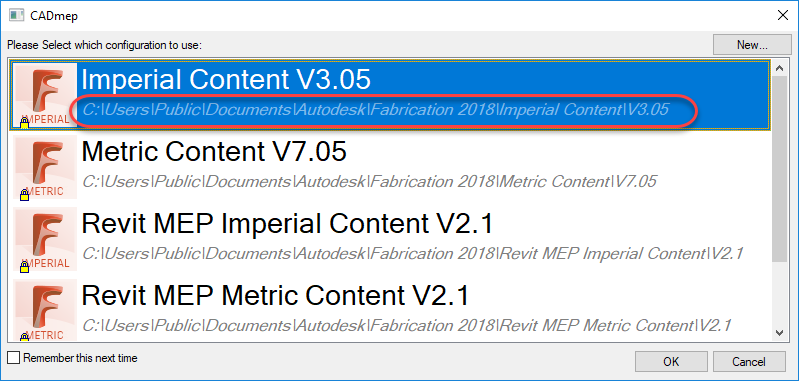
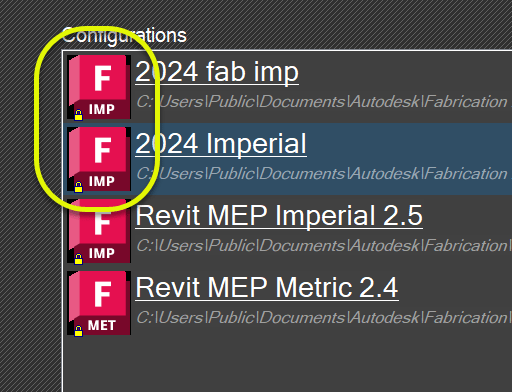
When you manually add a Fabrication Configuration to your system yourself, it only works for the currently logged in user. In fact, you may have noticed this with your own configurations compared to the default ones Autodesk adds during installation. You can see the difference by the presence of a little Yellow Lock icon in the lower left of the Configuration’s image.

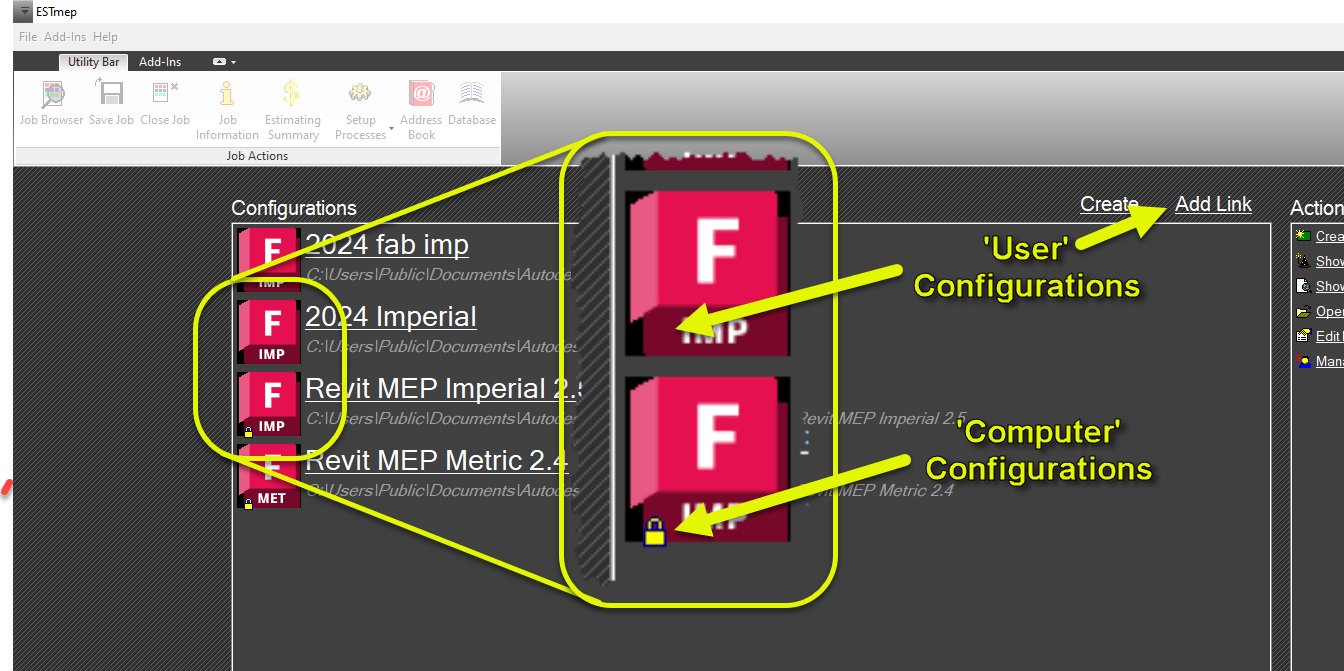
So when you use the Add Link option to add a configuration, it’ll only exist for you. If someone else logs into the computer, the configuration won’t be displayed for the new user. Autodesk’s on the other hand…will still be there.

The difference between these two ways Configurations work is based on how the configurations are “configured” in the Windows Registry. So let’s take a look by starting the Registry Editor.

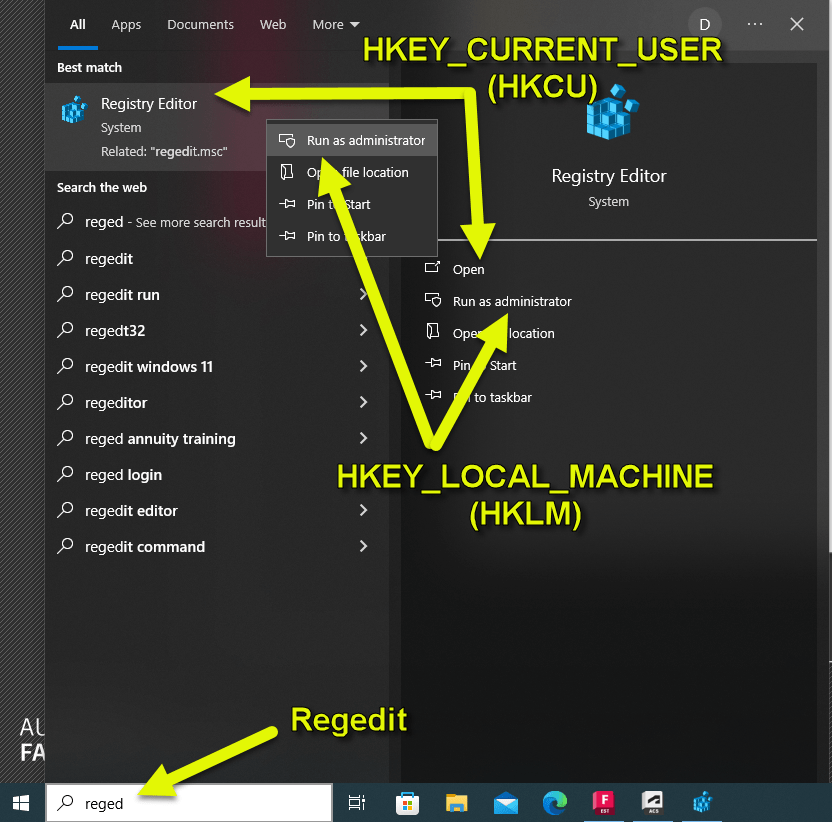
The first thing to know, is that there’s two ways to start the Registry. Just running the REGEDIT command opens the editor and displays everything. The other way is to Run as Administrator. When just run, you’ll have read/write access to the HKEY_CURRENT_USER branch (‘Hive’ is the proper term) often abbreviated as HKCU. This is the branch where the User configurations are stored.

The Computer based Configurations (like Autodesk’s) are stored in the HKEY_LOCAL_MACHINE branch often abbreviated as HKLM. When you run REGEDIT normally, you’ll see the HKLM branch but it’s Read-Only. To write to the HKLM branch, you’ll need to launch REGEDIT with the Run as Administrator option. Your IT Department may restrict this from you so you may need to involve them if you want to implement Computer based Fabrication Configurations.

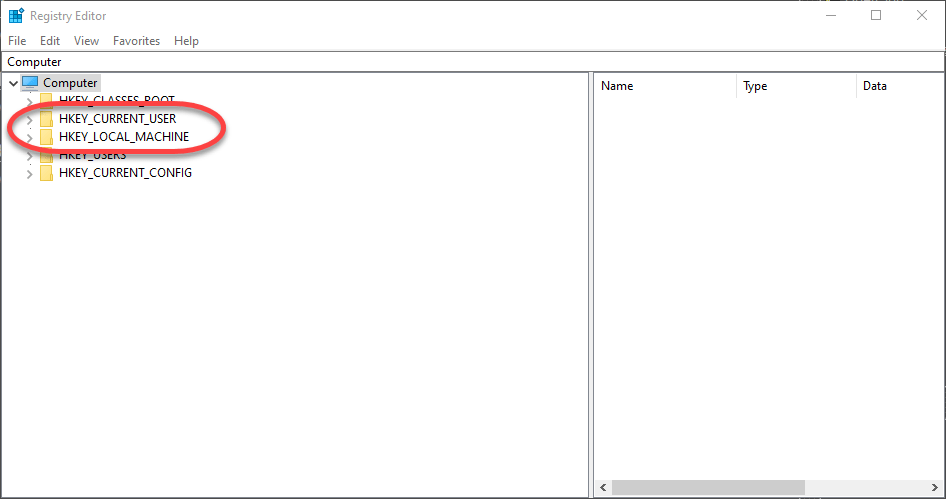
The other thing to note, is that when you Run as Administrator, the HKCU branch is there but the settings may be missing or different. This is because, the Registry Editor is technically running as another user and that branch is User specific. You can see the two branches I’ve referenced in the following image.


Converting Configurations to ‘Computer’ Based

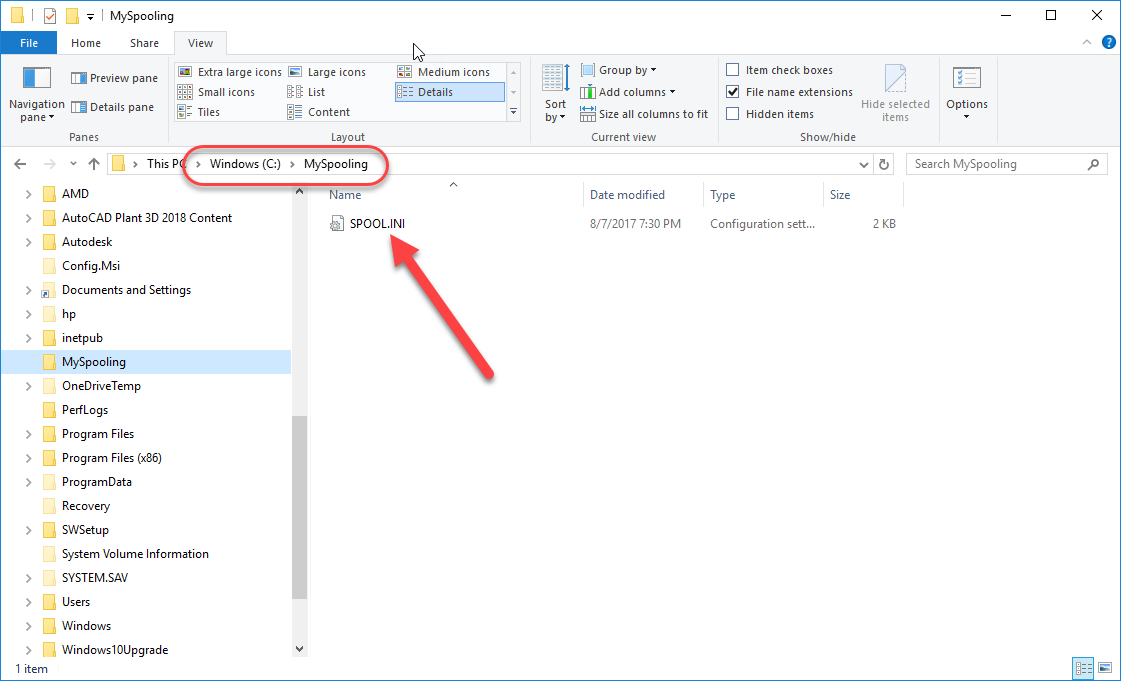
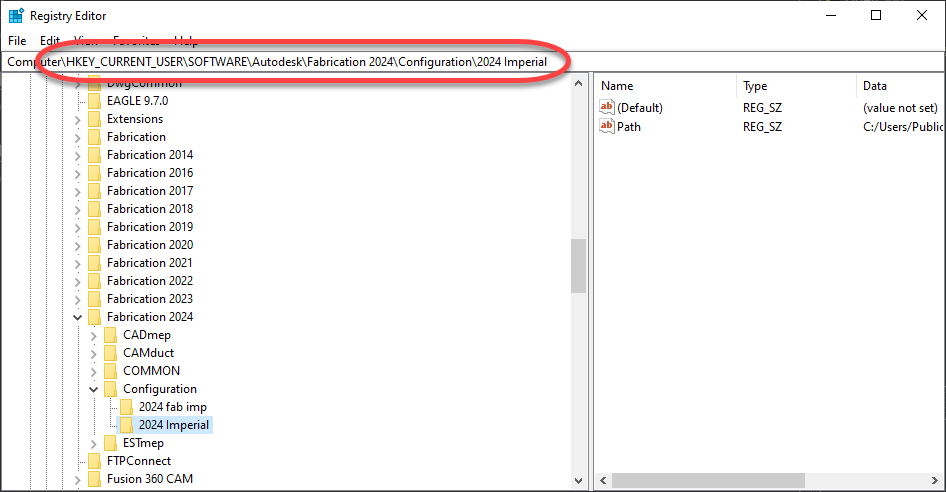
While you can edit the Registry manually, the easiest way to convert your Fabrication Configurations to be Computer based (not User) is to run the Registry Editor normally (not as Administrator) and export the HKEY_CURRENT_USER settings. The settings are in the key…

HKEY_LOCAL_MACHINE\SOFTWARE\Autodesk\Fabrication <year>\Configuration

The <year> represents the version year of Autodesk Fabrication (CADmep, ESTmep, CAMduct, Remote Entry, etc.) or Revit. You can see that in the following image. If the Configuration key isn’t there, that means there’s no configurations “configured” for that version year. If a specific “year” isn’t listed, it means that version wasn’t installed.

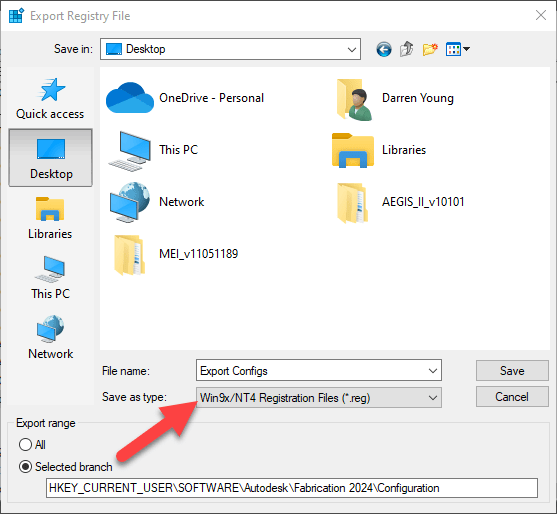
Once you get to the Configuration Key, you can export it using the File -> Export option as shown here…

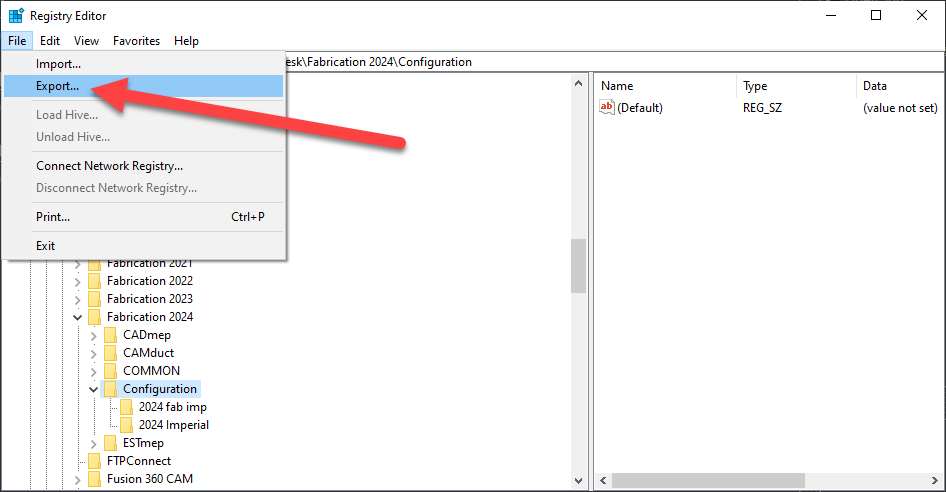
While you can Export a single configuration, I like to pick the Configuration Key and do them all. We can get rid of what we don’t want later. The main point to note when exporting is to change the Save as type: to the Win9x/NT4 Registration Files (*.reg) option. This will save the export in ASCII text which you can edit in Notepad.

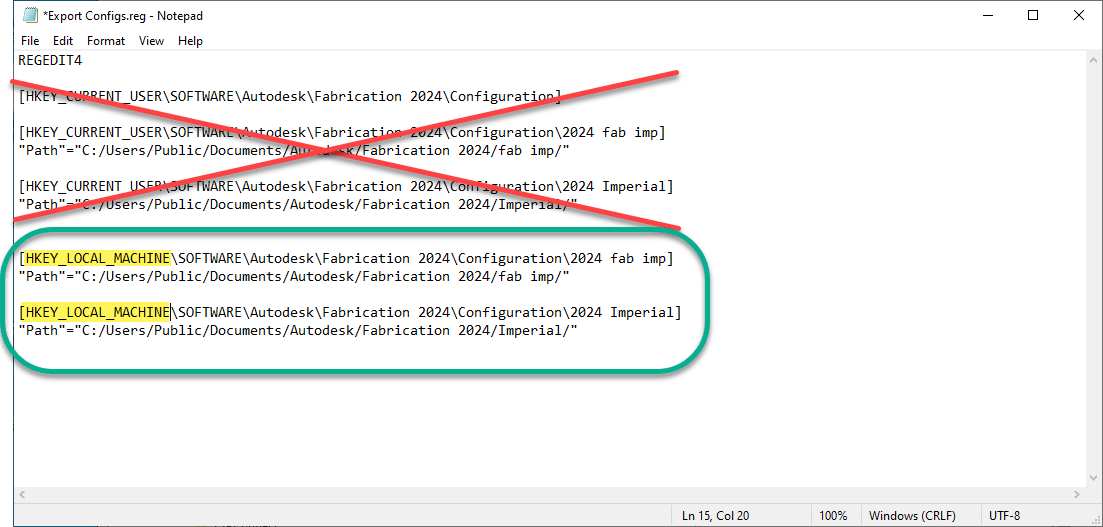
Once you export to a file, you can right click on the file and select Edit to open in Notepad. The following image shows how it looks and is marked up what I’ve removed vs added/edited. Note I also edited the Registry Hive from HKEY_CURRENT_USER to HKEY_LOCAL_MACHINE.

Once you’ve edited the file and saved it, you’re almost ready to import it. It’s generally not advisable to have the same configuration with the same name and same path in both the HKCU and HKLM branches.

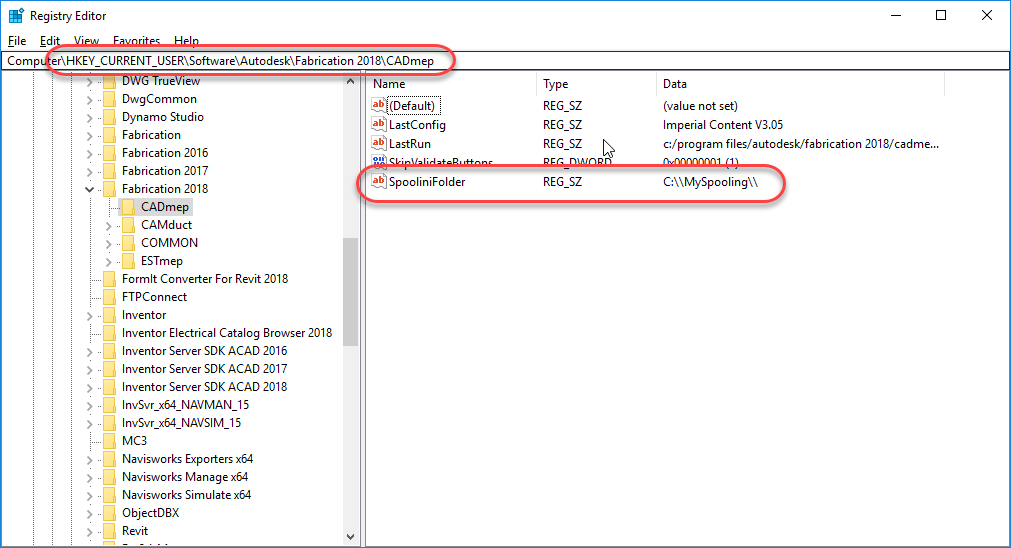
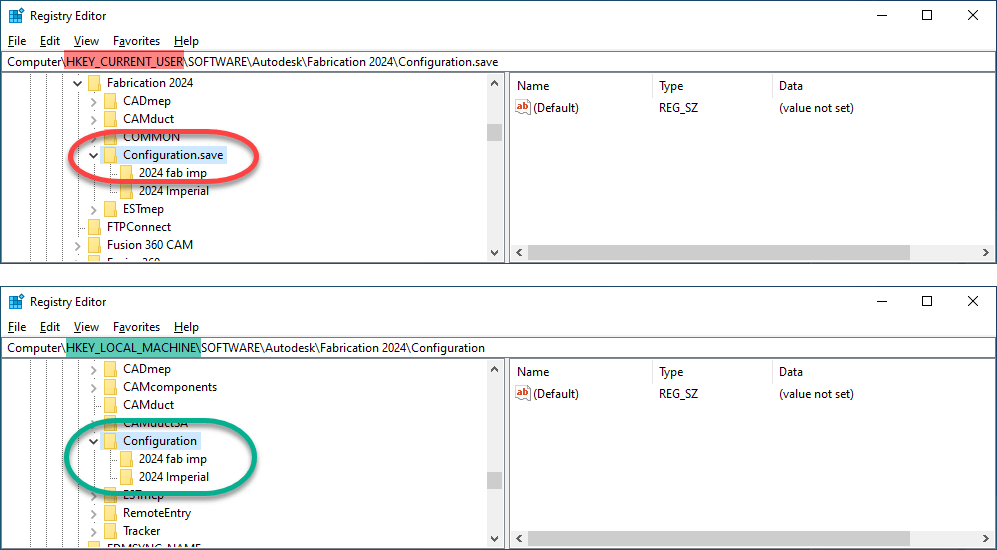
So first, you can run REGEDIT normally and rename the Configuration folder…or just delete it (if you’re comfortable doing so). Then close the Registry Editor and run it again but Run as Administrator. You can now Import the file you just edited to import those new Registry settings. The following image shows what both branches might look like…

Now, when you launch Fabrication (CADmep, CAMduct, ESTmep, etc.) you’ll see the little Yellow Lock icon on your configurations. Revit won’t show that little icon but it does honor the ‘User’ vs ‘Computer’ configurations.


A Word About Fabrication ‘Profiles’

One side effect of ‘Computer’ or machine based Fabrication Configurations shows up if you use Profiles in your Fabrication Configuration. It doesn’t apply to Revit but does CADmep, CAMduct and ESTmep. When you use Profiles with ‘User’ based Configurations, the last active profile will be the default when you launch the program again. With ‘Computer’ or machine based profiles, you’ll always default back to the Global profile.

However this is easily fixed. To start, let’s look at the ‘User’ based configurations under HKCU when a profile was used…

You’ll see there’s now an ActiveProfile value in the configuration that wasn’t there before. That’s how Fabrication knows which profile to load by default. But also remember, the HKLM branch of the registry is normally Read-Only. So this means those programs can’t create this value when you change profiles.

The solution to this, is making those registry keys Read-Write in the HKLM registry branch. You can do that by running REGEDIT as an administrator like before and navigating to the proper registry keys. From here, you can Right-Click on the Key’s name and select Permissions….

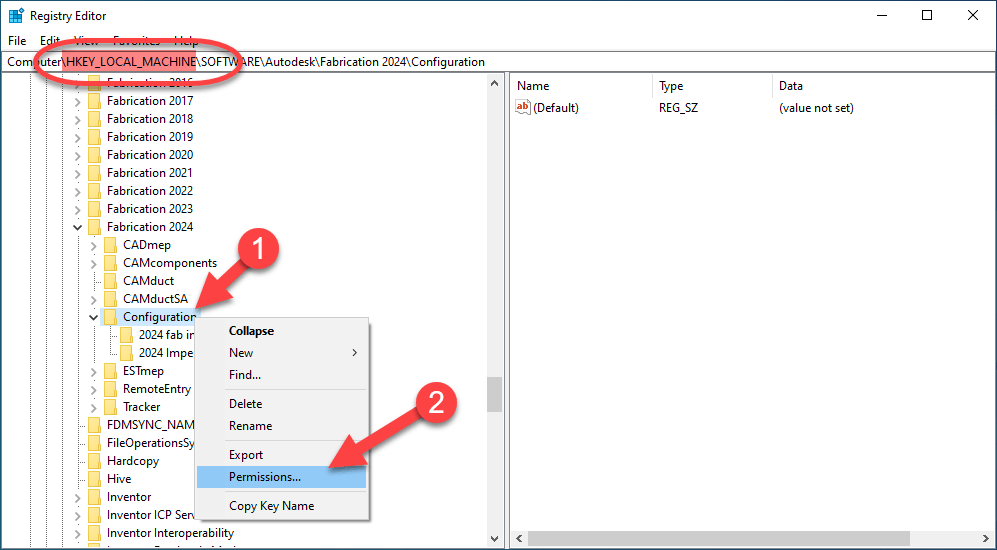
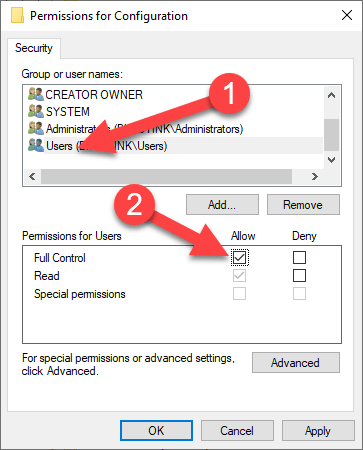
You can do this on a specific configuration or at the root Configuration key and the permissions will be inherited by the downstream keys. Once the Permissions dialog shows up, select the User permission group and select the Allow toggle for Full Control. Again, you may need your IT’s help if you don’t have permissions to do this.

This will now allow CADmep, CAMduct and ESTmep to save the last Fabrication Profile to the Registry in the HKLM branch so when you start the software the next time, it’ll be able to use the last Profile used.

One good side effect of changing these permissions…you’ll now also be able to import or create more Fabrication Configurations in HKLM in the future WITHOUT having to Run as Administrator as you’ll now have Read-Write permissions to those keys by default.

Make sure if you do these steps, to do them for all versions of Fabrication. You can even make entries for versions you don’t have installed so they work later if you install that version. So if you want to prepare for 2025 versions, you can copy/paste/edit those registry settings in the file you exported and rename them as 2025 (or older versions) all in the same file, Being proactive in this way will minimize future support downtime.

Autodesk Fabrication: Best Practice #5

Don’t Store Estimating Tables in Your CADmep Drawing

If your company uses ESTmep, pay close attention. CADmep stores in the DWG files most of your database with the exception of content that’s not used and reports. What this also means is that by DEFAULT, CADmep stores your Estimating Tables in every Drawing file (DWG) you produce. Most companies using ESTmep use 1.0 Factors for SMACNA, MCAA or other trade labor so exposing that data isn’t as big of a risk…everybody knows what it is. However, if you have pricing multipliers for your vendors, negotiated prices (as opposed to List Pricing) in your tables or have your own custom labor factors and rates, anyone with access to CADmep and your drawing files can EASILY extract that information from your DWG files,

This is easily changed by toggling the “Do NOT Store Est Tables with DWG Database” setting in the Edit Configuration utility as shown on the following image.

,

Setting this toggles will prevent CADmep from caching a copy of the Price Tables, Install Tables and Fabrication Tables in your drawing file, These are a few other things to note…

  • While this settings prompts you for which configuration to load (if you have more than one), the setting is not configuration specific. Meaning, it is not stored in your Fabrication Database. The setting applies to ALL configurations so you can pick any one you like to make this change.
  • This change is software VERSION specific. For example, if you run 20017 and 2018 versions of CADmep, you need to make the change in both versions.
  • This issue is NOT present when using Revit with Fabrication Parts. Only CADmep has this issue,
  • Because this setting isn’t stored in the database, that means it’s computer specific. You need to change it on each computer running CADmep.
  • This setting is also USER specific (stored in your Windows profile) so even if you change if for one user, if a different user logs in on the same computer, you’ll need to make the change again.

Because this setting is user specific and computer specific…and because the default setting if you do nothing is the RISKY option, it’s easy for this setting to revert back to it’s original value and save the Estimating Tables to the drawing. For this reason, you many want to consider creating an AutoLISP routine that sets this setting every time you start AutoCAD. You could also have it run from a Batch File or VBScript in the Windows Startup folder each time you log onto Windows or even have your IT Department force the setting via Group Policy or other methods. For any of these solutions, it’s as simple as automating the setting in the following Registry Key.

Key: HKEY_CURRENT_USER\Software\Autodesk\Fabrication 2018\CADmep
Value: StoreEstDatabase
Type: REG_SZ
Data: FALSE

If you’re interested in a sample LSP, Batch File and/or VBScript to set this, drop me an Email at Dyoung@Mcwi.Com.

CADmep User Specific Spooling

Autodesk Fabrication CADmep does a great job of spooling. One of the issues with spooling affects companies that have their configuration located on a network resource. More specifically, if your fabrication configuration’s MAP.INI file is located in a location shared by multiple users, as each user performs spooling, you they can over write the Spooling names/numbers because they are all reading/writing to the same SPOOL.INI folder which controls spooling settings.

One of the undocumented changes you can make is to have each user point to their own SPOOL.INI file in their own folder. This avoids and conflict when multiple people are spooling at the same time. To make this change, a simple registry edit is needed. Now, editing the registry makes a lot of users nervious if they’re not familiar with such hacks, but don’t worry. This registry edit is fairly safe if you’re careful and here’s why….

  1. You’re not editing an existing setting or deleting a setting. You’re adding a new setting. If you type something wrong, your system and software simply don’t find what they’re looking for and continue on their way.
  2. There’s a few main areas in the registry, the location you make this one is user specific and tied to your Windows profile. If it gets corrupt (unlikely if you’re careful) your company IT person can create a new Windows profile for you.

So let’s get started….

Do you need this solution?

The best way to determine if you need this solution is to look where CADmep is loading your configuration from. You can do this by looking at the path for the configuration you’re using. If your configuration path lists a shared location on your network, this solution may help you. If your configuration location is on you local drive like below, this solution is most likely of little benefit to you. This path is where your configuration’s MAP.INI file is located. The MAP.INI file is what tells CADmep where all the parts of your database are located. The same folder that holds this MAP.INI file is where the SPOOL.INI file is located by default.


Your Configuration selection dialog shows where the MAP.INI is located.

Here, you can see by default, the SPOOL.INI file is located in the same folder the configuration (MAP.INI file). If you don’t see a SPOOL.INI, you’ve likely never performed spooling or your systems had already been configured. When this location is in a shared network location used by many users, they all read and write from the same SPOOL.INI folder and this can cause conflicts if multiple people are spooling at the same time.


By Default, the SPOOL.INI is created in the same folder as MAP.INI.

Changing the SPOOL.INI location

To change the SPOOL.INI location, you need to edit the registry and create a new entry. Start the Registry Editor by pressing the Windows key on your keyboard and typing “Regedit“. This will call up the Registry editor. You’ll want to navigate to the following location…

HKEY_CURRENT_USER\Software\Autodesk\Fabrication 2018\CADmep

A few things to note….

  1. The HKEY_CURRENT_USER section in the registry is very similar to HKEY_LOCAL_MACHINE. Make sure you edit the HKEY_CURRENT_USER section of the registry as the other location will not work.
  2. The HKEY_CURRENT_USER section in the registry is User specific. Edits here will work for the currently logged in user. If another user logs into Windows on the same computer, this section will need to be edited again for the setting to apply to that user.
  3. This setting is also version specific. Change the “2018” in these examples to the version your you are using. If you are using multiple versions of CADmep, you’ll want to make this change for each version.
  4. This setting is global in scope for the user who’s currently logged into Windows when you make this change. It is NOT specific to the database configuration they are using. When you redirect CADmep to a new location for it’s SPOOL.INI file, it applies for any and all configurations that this user loads in that version of CADmep.
  5. The folder you specify must already exist. It won’t be created for you. You’ll get an error when spooling if this is the case.
  6. The SPOOL.INI does not need to exist, CADmep will make a new one using it’s defaults if there isn’t one already there. If you have one already setup, you can copy it to this location and CADmep will use it.

To change the location of SPOOL.INI location, create a String Value named SpooliniFolder (this is not CaSe SeNsItIvE). A string value will show REG_SZ in the type column. In the data column, you’ll enter the path where you want this particulars user’s SPOOL.INI file. You’ll want to make sure folders are separated by double backslashes or singe forward slashes. The path should also have the ending slashes. Here’s a quick chart of valid and invalid path formats for your reference.

Local Path formatUNC Path FormatValid Path
C:\MySpooling\\MyServer\Share\MySpoolingNo
C:\MySpooling\\\MyServer\Share\MySpooling\No
C:\\MySpooling\\\\MyServer\\Share\\MySpoolingNo
C:\\MySpooling\\\\\\MyServer\\Share\\MySpooling\\Yes
C:/MySpooling//MyServer/Share/MySpoolingNo
C:/MySpooling///MyServer/Share/MySpooling/Yes
C://MySpooling////MyServer//Share//MySpoolingNo
C://MySpooling//////MyServer//Share//MySpooling//No

When you are done, your registry should look like the following image.


Registry configured to redirect CADmep to a new folder for it’s SPOOL.INI.

Because CADmep read and writes to the SPOOL.INI file each time it spools, this is one of the few settings you can make that take effect immediately without having to restart CADmep. You can see the new folder and SPOOL.INI below after the chages have been made.


SPOOL.INI is now located in a new folder for the user currently logged into Windows.

Rethink what’s possible

Many of the companies I run into that do not have their MAP.INI file located on a network resource, keep it locally specifically because of issues like the spooling conflict with multiple users sharing the same SPOOL.INI. They often would like to have their MAP.INI are other setting located on a network to maintain consistently in settings and easy of support but don’t, viewing the tradeoff worth it to eliminate the spooling conflicts. If your Fabrication configuration points to a local MAP.INI, you may want to consider the above solution if Spooling conflicts was the reason for your current fabrication configuration setup.

Fix Install/Uninstall issues easily

Install and Uninstall issues are common. They can be difficult and time consuming to resolve. Often, the fix is worse then the problem. Autodesk has a number of Knowledge Base articles on the topic with a variety of tips and suggestions…

Installations
Uninstall

One of the best options that I’ve been typically going to right from the start due to it’s high rate of success is Microsoft’s “Fit-It” utility. You can access it from the following link and clicking the Download button.

Microsoft Fix-It

This downloads and saves a file named MicrosoftProgram_Install_and_Uninstall.meta.diagcab to your computer. When you double click this file, the program starts and as you work your way through the wizard, you’ll be prompted for which type of problem you want assistance with.

My experience had been that most Install issues are related to programs already installed incorrectly. As such, I find myself using the Uninstall option not only to resolve uninstall problems but also install problems by removing the problem programs and reinstalling those to.

Regardless of the option you choose, you’ll then be presented with a list of programs the utility finds. Select the one you think best and let the Fix-It utility do the rest. It’ll scan the registry for invalid or corrupt keys, fix if possible and even uninstall the offending program.