We’ve all been there. Moving our mouse around trying to find the pointer on the screen. This can be especially troublesome in a shop floor environment. Computer screens are small. Full of dust and dirt. Poor lighting and perhaps even a poor mouse surface. All of these factors can make use of a computer on as shop environment annoyingly painful.
Beyond the obvious improvements like a larger, regularly cleaned monitor and improved lighting, there’s a couple simple tweaks you can make to keep your staff providing value as opposed to looking for a mouse pointer.
Advanced Mouse Options
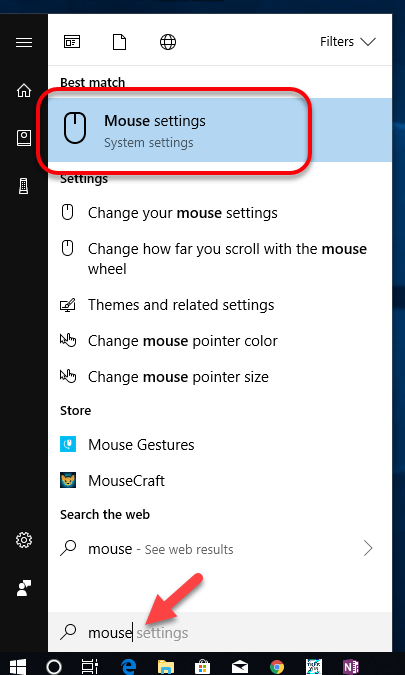
Using your Additional Mouse Settings, you can make a couple quick changes that will significantly improve the usability of a shop floor system. Simply press the Windows key on your keyboard and type Mouse.
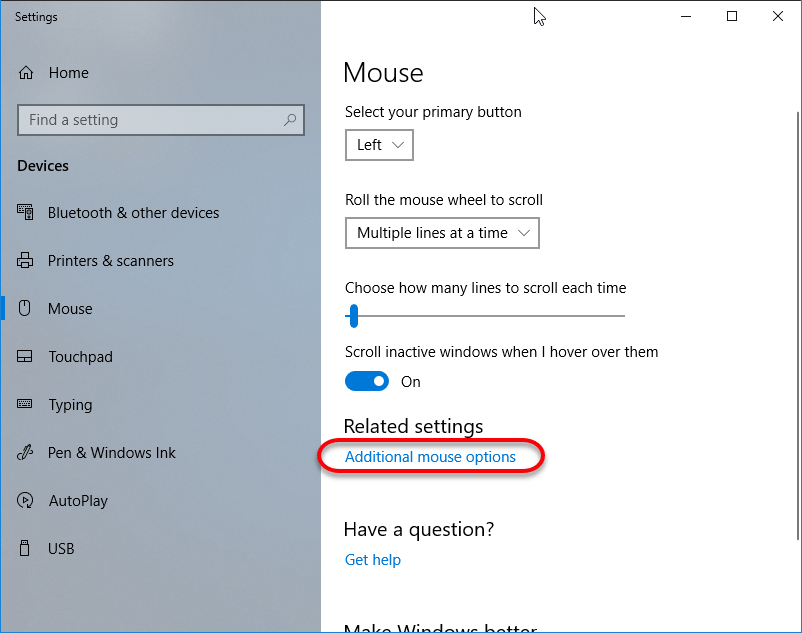
This should display the Mouse Settings option in the search results, that’s what you’ll want to click. This will bring up the Mouse Settings window. Here you’ll want to click the Additional Mouse Options link.
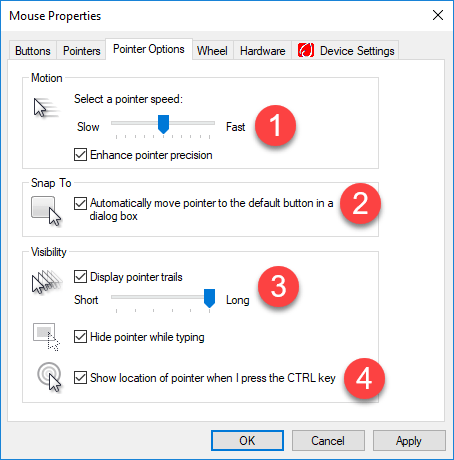
Now from the Mouse Properties dialog, there’s a few things, you should make adjustments to.
Select a pointer speed – You may want to turn down your pointer speed. It can be hard to find and track a mouse if it’s moving really fast.
Automatically move pointer to the default button in a dialog box – This setting may help depending on the software used on the shop floor. It may also be annoying. However, every time a dialog or window is opened, you’re cursor will be in a predictable location.
Display pointer trails – This leaves a few images of your cursor trailing around as you move your mouse. The longer the trail, the easier it will be to spot your mouse as you move it. Longer trails will have the most visibility.
Show location of pointer when I press CTRL key – You’ve likely seen this trick in software presentations. Press and release the CTRL key and a series of circles will radiate out from your mouse position.
A Word About Machine Controls
A lot of machines now are using Windows based controls. If these systems rely on the use of a Mouse instead of a touch screen, you may want to make these same changes. However these systems can often launch upon startup and make it appear you have no access to the Standard Windows interface. You can often simply plug in a keyboard and mouse into a USB port for quick access. You can then use standard Keyboard tricks to get you to a more familiar interface.
Press the Windows key on the keyboard to bring up the standard Windows menu.
Press Alt-Tabto gain access to other running or hidden applications.
If the control is running in Kiosk mode, you may not have access to the standard Windows options. In this case, press CTRL-ALT-DELETE to bring up the Task Manager. From the Task Manager, you can launch a new process or run a new program. You can simply type Explorer.exe and this will reload the Windows interface you’re use to allowing you to make the mouse changes.
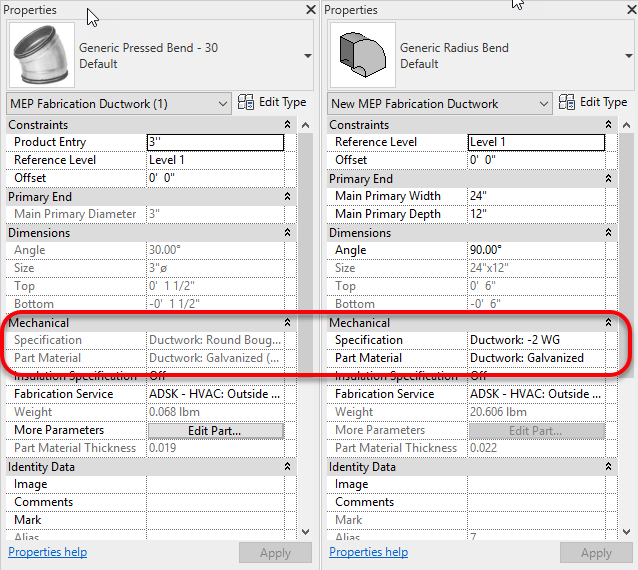
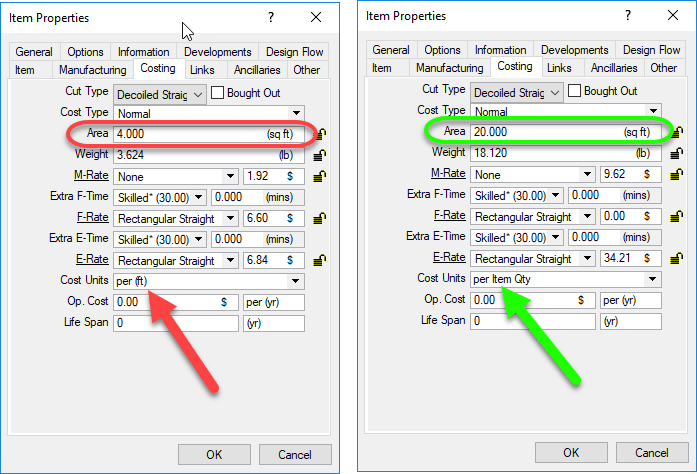
Fabrication Parts in Revit don’t always allow editing of their Material or Specification properties. Look at the below side by side images. Revit’s properties can be seen grayed out on the left but those on the right are not.
Material & Specification Properties – Left Read Only, Right = Read/Write
Revit can obscure the reason for this because you have no access to edit your Fabrication Database within the Revit environment. The answer however is quite simple.
Fabrication Parts with the “BoughtOut” property set do not allow editing of Material or Specification. After all, a bought item is typically static and can’t be easily changed. Non-BoughtOut items do allow editing of the Material and Specification properties.
The following is another side by side image of Fabrication Part properties. The properties on the left have the BoughtOut property set. The properties on the right do not have the BoughtOut flag set. While not accessible from Revit, any of the other Autodesk Fabrication products can display and edit the BoughtOut property.
Over the years, I’ve written a number of scripts helpful for managing an Autodesk Fabrication configuration. I’ve given them away in my Autodesk University session I’ve taught so they’ve circulated around a bit.
I’ve rewritten most, streamlined them, made enhancements, added others, etc, etc. Because I’m always updating and changing them, I thought I’d host them here too. I can then just post when I update them.
There’s are 2 sets of scripts covering the following topics…
Debugging Properties Scripts
Job Item Scripts
Library Item Scripts
One set is for use in 2019.0 and earlier versions (but work in any version), the others are designed for 2019.1 and later when Autodesk added support for the Pattern Number property.
You can get to the scripts from the menu or click here. The scripts are free to use for all except employees of ENGworks or anyone working on the behalf of ENGworks. (contractors, consultants, etc.) who are prohibited from use.
ActiveX is a framework developed by Microsoft in 1996 which adapts earlier concepts of COM (Component Object Model) and OLE (Object Linking and Embedding). Most people may think of this as Visual Basic (pre .Net era) programming.
This was supposed to fade away as Microsoft moved to the .Net based languages so Autodesk pulled support in the shipping versions of AutoCAD years ago. It was however still available as a separate download for a limited time but that time never arrived. Microsoft kept it around and still today, Autodesk supports VBA, a version of Visual Basic embedded within the Application over half a decade later.
If you’e not interested in programming AutoCAD in VB or VBA but do use AutoLISP, I’d encourage you to keep reading, this article is still for you.
Enabling VBA in AutoCAD
If you want to take a stab at VBA programming in AutoCAD, you’ll need to install the Visual Basic Extension. The extension can be downloaded for 2016 – 2019 versions of AutoCAD from this link….https://tinyurl.com/AcadVBAInstaller
Download the VBA Enabler for AutoCAD from Autodesk’s web site.
VBA Help for the AutoLISP Programmer
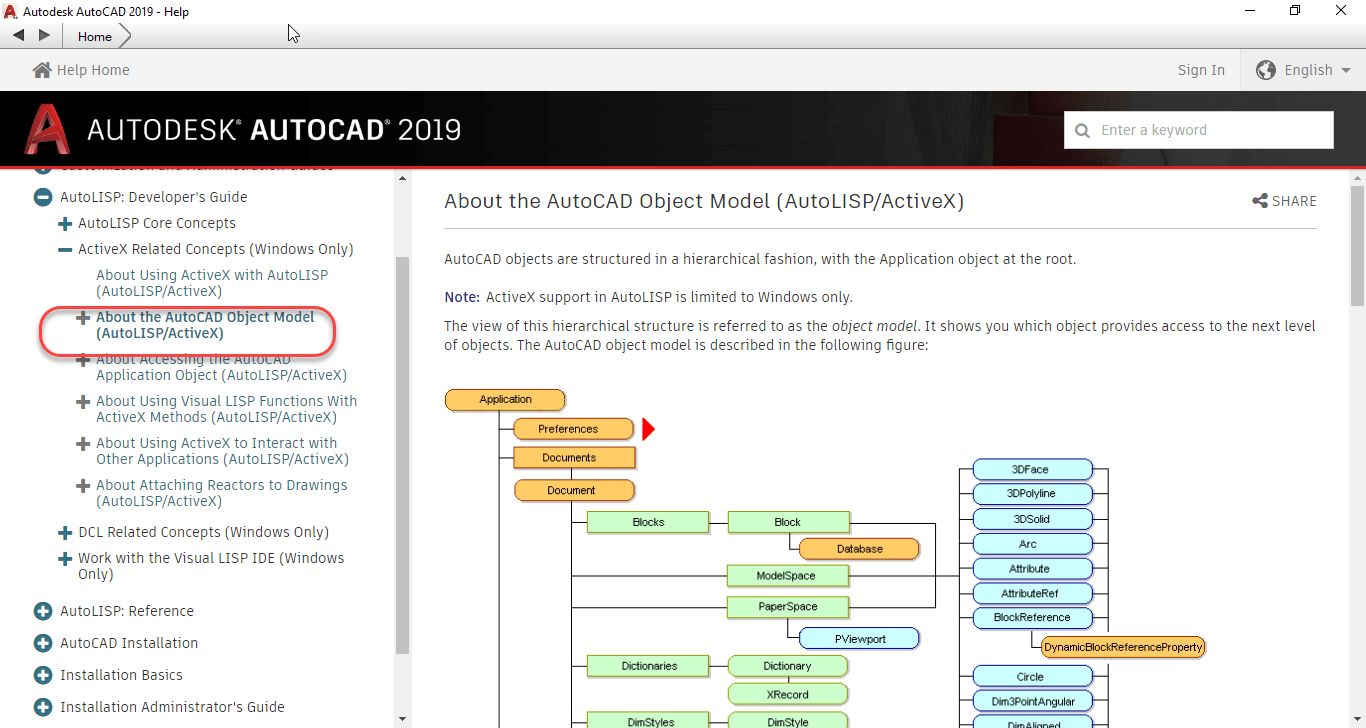
Now, with AutoCAD’s help now Online, you might be tempted to think that it’s the most robust help you can get from Autodesk. Simply typing “F1” will bring up AutoCAD’s help and browsing through the developer documentation, you can find documentation of AutoCAD’s ActiveX Object Model like seen in the following image.
AutoCAD’s ActiveX Object Model is buried in the AutoLISP documentation Online.
Looking at the above image, the graphic of the Object Model contains no hyperlinks. And there’s no documentation on the Methods, Properties and Events typically available for this type of programming.
If you’re programming in VBA, the VBA Editor has tools for helping navigate this model or provides a lot of Auto Complete functionality when typing code. This doesn’t help anyone trying to program ActiveX from AutoLISP.
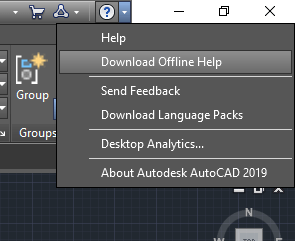
This is where the Offline Help comes in. You can access the OffLine Help download page from within AutoCAD by clicking the down arrow next to the question mark in the upper right corner of AutoCAD and then selecting Download Offline Help to download and install the help system.
Got to the Offline Help Download page from this menu.
You can also click the following link….https://tinyurl.com/Acad2019-OfflineHelp to go to the AutoCAD 2019 Offline Help download page as shown in the following image.
Download and Install Offline Help from this page.
Configuring Offline Help
Once installed, you can configure AutoCAD to use the Offline version of Help by typing Options at the command line and clearing the toggle in the following image.
Clear this Toggle to Default AutoCAD to Offline Help
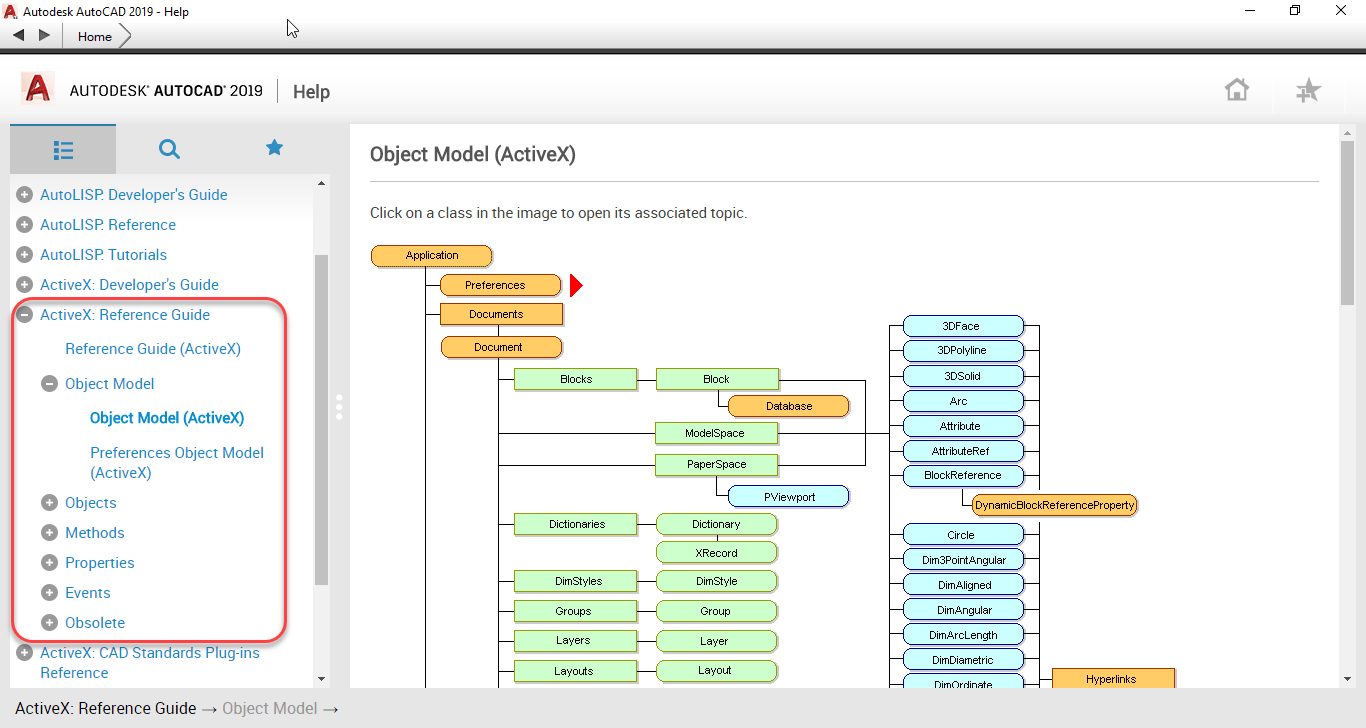
Once configured, typing “F1” will access the Offline help. One of several added pieces of Documentation which includes the ActiveX Developer’s Guide, is the ActiveX Reference Guide. You can see the graphic of the same Object Model documentation as before, but this one is hyperlinked to documentation of the Objects as well as lists all of the Methods, Properties and Events.
The ActiveX Reference Guide contain all the documentation you need for ActiveX programming.
While all of documentation is written with the Visual Basic programmer in mind, the organization of the ActiveX object model and everything else is where you can get all the documentation you need to help translate the function calls to their AutoLISP syntax. When you make a call to (vl-load-com) in AutoLISP, you have access to over 2000 additional AutoLISP functions with a VLR- prefix. These functions are all documented here in the ActiveX Reference Guide in Visual Basic syntax.
In a future post, I’ll explain how to translate the Visual Basic documentation to AutoLISP syntax. If you don’t want to wait, review the ActiveX documentation found in the AutoLISP developer guides…it’s all in there!
One Final Note: You do NOT need to install the VBA Extensions in order to program w/ActiveX from AutoLISP. Just install with Offline Help and you’ll have everything you need.
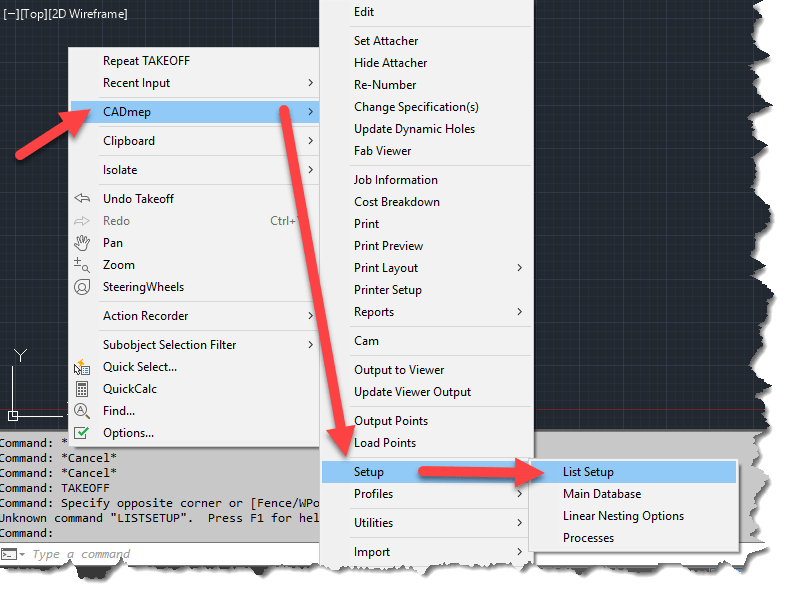
If you’re an AutoLISP programmer and use Autodesk Fabrication CADmep, you most likely know that there’s a COD Scripting language in Autodesk Fabrication that provides read and/or write access to CADmep properties. The problem with COD Scripts, is that sometimes they’re not powerful enough to do all of the other things you’d like to do and you may want to use AutoLISP.
What you may not know is that you can access the vast majority of CADmep properties from AutoLISP. To so this, you need to configure CADmep’s List Setup dialog which will provide a light weight but similar interface to what you see when you build reports in Autodesk Fabrication.
To access List Setup, right-click in an open area or the drawing editor and then select “CADmep” -> “Setup” -> “List Setup” from the menu.
ListSetup will Provide access to CADmep Properties
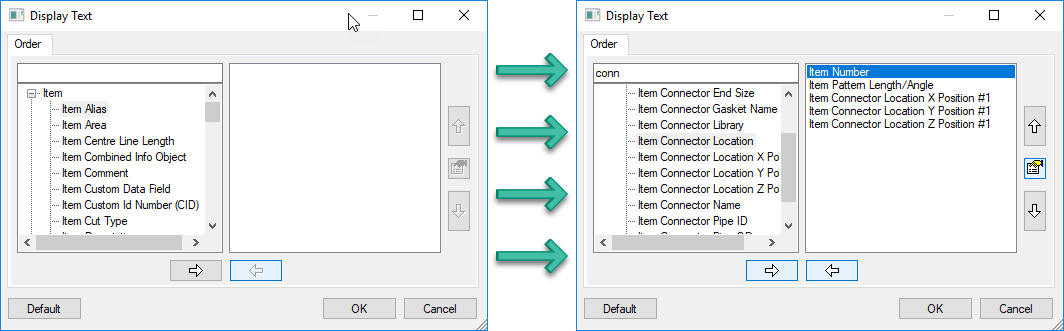
Configuring List Setup will provide access to the configured properties via DXF codes which are one of the most common ways of accessing object properties in AutoLISP. (You can also access these same DXF based properties via VBA, ARX or .Net)
The following image shows the List Setup dialog before (left) and after (right) being configured. Simply add the properties you want to extract in the order you want them.
Before and After Configuration of List Setup
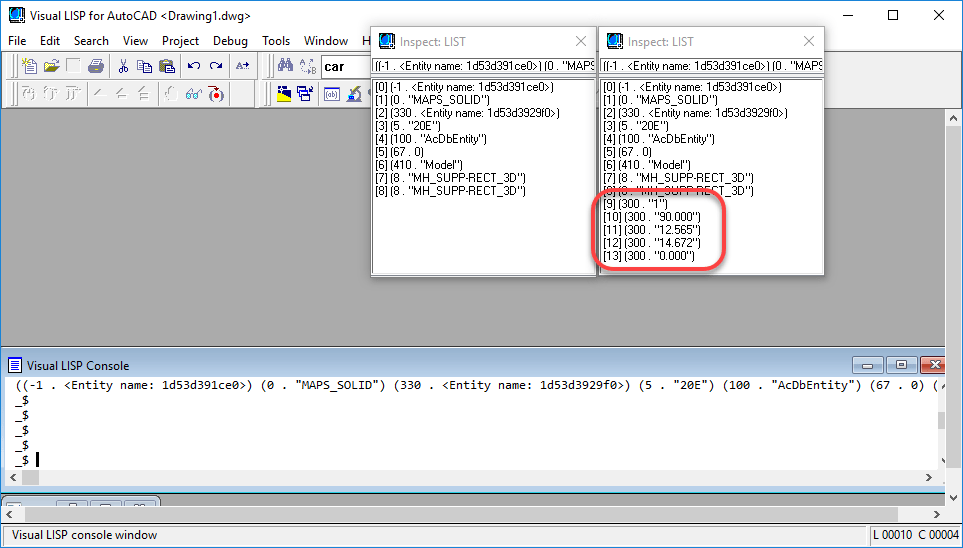
Once you’ve configured the properties you want, a simple call to the (ENTGET) function in AutoLISP will return the data you’re looking for. You can see in the following image, that we’ve saved the DXF data to two different variables in the VisualLISP editor. The listsetup-blank variable (left) was done before configuration and the listsetup-config variable (right) was done after the configuration of List Setup.
CADmep Properties can be Found in the 300 DXF Group Codes
The code used to extract the data is the following….
Because the VisualLISP editor does not word wrap it’s results, you can use the Inspect
Now, there are a few things to know about this method….
All CADmep properties show up in DXF Group Code 300. If you are returning multiple properties, you’ll have multiple 300 codes to parse through.
The order the properties are configured in List Setup is the order the properties will appear when returned in AutoLISP. There really is no other foolproof way of knowing which codes are which properties (unless obvious by their value) without knowing the order List Setup was configured.
If you later change the properties or their order, you’ll likely break your existing code. Think carefully about what you may want later and add it from the start even if you don’t want it at this time. If you need to add properties later, simply add them to the end of the list.
This method works well for reading Fabrication properties. It doesn’t allow you to set them using functions like “(ENTMOD)” or “(ENTUPD)“