Autodesk Product Install Order

Back in the day, I briefly worked for an Autodesk reseller. This particular reseller was classified as an “Education Reseller”. In short, this meant they were one of a few resellers that sold Autodesk products into the educational market (high schools, universities etc.).

As you can imagine, a school would likely have most of not all the products. Back then, Autodesk provided a complete list of all the products and their recommended install order. Fast forward to today, they’ve either gotten incredibly lazy or in all their massive layoffs over the years, the domain knowledge is gone. I suspect both.

Autodesk’s Recommendation

Take a look at Autodesk’s current recommended install order from this link. which was last updated 6/6/2018 at the time of this writing. In the event the link changes, here’s what they say…
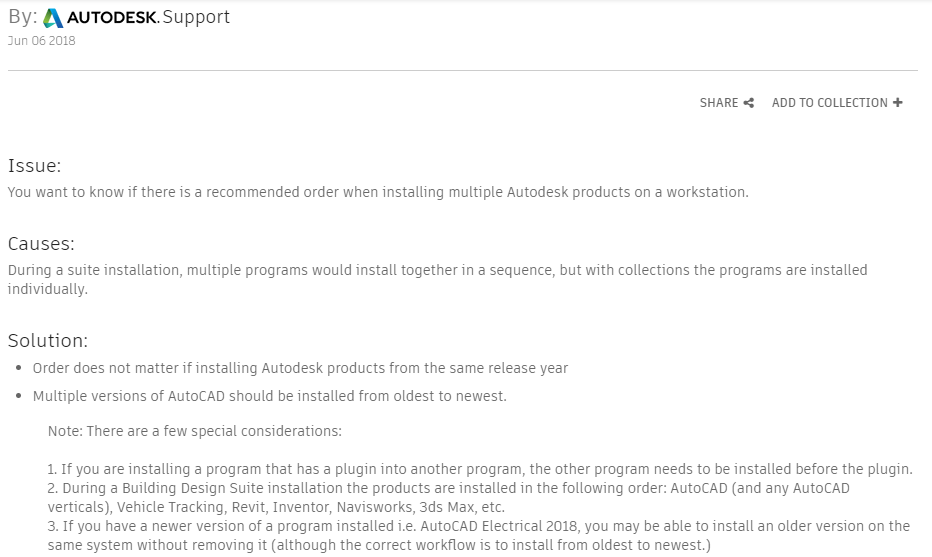
What’s wrong is that they tell you within the same product year, the install order doesn’t matter. This is outright false for many reasons. They try to note a couple “exceptions” stating that if there’s any add-ins, the base product should be installed first. But which products have add-ins to what other products?

CADmep is obviously running on top of AutoCAD so AutoCAD should be installed first. That seems obvious. But Navis also installs Exporters depending which products it finds and it doesn’t always show up in an Add-ins tab. So this is less obvious. Buy there’s also other dependencies that are even more obscure. Should you install Revit or Inventor? Should either go before or after 3ds Max? This is less obvious to most users.

This is really why someone would ask that question. It’s a real dis-service then to start out telling them it doesn’t matter. In fact, it matters most of the time, and it doesn’t matter as the “Special consideration”.

Determining The Real Install Order

There’s a few ways to handle this. If you’ve been around a while and had one of the old “Design Suites”, install in the same order as the Design Suite did. But note that this did change between product years and types of Suites. Plant Deign Suite 2013 for instance installed Autodesk before Revit where as Building Design Suite 2016 installed Revit before AutoCAD.

One of the other ways is to look at the install media folders to see if you can find any dependencies. Take for example 3ds Max. Look in the x86 or x64 folders and you’ll see references to Revit and Inventor.
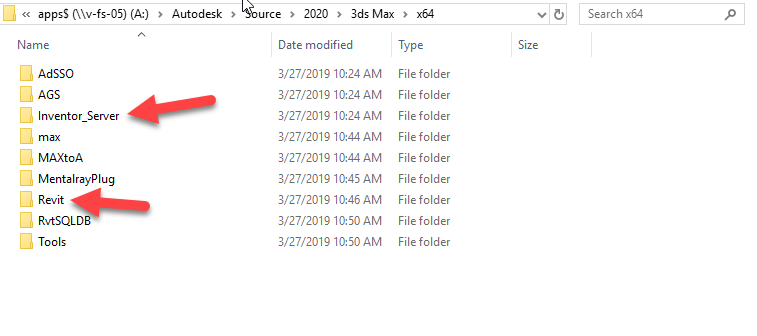
This means we should install Revit and Inventor before installing 3ds Max. But what if we’re using both Inventor and Revit? Which of those goes first?
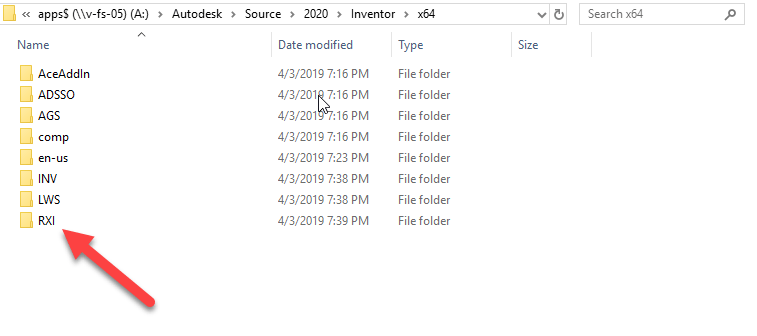
You’ll see the RXI folder in the install files. Hard to tell what it is. When you drill into the folder, there’s just a single MSI. If you right-click on it and select Properties and do to the Details tab, you can see it’s Revit Interoperability for Revit. Other folders deeper in the structure also confirm this by their naming,
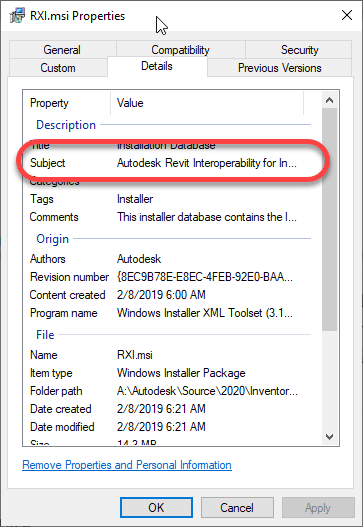
Based on this findings, it suggests installing Revit first so Inventor can see it and install the Interoperability tools.

Here’s My Order

So, if you’re an Autodesk Fabrication user, here’s what I typically do (and why)….

  1. Revit (doesn’t seem to depend on anything else)
  2. AutoCAD (I can’t find a dependency for AutoCAD. But anything with an Object Enabler will want it here and it’s a core product so as a matter of safety, I install it early just in case)
  3. AutoCAD based Verticals like MEP, Arch, etc. (These use AutoCAD as its core. I’ve not checked dependencies between verticals but it’s likely safe to install them in any order. I usually do Arch first if I’m going to include it as MEP is built on top of Arch but it’s really not needed as MEP installs what it needs)
  4. Inventor (because of the Revit dependency covered earlier)
  5. 3ds Max (because of the Revit/Inventor dependencies)
  6. Navis – Freedom/Simulate/Manage (Navis exporters only install for products already installed so we install this toward the end)
  7. Fabrication CADmep (allows CADmep Object Enablers to install for Acad, Navis, etc.)
  8. Fabrication – EST/CAM/etc. (order doesn’t matter)

If there’s anything on the list you don’t use, just skip it. If you happen to install Navis before some of the dependent products, just use “Add/Remove Programs” in Windows Control Panel to modify the install to include new exporters or download the Exporter installs separately from Autodesk’s web site.
What Does COST TYPE do on ITM Content?

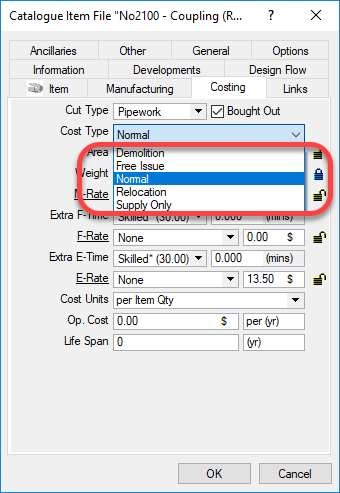
When you build Autodesk Fabrication content, you may have noticed one of the properties “Cost Type“. You can see this setting is shown in the following image. 

If you do some searching online, you may run across an explanation for some but not all. As Autodesk explains in it’s online help….

  • Normal – Reads the MaterialFabrication, and Installation tables to generate costs of all materials, fabrication labor and installation labor.
  • Supply Only – Reads the Material and Fabrication tables to generate the same costs of material and fabrication but NOT installation. (You’d typically use this if you are fabricating for others outside your company.)
  • Free Issue – Reads only the Install table when calculating costs.

This leaves two remaining values that can be set. These are not documented by Autodesk. These two serve the same purpose…

  • Demolition – Used as a filter for Labor table value sets
  • Relocation – Used as a filter for Labor table value sets

Using these values would allow you to build a labor table for relocation that would include uninstall and reinstall time. You could also use the demolition value to build a labor table for removal only of an item. 

While you would think these only would apply to an install table, these filter values are also available for the fabrication table. At the very least, this opens up the possibility of using it in creative ways to serve whatever purpose you like.

Autodesk Fabrication: Best Practice #4

Make sure ALL of your ITM content has a Database ID assigned to it.

A database ID is a unique identifier for content. There should be a single Database ID for any ITM that is NOT Product Listed. For Product Listed ITM’s, there should be Database ID for each entry in the product list.

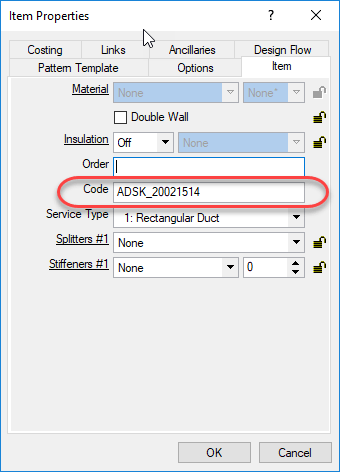
For ITM’s that are not product listed (typically fabricated sheet metal fittings or other content where the ITM only represents one size, you can put the Database ID in the “Code” field of the ITM Properties as shown in the following image…

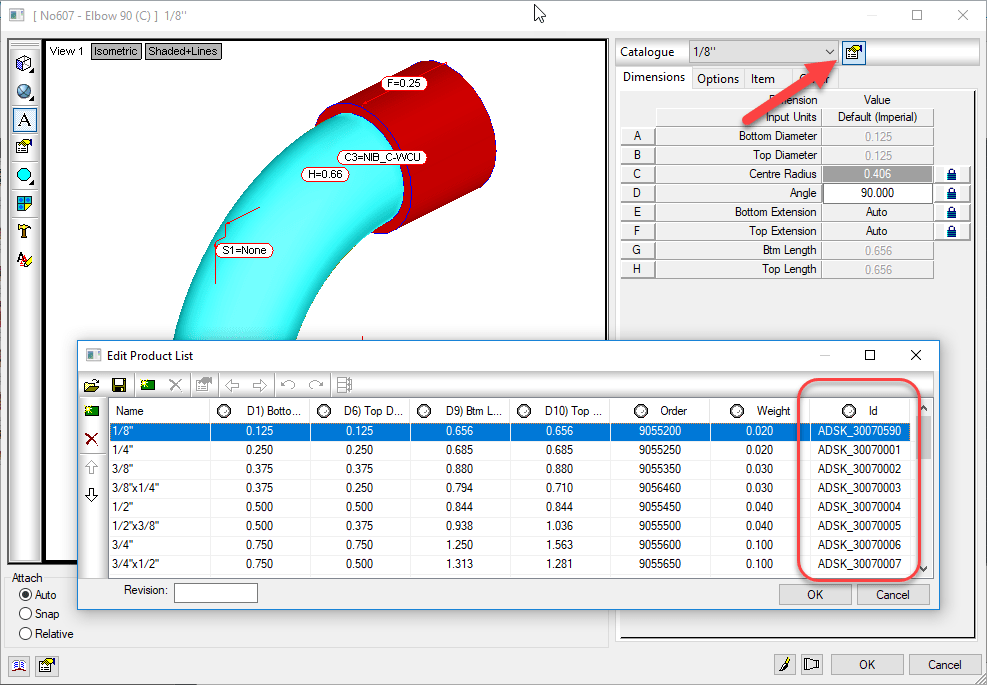
For ITM’s that are Product Listed, the Database ID should be in the ID column of the Product List. When you place an instance of a product listed ITM in your model, you select a size from the product list, When you select that size, the Database ID associated with that size it automatically entered into the Code field of the ITM Properties like shown earlier, The following image shows the Database ID column in a Product List…


Why Use A Database ID?

The Database ID is a useful component to managing an Autodesk Fabrication configuration. This Database ID can be referenced by other aspects of Autodesk Fabrication should you choose to use them. The Database ID is what can link your content to….

  • Price lists
  • Fabrication Labor
  • Installation Labor
  • Product Information (ProdInfo)

Even if you don’t use ESTmep for estimating  and don’t want to use the Price and/or Labor features of the database, Product Information is tied to the Database ID and is used to store additional meta data about your content like Manufacturer, Size, Description, etc. Even if you’re not using ProdInfo now, it’s still a good idea to use Database ID’s because adding them to the content is the most time consuming part. It’s easy to add them when building content, more cumbersome later after the fact. If all your content had Database ID’s assigned, it’s much easier to implement ProdInfo, Price and/or Labor later down the road.

The following Video shows how to access the Database ID of Product Listed and Non-Product Listed ITM’s. It also shows you 2 different sizes of a product listed ITM in a drawing and how Autodesk Fabrication automatically assigned the Database ID from the Product List for the corresponding size into the Code field of the ITM Properties.


Key Database ID Takeaways

Here’s a few pointers when working with Database ID’s:

  • Each Database ID should be unique and not assigned to other content or sizes.
  • Managing Database ID’s using a spreadsheet or other database makes managing them much easier.
  • Your database ID can be anything you want but should have some sort of naming standard associated with it.
  • Your Database ID Naming standard can be as simple as a prefix followed by incremental numbers to something complex with special codes and formatting to indicate other aspects of your content. (e.g. Valves, Pipe, Sheetmetal, etc)
  • You can use Autodesk or other Vendors ID’s if they already have them assigned and use your for anything you create or replace them all with your own company Database ID’s if you are particular about naming standards,
  • Don’t reuse ID’s if the content that once used them is now obsolete. Legacy/Archive drawings still reference these numbers. Simply flag them as being obsolete in the Spreadsheet you are managing them with.