Autodesk Fabrication: Connector Matching – The Feature Nobody Knows About & Why You Should Use It.

Do you know what ‘Connector Matching’ is as it relates to Autodesk Fabrication? It’s been in the product since the 2020 release. Yet most people I run into have no clue what it is.

There’s a good reason for that. It’s hidden from view. That is to say, there’s a good reason you don’ know about it. There’s no good reason it’s hidden from you besides Autodesk is pretty slopping (lazy?) when it comes to product design in recent years.


What is Connector Matching?

Connector Matching only works in Revit w/Fabrication Parts. If you’re not using Revit, you need not worry about it but setting it up won’t cause any issues either. It’s designed to place a matching connector on pipe after you cut in a fitting when modeling in Revit. CADmep, ESTmep and CAMduct will simply ignore the settings.

As an example, if you’re drawing a welded piping system and want to break it with a Grooved coupling, Connector Matching places the proper grooved connector on the end of the pipe when the Coupling is placed. This helps us build a system with Welded Pipe Spools that’s assembled in the field with Grooved Couplings…a very common activity in mechanical construction.
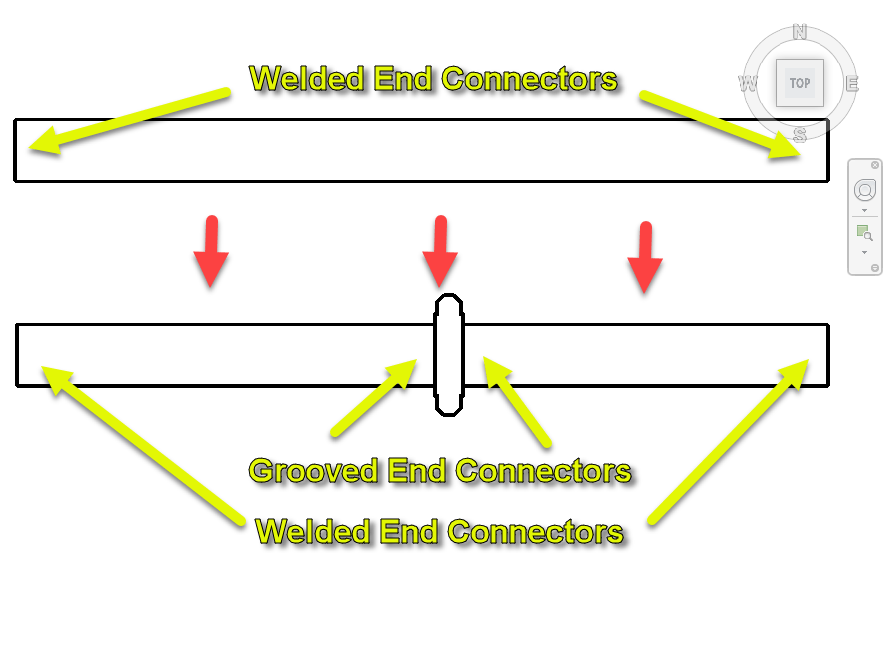
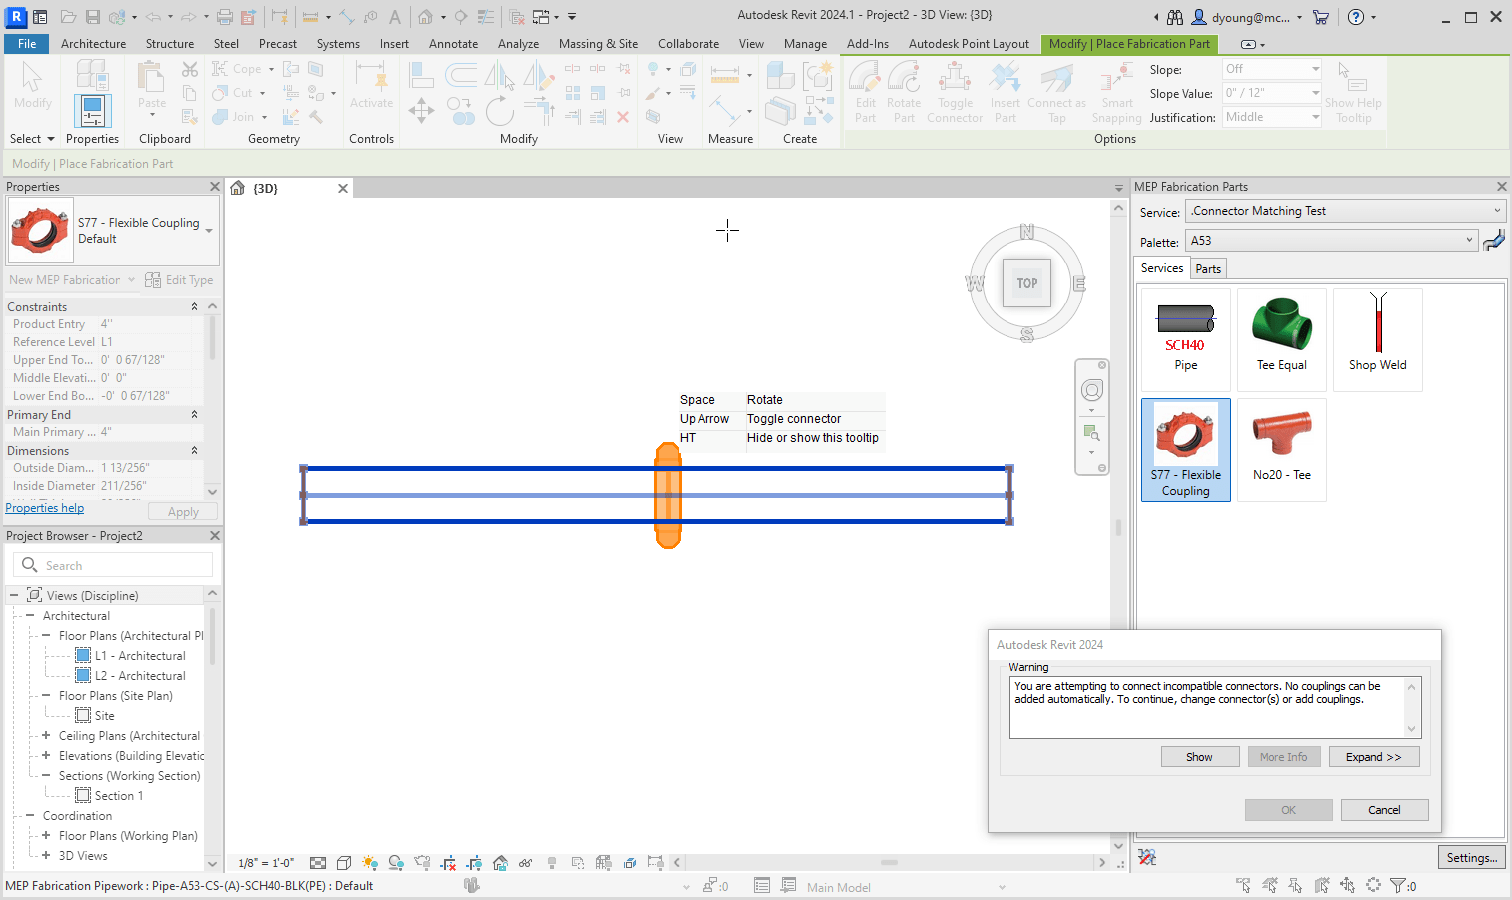
When Connector Matching isn’t configured, you’ll have issues cutting in things like a Grooved Coupling into a Pipe that’s part of a welded system.

Configuring Connector Matching

The reason many don’t know about connector matching is because it’s hidden. None of the 3 views (Manufacturing, Costing & Drawing) display this option.
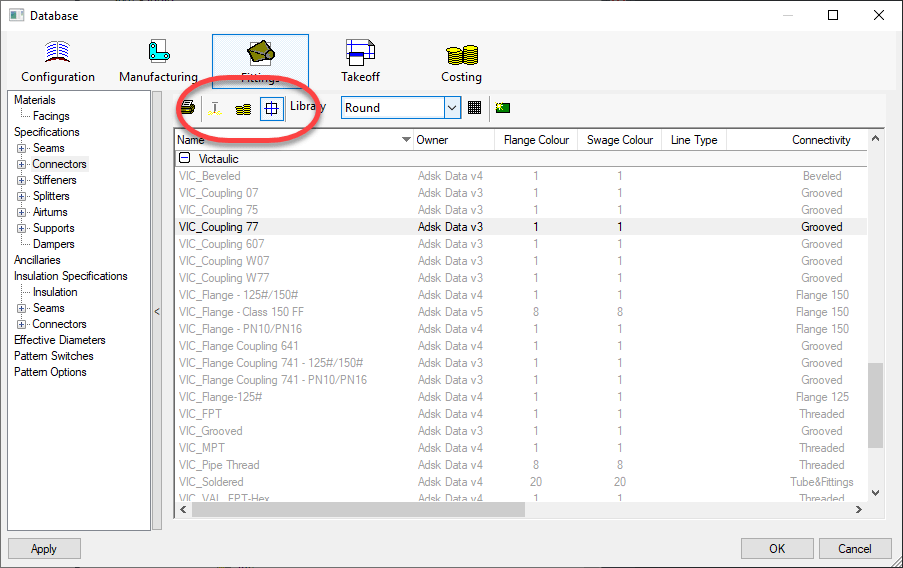
To set Connector Matching, you Right-Click on a connector that’s configured for the Item you need to match. In this case, it’s a Victaulic 77 Coupling.
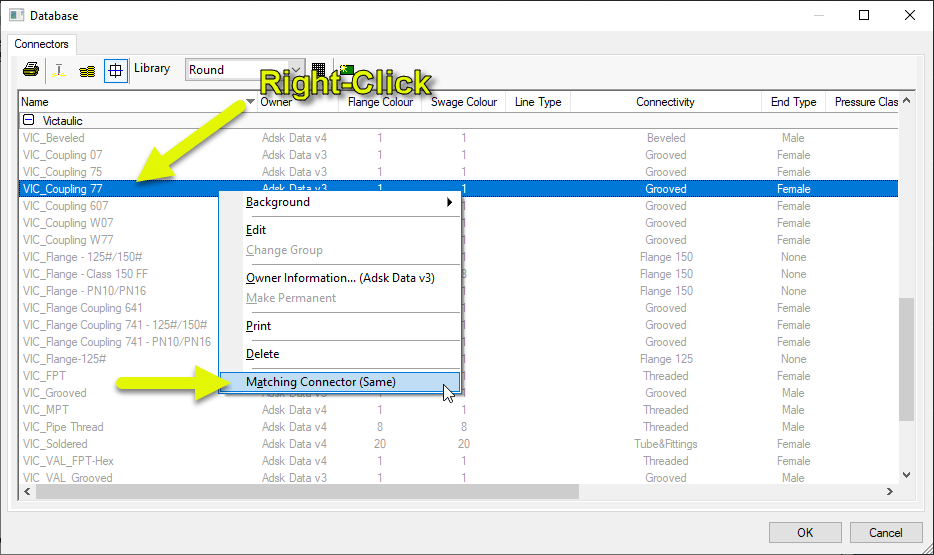
You can see the Matching Connector is set to “Same” by default. That’s certainly not what we need so select that menu option.
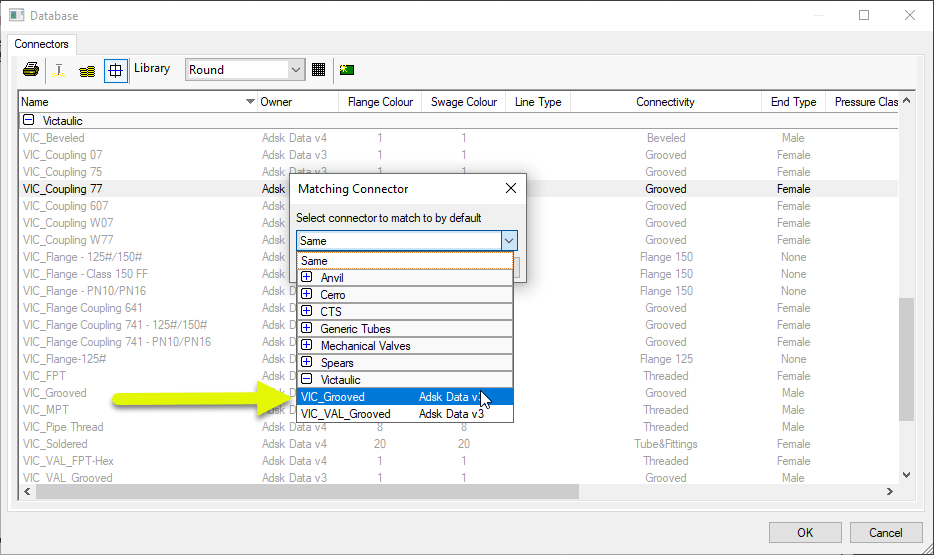
You can see now the Matching Connector is set to a Grooved Connector. So every time an Item with the “VIC_Coupling 77” connector is cut into a piece of pipe, the pipe will get a “VIC_Groove” connector.


Added Configuration to Make it Work

Above, you set the matching connector. Unfortunately, that’s not enough. There’s some added configuration to verify to ensure that it works.

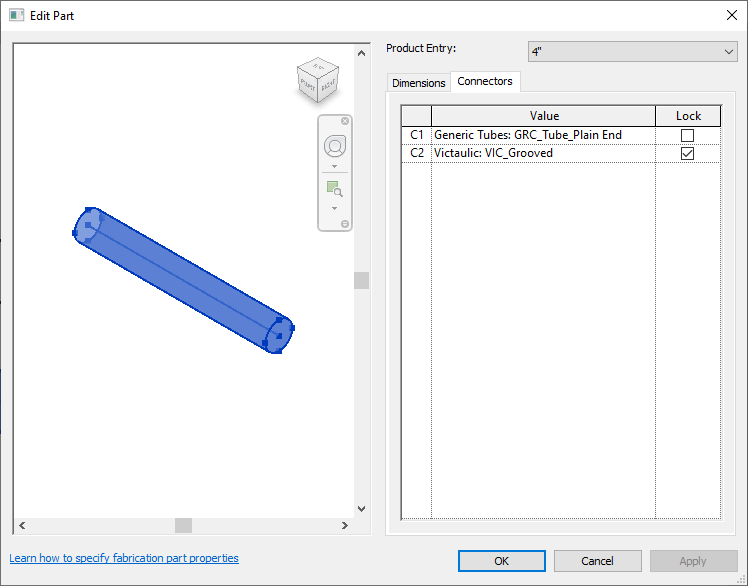
One of the requirements of Connector Matching is to make sure the Pipe’s Connectors are NOT locked and defaulted to the connectors they should use. In other words, ‘Set’ but not ‘Locked’.

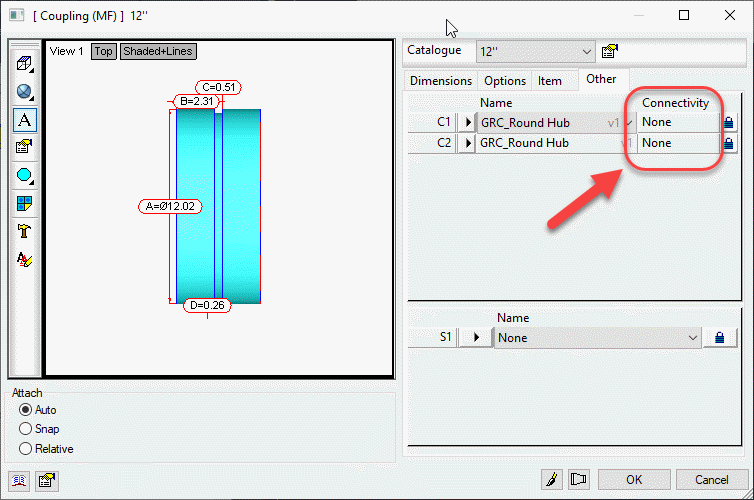
Here’s what your Pipe ITM most likely looks like…
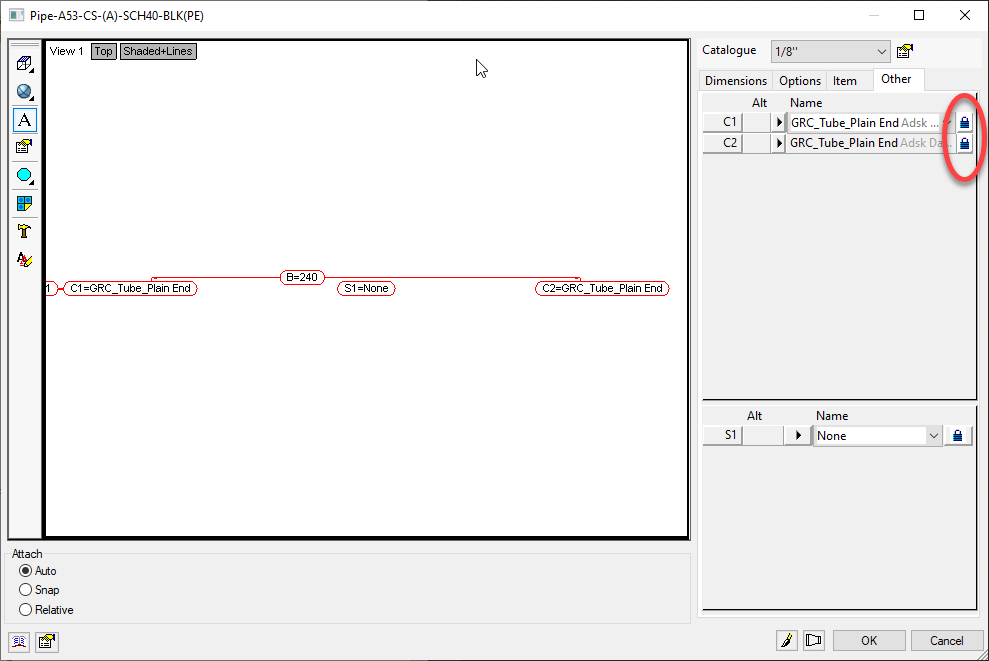
What I recommend here is, Unlocking only 1 of the Connectors and Clicking OK. After you do that, go back and edit the ITM again and take a look at the Connectors.
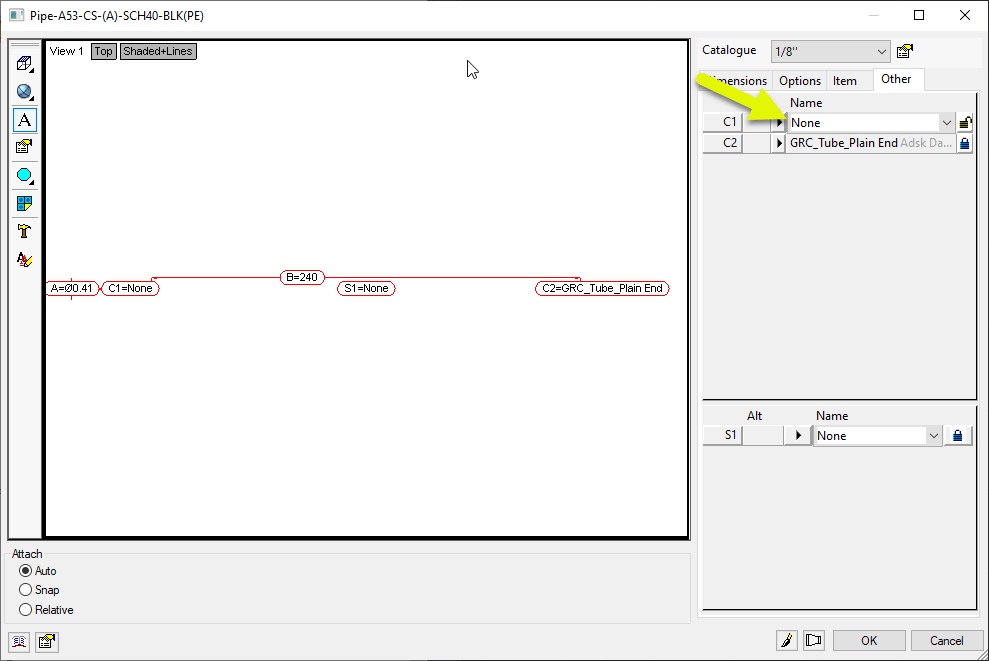
You can see here that after Unlocking one of the Connectors and Clicking OK, going back to edit the ITM the Connector changed to “None”. This is a tell tale sign that there’s yet another thing you have to change to make it work.

In some Configurations, people have the Specification set to drive the Connectors. This is most commonly done for Sheetmetal but you see it in Piping as well. In the following image, the Piping Specification is configured to set the Connector to “None”.
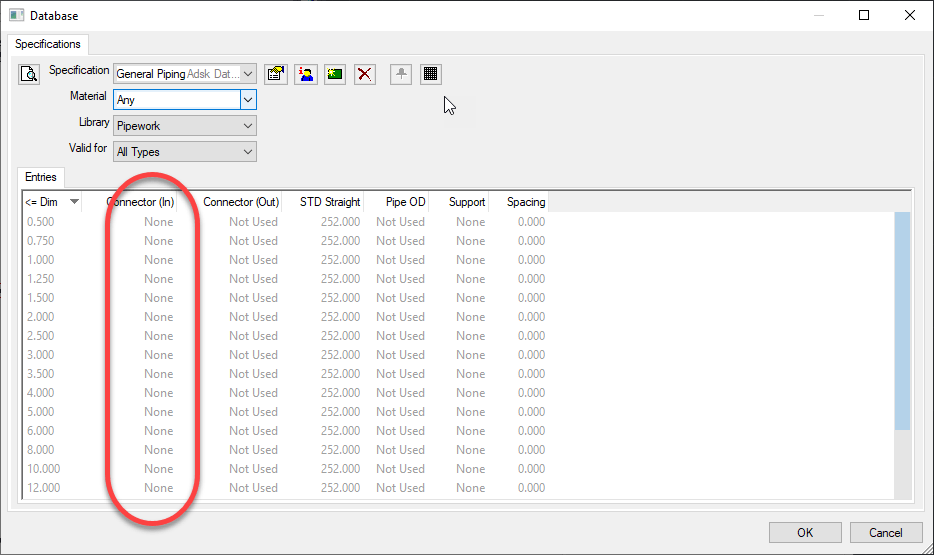
What we need to do here is set the Connectors in the Breakpoints to “Not Used”. Note, if the Connector you unlocked earlier didn’t change to something other that what it was, you most likely don’t have this issue but still could…it could just be configured to use the Connector the ITM was set to.

You might have to hunt around for which settings apply. It could be on the ‘Any’ material or a specific material the ITM is using. The ‘Valid For’ could have it in ‘All Types’ or ‘Straights Only’. It’s possible too that you don’t have any breakpoints in the Specification at all. If that’s the case, then your Specification is likely already good. But if it’s not, simply ensure the Connectors are all set to “Not Used”.
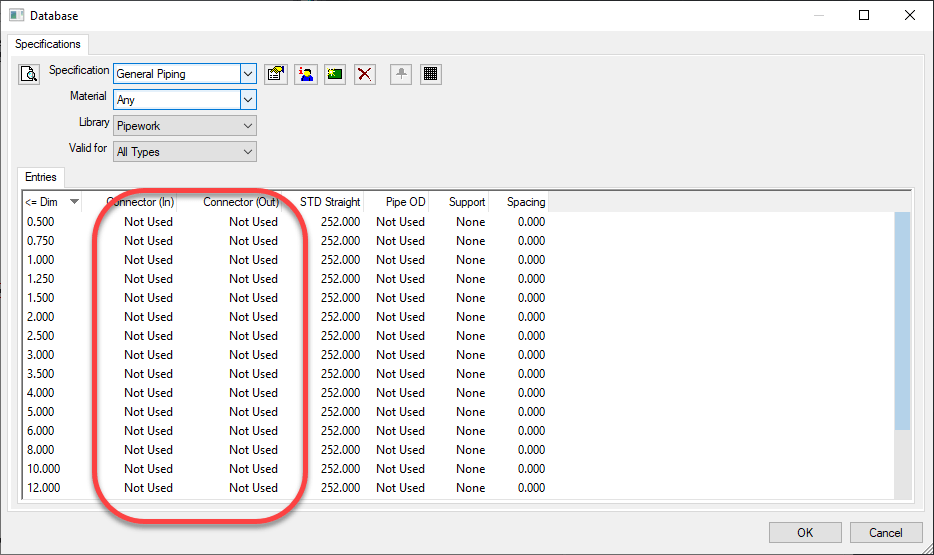
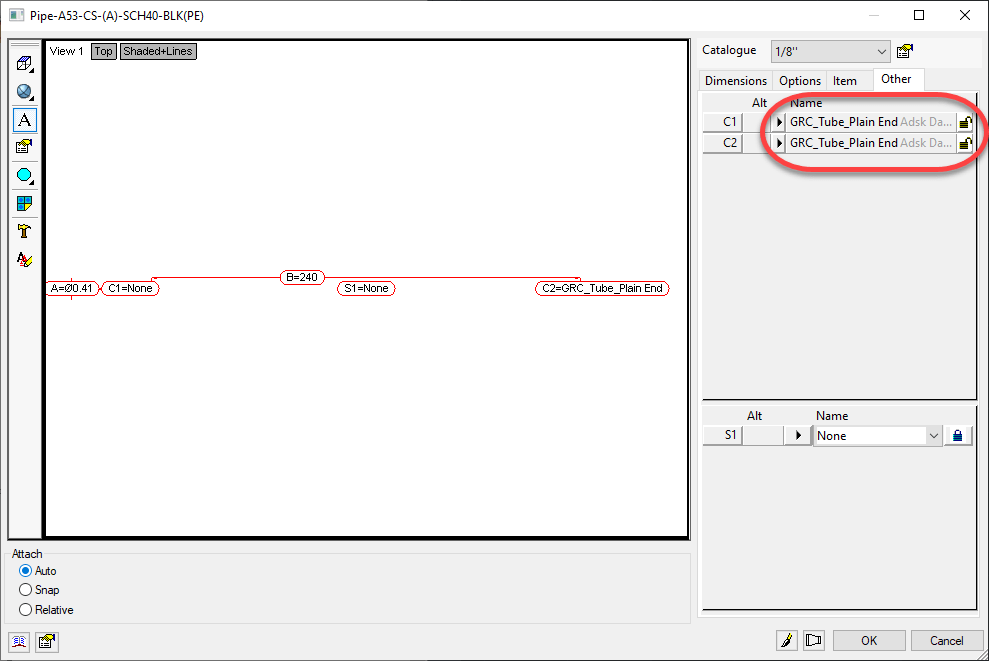
Once your Specification is setup correctly (if it was a problem in the first place) you can go back to your ITM for the pipe and unlock both connectors but leave them set to the Connector it typically uses.
Once everything is set properly, Revit will then let your Grooved Coupling be placed in the run of pipe.
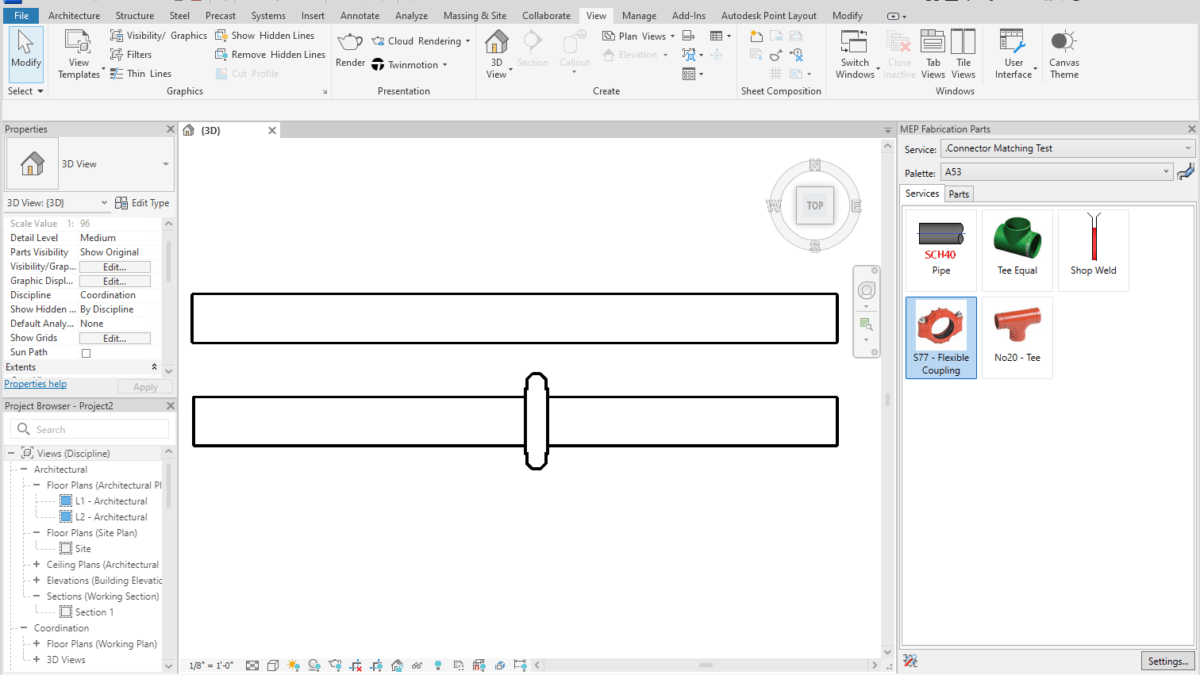
If you Double-Click on one of the pieces of pipe, you can see the Connectors are now set to a Groove for the end where the Coupling is.

A Final Word

Note that these settings were added in 2020. If you’ve had your Database configuration a long time, they’re likely not set. Even Autodesk’s ‘Out of the Box’ configurations that shipped with 2024 don’t have these set. So you’re pretty much on your own to make it work.

If you do ANY Administration of your Database Configuration in 2019 or earlier, these settings will be lost. As I’ve advised many times earlier, pick a version for Administration and stick to it. If you have Admin permissions and use 2019 or earlier, all those settings get lost and because they’re not displayed, you won’t really know.

You can use these settings for all kinds of things. They don’t have to be limited to Grooved Couplings. Changing the end of Steel pipe to Threaded when Cutting in a Threaded Coupling, Threaded Adaptor, Threated Tee, Threaded Valve, etc. All of these things should have their connectors looked at and Matching setup. Just about any of those types of fittings in all materials should have Matching set.

Hope this helps improve your Revit workflow.
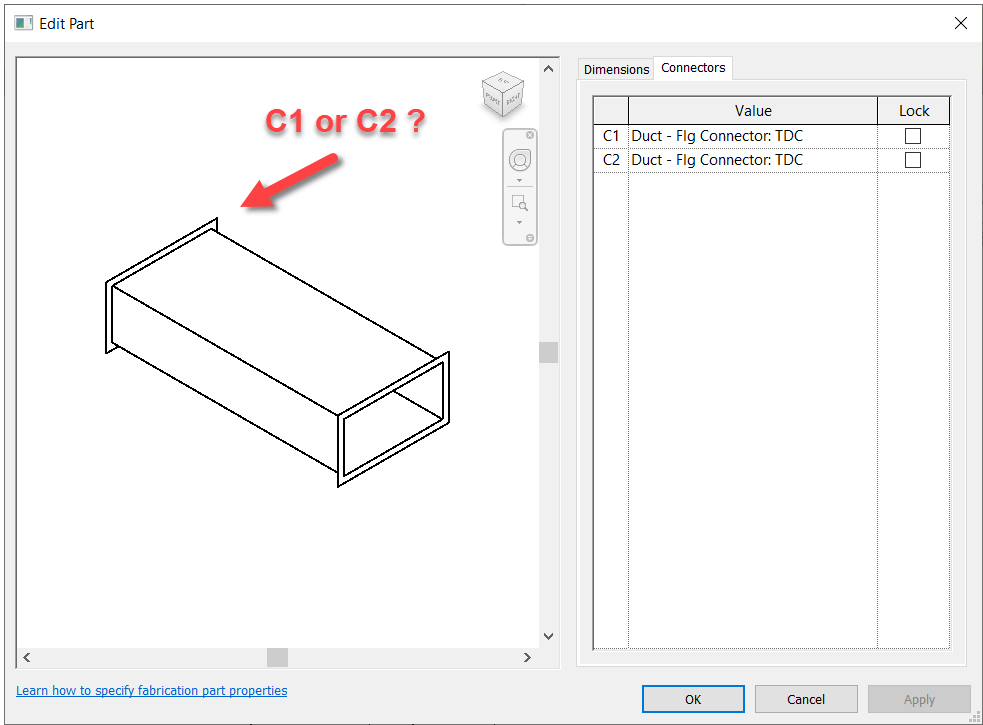
Autodesk Fabrication – Determining C1/C2 Connectors in Revit

Fabrication Parts in Revit allow you to edit their connectors just like in CADmep. However, unlike CADmep, you can’t simply hover over a connector to determine if it’s C1 or C2.

So if you need to change a connector, you’re essentially guessing which one to change. Trial and error is at best 50% unless you’re lucky.

So how can you improve this “guessing” based workflow?

Thankfully I have a great network of people smarter than myself. I often get the credit for sharing the information but really, the credit belongs to those who show me. In this case, two of my industry friends showed me ways to improve the odds.


Method 1 – Slope

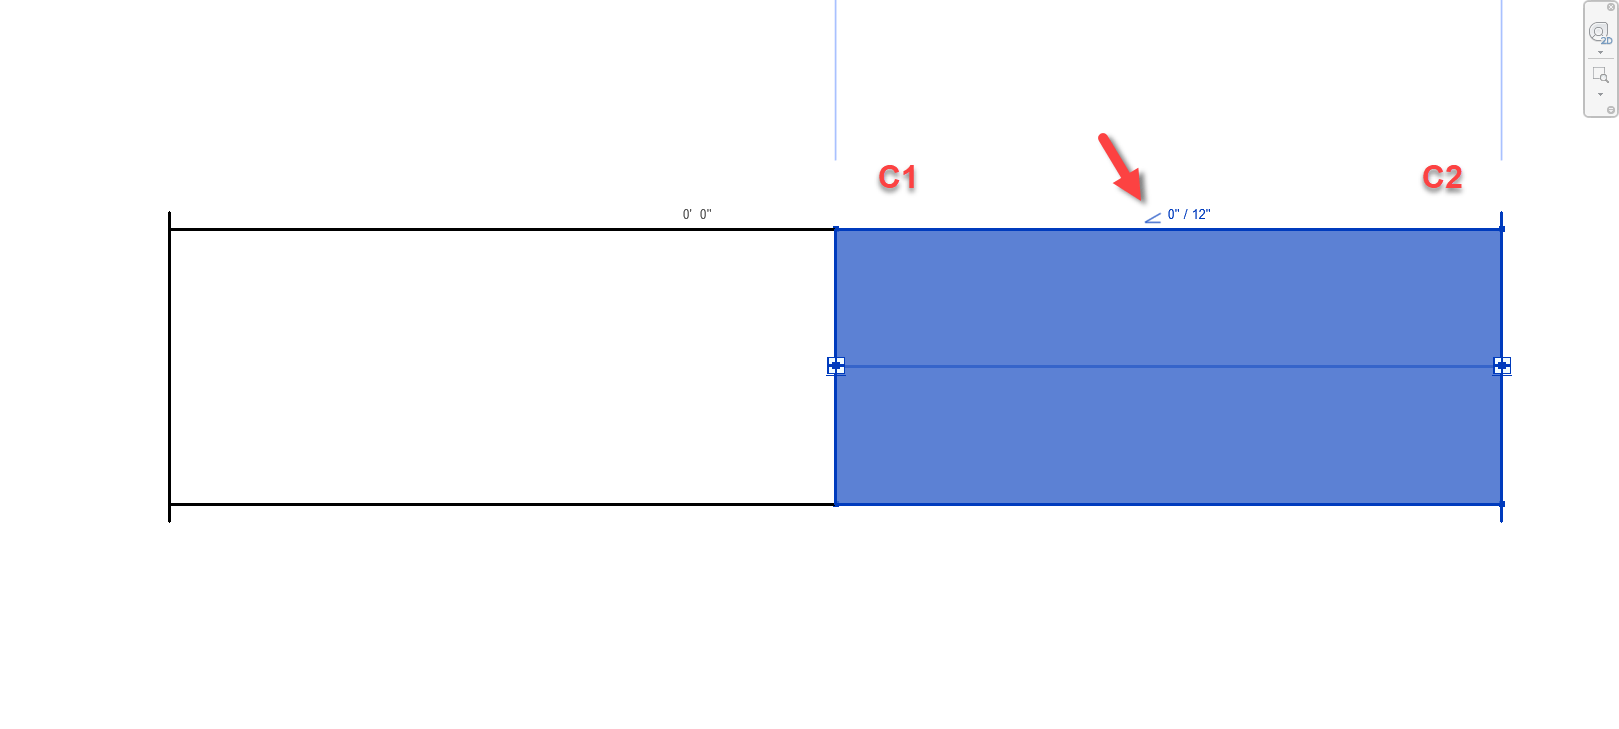
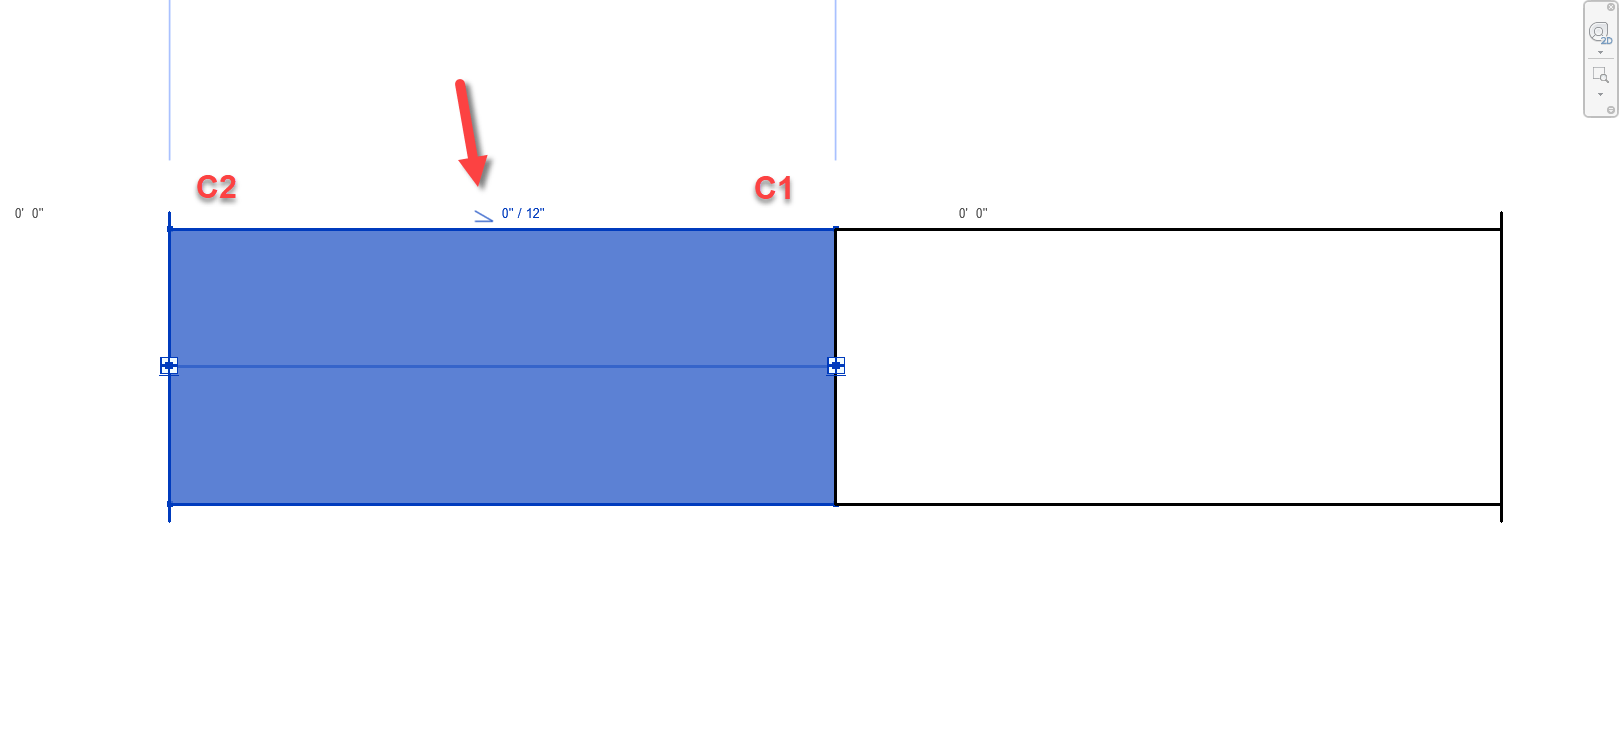
For this first method, credit goes to Liz Fong from MacDonald Miller. When you place a piece of straight pipe or duct, when you select it you’ll see a Slope indicator (< or >). This by default points to the C1 connector.

Duct/Pipe placed defaults the Slope symbol pointing to C1
Duct/Pipe mirrored also defaults the Slope symbol pointing to C1

There’s a couple downsides to this approach that may apply in some scenarios….

  1. This doesn’t work for fittings. Only Straight Pipe/Duct.
  2. If you click the Slope Symbol, it changes direction and is no longer accurate.
    • This should really only affect Plumbing or sloped Grease Duct systems. Otherwise there’s not a lot of reason to change direction on a non-sloped system.
    • Symbol could still be accidentally clicked and reversed anyway and then be wrong.
  3. Once changed, Slope symbol direction is remembered and there’s no good way to “reset” it.

Still, despite the downsides of this approach, I’m going to go out on a limb and suggest that even on a plumbing system, less that 50% of the slope symbols will be changed from their default. This alone makes this method better than a 50/50 guess like before.


Method 2 – View Cube/Viewing Direction

This next method takes slightly more work, but is almost 100% accurate. Credit for this method goes to Alina Y. from JH Kelly.

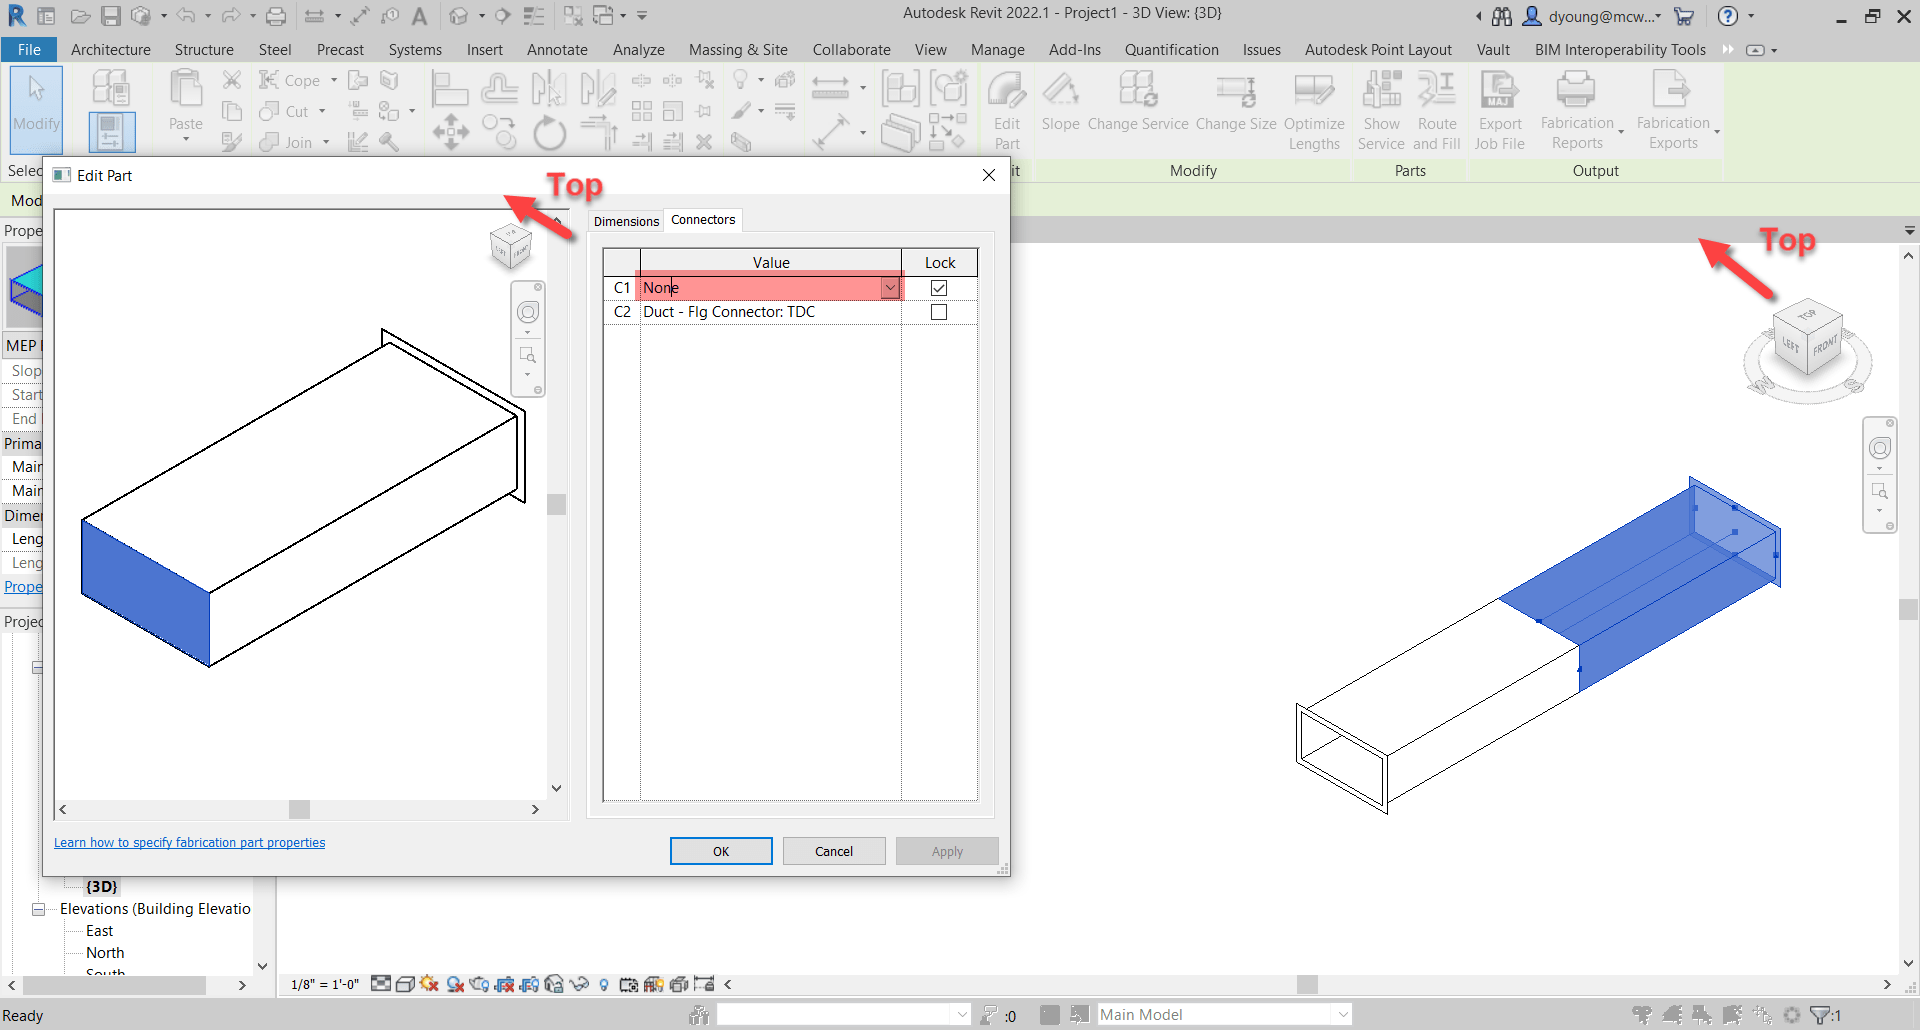
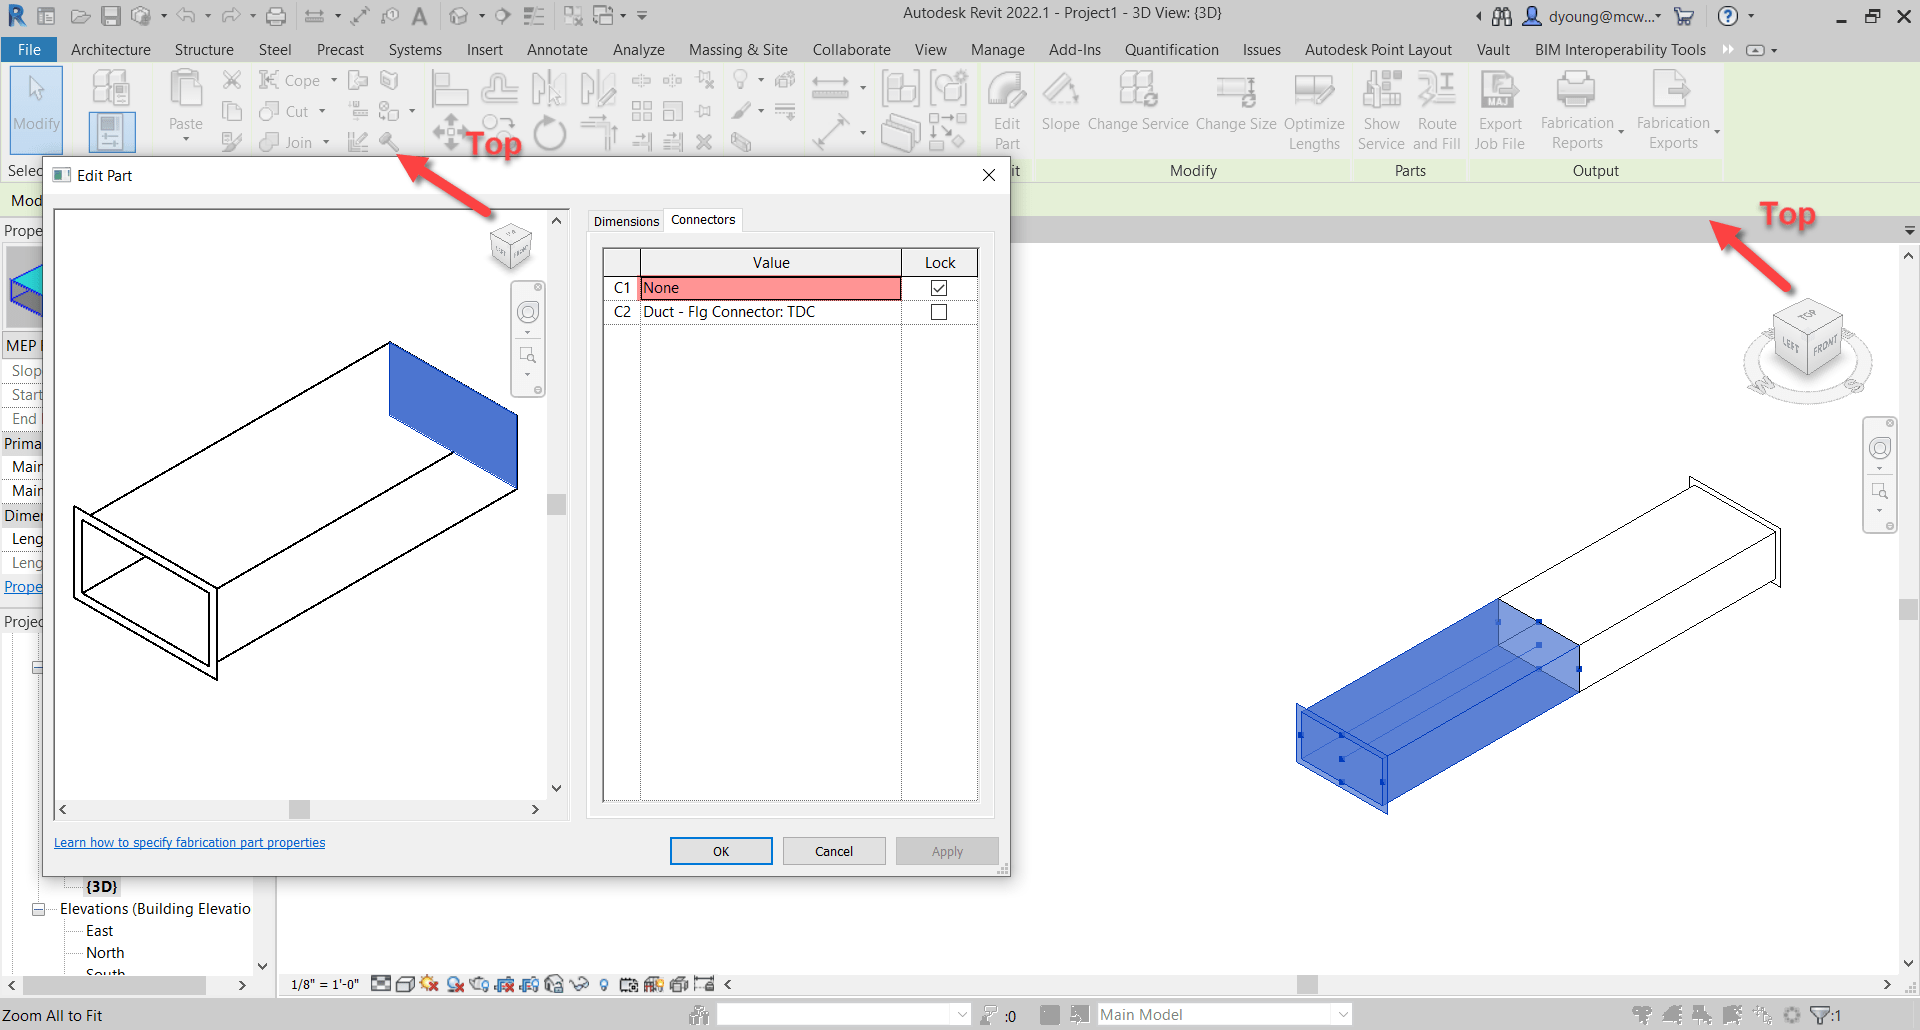
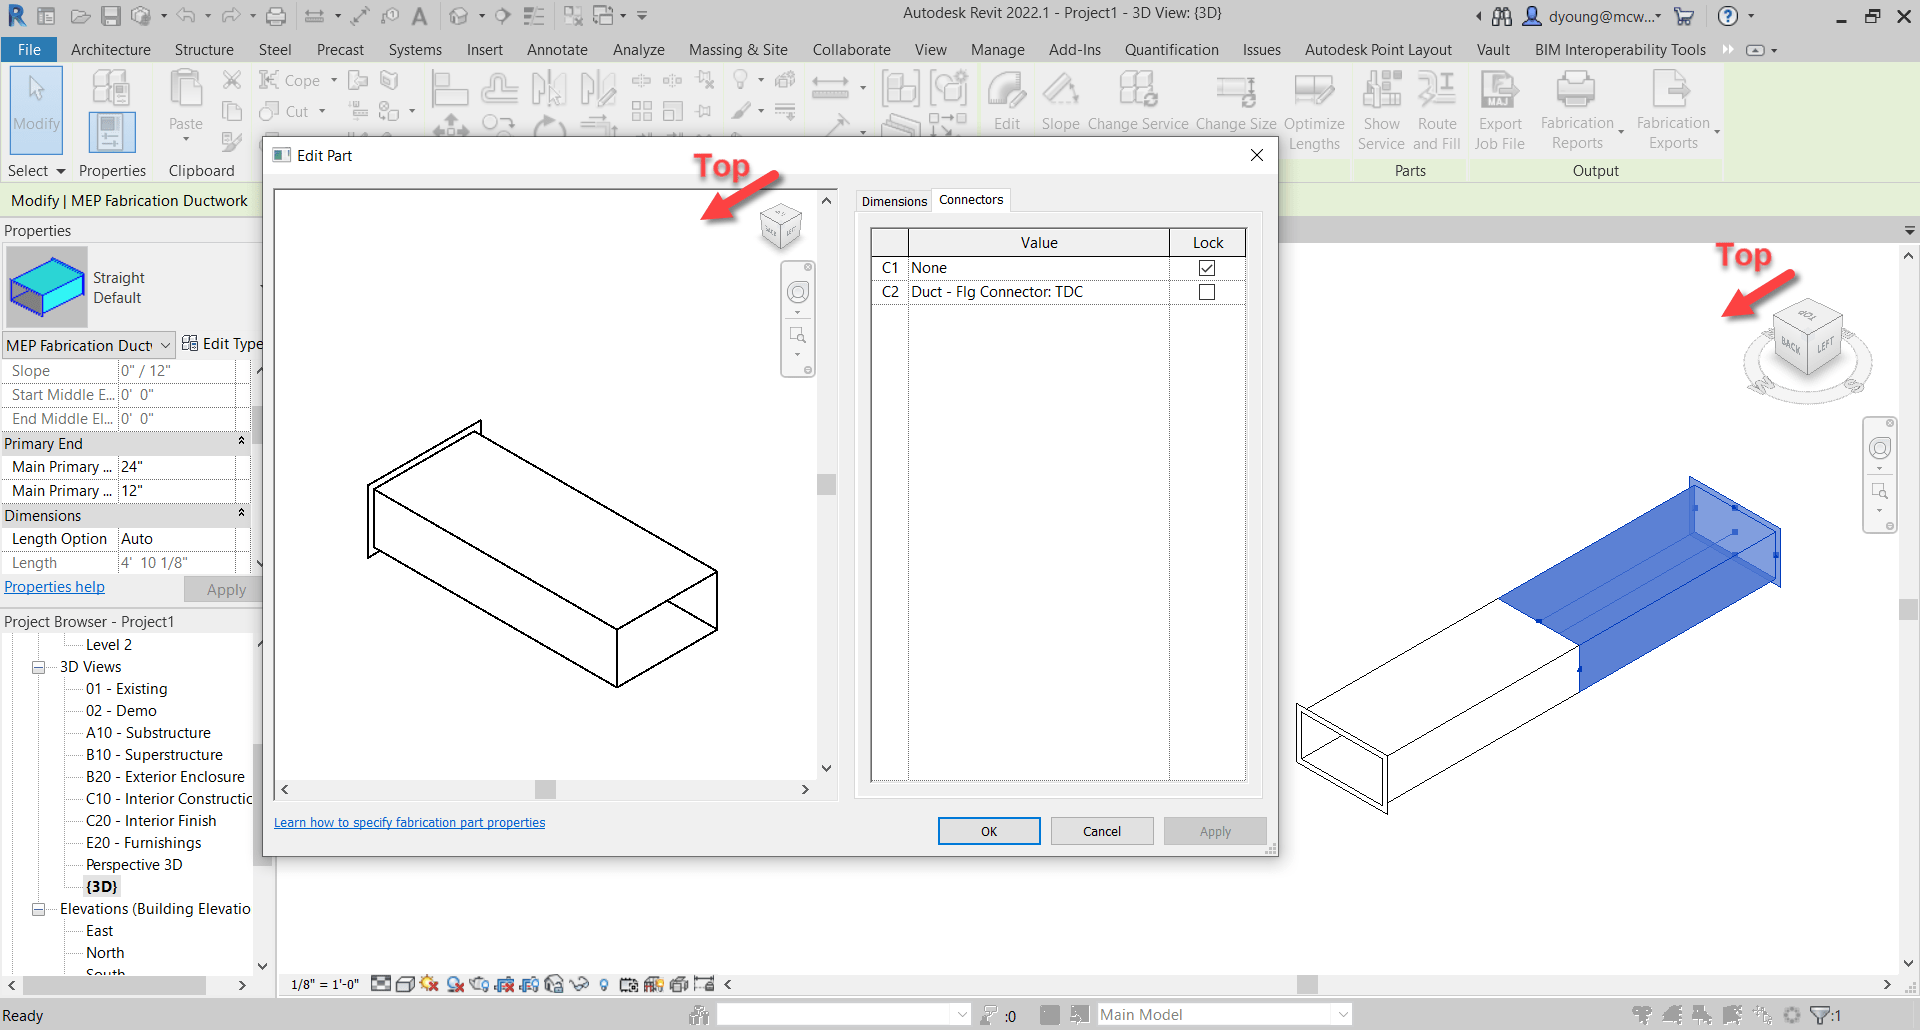
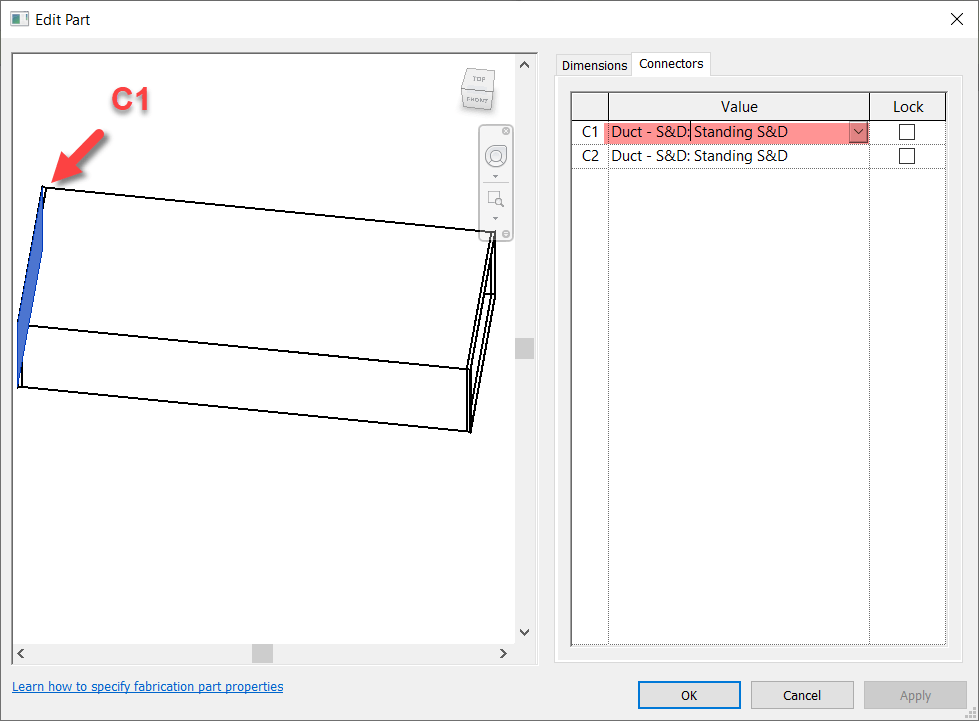
In short, from a 3d view, if you make sure the View Cube in the Part Editor window is aligned to the Revit View you’re in, the fittings is oriented in the same direction in the editor as in Revit. You can then select the connector in the Part Editor window and it highlights the connector end associated with it.

Duct/Pipe placed in Revit matches the editor when View Cubes are aligned. Selected Connector highlights.
Duct/Pipe mirrored in Revit matches the editor when View Cubes are aligned. Selected Connector highlights.

This method is almost fool proof and has a few benefits over the sloped method we showed earlier.

  1. Works on Fittings in addition to Straight Duct/Pipe.
  2. Slope direction doesn’t matter.

But we did say Almost. Where this method fails, is if the View in Revit is redefined.

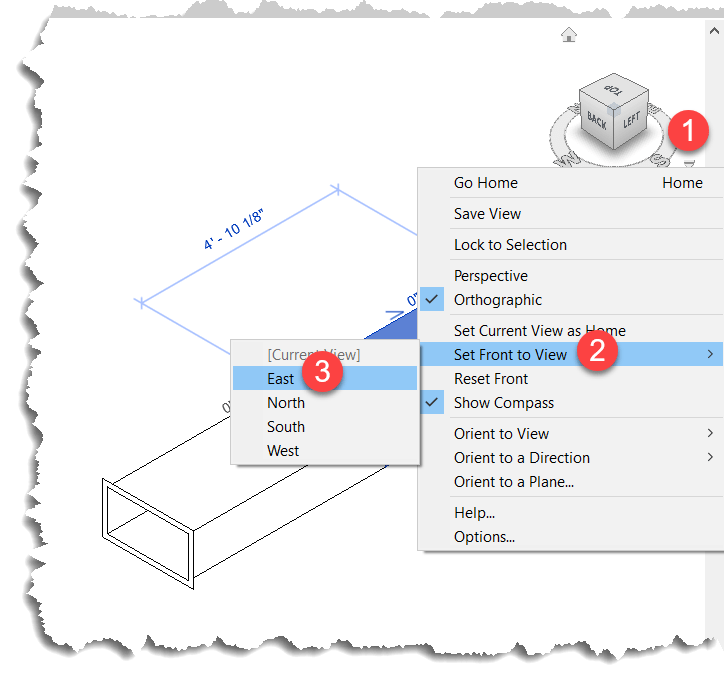
When you set a new Front View, the view in Revit no longer matches the orientation in the Part Editor window as seen in the following image…

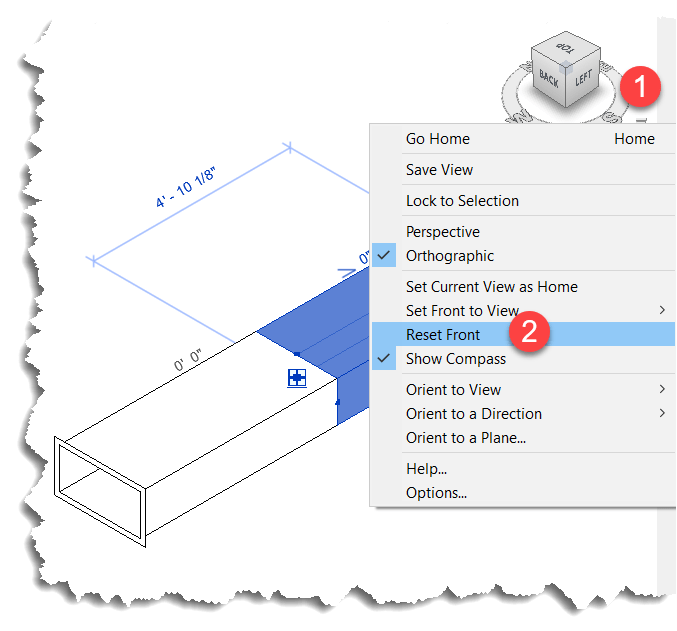
Luckily, this is easily remedied by simply resetting the Front View in Revit.

This method also works in Plan and Elevation Views with a slight twist. There’s no View Cube in the Revit window so it’s up to you to understand which viewing angle Revit is in. Next, you can make the View in the Item Editor match but when you look at a connector straight at the edge, you don’t see it highlight. You can then hold the SHIFT key and use the Middle-Mouse Button to slightly rotate the view so that you can see the connector that’s highlighted.

Here you can see what that looks like…


Summary

While not as quick and efficient as hovering over a connector in CADmep, either of these methods or even used in combination can increase your odds of changing the Correct connector on the first try.

While method #2 is more fool proof than method #1, there’s a reason I explain both and here’s how I’d use them both.

For non-sloped systems, the chances the slope symbol is reversed is very low. Because you’re likely selecting the part anyway to edit a connector, a quick glance is all you need to know which connector to change. Quick and easy for straight part on non-sloped fittings. No fuss. No muss. In this scenario, Method #1 is super quick.

For fittings and sloped systems, I would then shift to Method #2. Take a little more time, but it’s certainly quicker than being wrong 1/2 the time and then undoing the connector you just changed and then changing the other. That “trial and error” method results in 3 connector changes when you guess wrong. This is where Method #2 really shines…you get it right every time. If you’re Front View happens to be redefined, it’s easily rest.

Thanks again to Liz Fong (MacDonald-Miller) and Alina Y (JH Kelly) for their great input in coming up with these methods. They’re two of my favorite “Go To” people when I get stumped or need a little help orienting my thoughts.

COD Script Updates – 2020.07.08

I’ve made a couple updates to the Autodesk Fabrication script libraries. If you use them, you can download updated versions from here.

Scripts have been updated to include the Connector Material property found on CID/Patterns 522, 1522 & 2512 as shown below…

This property is intended to be used by a connector to specify a alternate material the connector can connect to. This allows a coupling to connect to alternate materials such as with transition couplings.

Credit for discovering the COD function to extract this property goes to Liz Fong at MacDonald Miller Facility Solutions in Seattle, WA.

Note: This property has also been added to the list of COD Item Properties located here.

Scripts Updated

  • Debug Scripts
    • Debug ITEM Connectors.cod
  • Job Item Scripts
    • WriteAllConnectors (Job).cod
    • WriteAll_Props (Job).cod
  • Library Item Scripts
    • WriteAllConnectors (Library).cod
    • WriteAll_Props (Library).cod