I’ve updated the Fabrication COD Script Libraries. You can find them here. There’s a few things you’ll note…
Database Table Export Scripts
I’ve added a library of DATABASE scripts. These scripts will export to a file the names of the entries for select tables in the Autodesk Fabrication Database. For all practical purposes, COD scripts can’t read from the database tables directly. They can only read and write properties of ITMs. However, there’s an exploit that can be used on a few database tables that allow you to iterate through them and step through the entries, assigning them to a Proxy ITM. Using this approach, we can export rudimentary table data limited to group/name.
This technique was discovered via the work of Christopher Kelly at Infinite CAD Solutions who years ago posted a COD script that iterated through the Connector table in a search/replace function that he posted to XtraCAD.Com.
Export Data Wrapped in Double Quotes ” “
Data fields are now wrapped in “double quotes”. This is done so that entries that may contain a comma are no longer split by Excel thinking it’s the start of a new field. This means that if your data contained a comma, you no longer need to use the advanced functionality to change the delimiter of the export to something other than a comma.
Note: I still highly recommend avoiding use of these commas in data field values as Autodesk does not do a good job of handling these in it’s own exports.
Embedded Double Quote Handling
Text that may contain double quotes (“) are now expanded to “double double quotes (“”). This helps Excel process them as actual parts of the data field and not wrappers around a field. Again, this improves data handling for text fields that happen to contain characters also used by CSV files.
Note: I still highly recommend avoiding use of double quotes in data field values as Autodesk does not do a good job of handling these in it’s own exports. If you want to simulate this look, use two separate single quotes.
Fraction Support
Fields like Size and Description can often contain fractional data which Excel loves to convert to dates or other characters. I’ve prefixed these fields with an equal sign (=) which forces excel to treat them as Text and not automatically try to interpret their data type and convert them.
CSV Exports vs TXT Exports
In the past, these scripts exported to a TXT file to force Excel to open the import wizard and allow you the ability to specify which fields were text. As a result of the above changes, this should no longer be necessary so the export files will now be CSV file extensions. This should now allow double clicking on them open them in Excel without splitting strings that contain sommas or double quotes or converting fractions to dates. If you run into properties still prone to Excel automatically converting them, please let me know.
2022 and Earlier Scripts NOT Updated
As time progresses, so should the version of software you use. As such, I’m no longer actively updating the old scripts to include the above changes. They’re still there to download should you need them. And you can easily download both and use a file compare utility to find the differences and update them yourself.
As there’s a LOT of small changes to these scripts. As such, it’s certainly possible I mistyped something and one produces an error in certain data sets. If you run into an issue, please let me know.
There’s a bug that crept into Autodesk Fabrication versions that prevent some COD scripts from running. Any Script that accesses the Item Product list [item.product / item/product.*] will likely fail in the initial shipping version of 2026 and any prior Fabrication version’s update that was released on May 21, 2025.
Here’s what that error looks like when you attempt to run one of my scripts. The code you run may be different but you’ll see a “Simple Variable Not Expected” error in the script and the highlighted line will likely have “item.product….” somewhere in there.
This affects the scripts I have on this site including….
WriteAllDatabaseIDs (Job).cod
WriteAllMiscProperties(Job).cod
Extract Product List Data (Library).cod
WriteAllDatabaseIDs (Library).cod
WriteAllMiscProperties(Library).cod
Here’s a list of versions that work vs have the bug…
Version
Fabrication Bug
2026.0.0
Yes
2025.0.2
Yes
2025.0.1 & Earlier
No
2024.0.4
Yes
2024.0.3 & Earlier
No
2023.0.5
Yes
2023.0.4 & Earlier
No
Autodesk has confirmed this bug/defect and it should be fixed in an upcoming update. If you need to use COD scripts that accesses the product list data, I recommend using one of the versions without the bug until Autodesk releases a fix.
Thank you to my network for alerting me to this issue.
Thanks also to Craig Farish at Autodesk for digging in and validating the defect and queueing up a future fix. I tend to beat up Autodesk a bit, but Craig is one of the good guys behind the scenes helping our industry.
Did you know you can change the Pattern (CID) of an Items in your Takeoff or Drawing in Fabrication? A Simple COD script is all it takes. Obviously, you an do some irrational things like try to change a piece of Decoiled Straight (Pattern #866) to a Square Elbow (Pattern #3). But there’s plenty of cases where swapping ITM’s and Patterns makes a lot of sense.
You may want to take a piece of Machine Cut Straight (Pattern #1) and change it to Decoiled (Pattern #35) or Sheared (Pattern #36) or the universal Straight (Pattern #866).
You may even want to keep the same pattern number and merely load a new ITM to get dfferent options like going from a Gored to Adjustable Elbow based on your library. The possibilities are really endless.
COD Script Library was updated for JOB and LIBRARY Scripts. You can download them for free here. Here’s a summary of changes.
Script Consolidation
In the past, there were 69 to 75 COD Scripts to export all the various properties to separate TXT files. Properties that have multiple entries per ITM like Connectors or Seams are still exported to separate files because the data columns don’t line up between them and there are multiple lines per ITM.
All other properties where it’s a single property per ITM like Spool or Material have all been consolidated to a single script and single TXT file. The WriteAllMiscProperties(Job).cod and WriteAllMiscProperties(Library).cod scripts are where you can extract all other properties so no matter what combination of properties you want, there’s less data files to sort through or scripts to run.
Improved Script Properties Display
The properties scripts were displayed script settings before running the script. They still are but additional properties are displayed where appropriate along with some additional properties the scripts now support (both covered later). In addition to the additional items, you’ll note that clicking theNo button no longer cancels the script. Instead, clicking No takes you to the Advanced Configuration (also covered later) where you can change some of those settings.
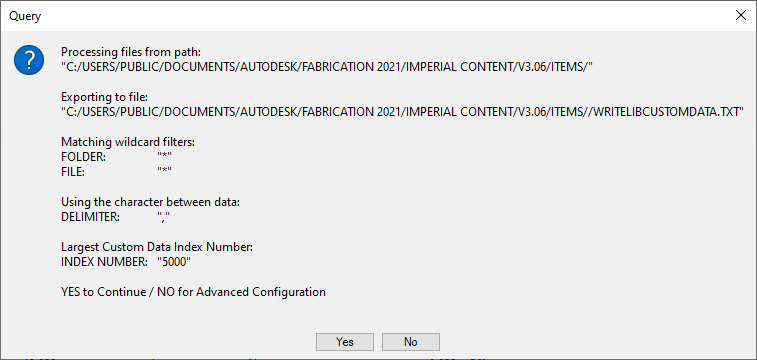
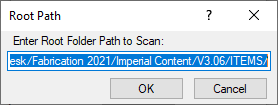
By default, the script looks to the root of your ITM Library folder of your database. This value can now be changed to point anywhere else. You may want to point to a folder of ITM’s outside your Configuration if that’s where you store your ITM’s. You can also scan further down the folder structure so you can perhaps skip exporting Duct ITMs but instead scan and export Piping ITMs.
Here’s what this looks like. Note that the path may use forward slashes ( / ). You can however paste a new path that uses backslashes ( \ ) and it should still work. There’s no option in COD Scripts to allow you to browse to a folder so make sure you type or copy/paste carefully.
Advanced Configuration – Export File (JOB and LIBRARY Scripts)
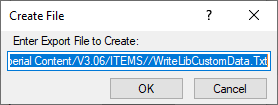
Similar to the Scan folder configuration, you can now also change the default export file name and location. Specifications for specifying paths are the same as above.
Also note that while you CAN specify “CSV” as the file extension, I recommend using “TXT“. When Excel sees a CSV file, it just opens it without giving you the ability to specify how data is interpreted. Using a “TXT” extension makes Excel prompt you for “How” the file should be read like which character is used as the delimiter or defining which columns are Text vs other data types.
Some numerical data or values can be interpreted incorrectly by Excel if you don’t explicitly tell Excel to treat them like Text. A good example of this is the size 1-1/2″ or 1-1/4″. Excel thinks these are dates and will display them as 1/1/2012 or 1/1/2014 respectively if you don’t explicitly tell Excel to treat them as Text. Using that “TXT” extension on the export file is a safe guard against this issue.
A lot more detail that you likely wanted but hopefully it’s helpful, here’s what that looks like….
Note you may see an extra slash character between the path and file name. This is can happen if your MAP.INI (Edit Configuration Utility) includes or doesn’t include an ending slash. I may add code to clean this up later but COD Scripts and Fabrication seem tolerant of this extra slash so no need to worry about it (or edit it out if you like).
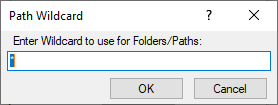
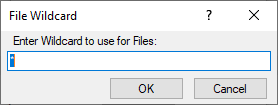
Instead of editing the folder you’re going to scan, alternatively you can specify a wildcard to use to limit which folders to export data from. As an example, you could specify *WELDBEND* and properties will only be extracted for ITM’s within folders containing the name “Weldbend”. Wildcard specification is not CaSe SeNsItIvE. By default, the wildcard is ( * ) to extract from all folders. Here’s what that looks like…
Just like the Folder/Path Wildcard specification, you can specify a wildcard for which ITM files to extract properties from. As an example, you could enter *PIPE* and you would export only from ITM files that contained the work “Pipe”. Again, the wildcard is not CaSe SeNsItIvE. You can use both Folder and File wildcards to very narrowly specify your data export scope. Default wildcard is an ( * ) to extract from all ITM files. Here’s what that looks like…
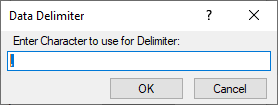
Advanced Configuration – Delimiter (JOB and LIBRARY Scripts)
Data exports by default use a Comma ( , ) to create a Comma Separated Value file. If your Fabrication Database uses commas in folder names or ITM file names this can cause data fields to shift in Excel when opening the export file. If this is the case for you, you can specify a different character to use to separate the data fields in the export file. The Pipe ( | ) character is always a good “rarely used” character for this purpose.
As a side note, it’s not a good practice to have commas in folder or file names. You can read more about that here. This option is really here in case you’re stuck with commas and haven’t fixed them yet.
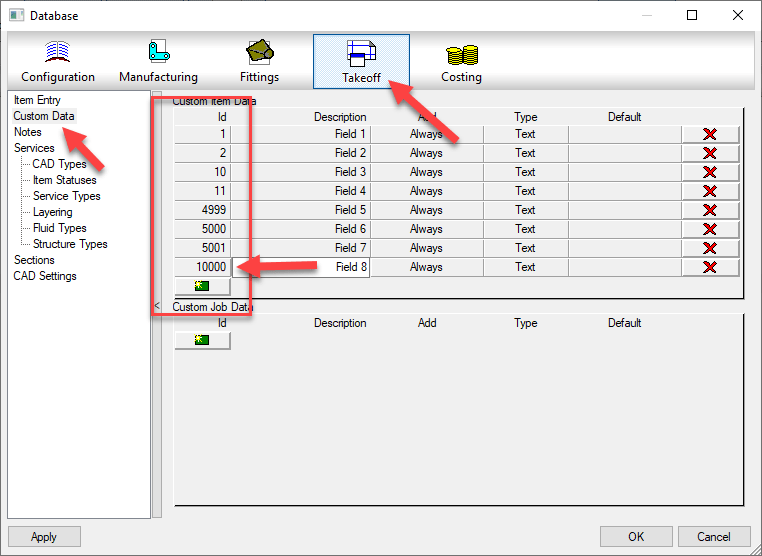
Advanced Configuration – Max Custom Data Index (Only Scripts that export Custom Data)
Only used for scripts that export Custom Data, you can specify the maximum Custom Index value. Unfortunately, COD scripts have no ability to determine how many custom data entries you have or which index numbers are used without jumping through some hoops. To work around this, you need to specify the maximum Custom Data Index value. The script will then loop through all those numbers and find which ones contain values and remembers them. It then exports only those custom index values so that the script runs efficiency.
By default the script uses 5000 as the maximum index number. But as you can see from the below example, the maximum index number is 10000 so we need to specify that. We look at all 10000 possibilities (it goes fairly quick) and takes note that there’s only 8 indices used and then extracts only those 8 from the ITM’s. In the past, the script would loop through all 10000 for each ITM really slowing things down. Now, even if your largest number is 6 or 7 digits (not recommended) the script will still be fairly quick.
Here’s what that Delimiter Character configuration option looks like…
Summary
In the past, if you didn’t like the export files names, where they went, or wanted to change the scope of which files or folders you extract data from, you could have always changed the COD script code yourself. You now shouldn’t have to. Hopefully this makes running these scripts a little more flexible and user friendly.
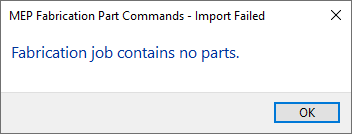
Have you ever tried importing an MAJ into Revit and received the following error….Fabrication Job Contains No Parts.
There’s a lot of reasons this can occur and it’s NEVER because there are no parts. So much for Autodesk’s QA/QC and Error checking.
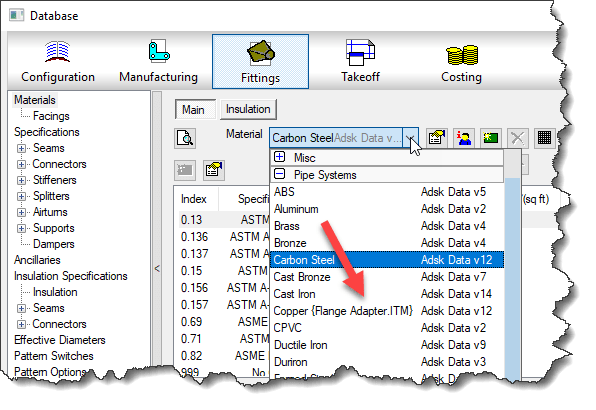
You may see this most commonly because parts used in the model contain data that’s no longer in your database. You’ve likely noticed from time to time database entries with curly braces around parts of the name like the following…
This happens when an entry in the database is used by an ITM but the database entry itself later gets deleted. Information is cached within the ITM so when it’s accessed, it creates a Proxy entry in your database if it was missing. Within the {Curley Braces} is the name of the object that created the entry.
While CADmep, ESTmep and CAMduct handle this fairly gracefully, Revit on the other hand does not. When it attempts to load an MAJ, it sees these entries and notices they’re missing from your database and prohibits you from importing the MAJ file. Revit thinks the database doesn’t match the MAJ and stops you cold!
A Possible Fix
If this is cause for the import error, you can use the following COD script to potentially work around the issue….
Take the following script and run in in CADmep, ESTmep or CAMduct. You should be logged in with Administrative Permissions while doing this. This script isn’t fixing Revit or the MAJ. What it’s doing is loading ALL the ITM’s from your Database Library into memory.
The process of loading all these ITM’s into memory creates all these proxy entries in your database. This way, when Revit attempts to import the MAJ, the data associated with those ITM’s are most likely present in your Database configuration. In many cases then results in a successful import of the MAJ.
If the Revit file you are importing the MAJ into already points to a Fabrication Configuration, you should reloaded the configuration FIRST before attempting to import the MAJ.
If for some reason this process still doesn’t work, verify that Revit is reading from the same database location as the version of CADmep, ESTmep or CAMduct where you ran the COD script.
In the event it still doesn’t work, there may be other reasons for the failure but this is often the most common, especially with MAJ’s created recently.
If it does work, you’ll want to use the other scripts I provide on this site to help analyze your database. You likely deleted those database entries in the first place for a reason. You either didn’t realize they were needed, or you didn’t know where they were used to repoint those ITM’s to a proper substitute. Those scripts can help you find which ITM’s use which database entries.
Not only is DOS still relevant, its often one of the quickest ways to get some things done.
On XtraCAD.com, someone recently asked how to get the system Date and Time in an Autodesk Fabrication COD script. I provided a solution that uses DOS commands inside a COD script. That solution is explained in more detail here.
DOS’s “Date” Command
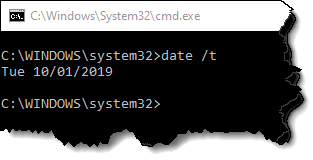
Using DOS, we can use the “DATE” command with the “/T” Switch to output the current date to a DOS prompt.
The information given by this simple command is all we need. A script can easily read the data if the output is redirected to a data file.
We’ll get a little more ambitious and get particular on the formatting. We’ll remove the “Tue” and format the date in the format “yyyy.mm.dd”.
To do this, we can use the “FOR” command in DOS.
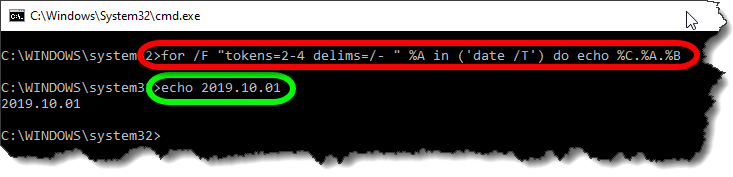
for /F "tokens=2-4 delims=/- " %A in ('date /T') do echo %C.%A.%B
The Red circled area is the command. It takes the data from the Date command and breaks it apart by the delimiters (DELIMS) which is spaces ( ), forward slashes (/) and dashes (-). You’ll note that the Date doesn’t actually contain any dashes so it’s just ignored.
The TOKENS specifies we want the 2nd thru 4th items of data. They will be assigned sequentially to variables starting with “%A”. The Green circled area is the resulting output ECHO’d to the DOS Window in the format we want.
%A = 2nd piece of data (month)
%B = 3rd piece of data (day)
%C = 4th piece of data (year)
Sending Data to a File
Now that have our DOS command, the next step is to send the output to a file on disk. Doing this will allow the COD script to read it back later.
For this purpose, we use a re-director to pump the data to a file. We simply append a suffix like this…
for /F "tokens=2-4 delims=/- " %A in ('date /T') do echo %C.%A.%B>"C:\Temp\COD Data.Txt"
A few notes about redirecting data to a file….
We use double quotes around the file path and name in case it contains spaces. This way, DOS doesn’t interpret the space as a separator between commands.
The Greater-Than (>) symbol is used to redirect output to a file. If the file already exists, it will be overwritten.
Double Greater-Than (>>) symbols can be used to “append” to the end of an existing file. This is handy if you want to add more data to the same file. If the file doesn’t already exist, it will be created.
We Have DOS, Now for the COD Script
Now that we have our DOS syntax down, we can start writing out COD Script. To start, I typically generate a few variables that help me format things.
REM ------------------------------
REM DQ = Double Quote Character
REM CR = Carriage Return Character
REM ST = Single Tab Character
REM WF = Working File
REM ------------------------------

DIM DQ = ascii(34)
DIM CR = ascii(10)
DIM ST = ascii(9)
DIM WF = "C:\Temp\COD Data.Txt"
Because some of our syntax contains double quotes, and because strings (text) in a COD script also contain double quotes, having multiple double quotes in a row can be confusing. Additionally, sometimes the script has trouble understanding where one string ends vs what’s a string containing a double quote.
To handle this, I set a variable (DQ) that will represent any double quote within a COD Script string. I also use a Carriage Return (CR) variable and a Single Tab (ST) variable for formatting purposes that you’ll see later.
Lastly, I also set a variable for the data file. It’s at the beginning, it’s easy to find and change without having to get in the middle of a lot of confusing formatted string data later.
Executing DOS From the Script
To execute an external command from a script, we can use the EXEC function.
<command> = “CMD.EXE” This is the DOS Command Interpreter
<execution mode> = exec_wait + exec_show_min These are a couple variables that tell the external program to “Wait” until finished before proceeding with the rest of the script and to minimize the Window.
<command/arguments> = The Prior DOS Syntax (with modifications) goes here.
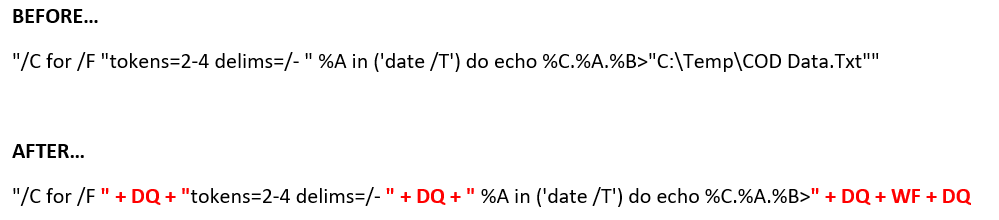
The CMD.EXE program takes an argument of “/C” followed by the command it’s going to execute which is our DOS Syntax. Pay close attention, because here’s where we’re going to have to break up the DOS commands and embed our variables for the embedded double quotes.
The below is a single “String” with double quotes on each end. It also has a lot of double quotes inside the text which will confuse you and your script. This below syntax is WRONG and needs to be corrected….
"/C for /F "tokens=2-4 delims=/- " %A in ('date /T') do echo %C.%A.%B>"C:\Temp\COD Data.Txt""
To do this, it’s easier to illustrate in color. We’re going to take one very long complicated string, and break it into several smaller strings when there’s double quotes within the string.
That is, where ever there’s a double quote within the string, we’re going to make a smaller string before and after, and piece them back together and use our DQ variable to embed the double quote between them.
This works for the first two double quotes. But at the end of the string, we’re going to do something a little different. Here, we want to remove file name and use the WF variable we set earlier to store the file name. And because the filename may have a path, we surround it with DQ variables to embed it in double quotes.
The next piece of code should look like this when we’re done. This will run our DOS command and dump the date to a file,
REM ---------------------
REM Get Date (yyyy.mm.dd)
REM ---------------------

Exec("cmd.exe", exec_wait + exec_show_min, "/C for /F " + DQ + "tokens=2-4 delims=/- " + DQ + " %A in ('date /T') do echo %C.%A.%B>" + DQ + WF + DQ
Reading Our Data File
Now that we’ve dumped the data file to disk, we can read it back in from the COD script using the following code…
DIM myDate
Object myFile as File (WF, forinput+istext)
myDate = myFile.Readline()
myFile.Close()
This code opens the file and reads its data and saves it to a variable. You’ll also note that this code doesn’t add extra double quotes around the WF “Working File” variable. That’s because they aren’t needed here, and will in fact cause problems. The COD Script language is actually better at handling files with and without spaces because it uses a comma (,) as it’s data separator between the file name and file read modes.
Displaying Our Data
Last, we can display the data in a simple debug dialog. Here, you’ll see I make use of the ST variable to place a single tab between the data purely for formatting purposes.
Debug "Date:" + ST + myDate
The Bigger Picture
The following code takes all the above principals and goes a little further. With everything you’ve learned, you should be able to figure out what it’s doing and how. It’s doing all the same things plus a little extra…
Also writing TIME and the USERNAME of the currently logged in Windows User to the data file.
It’s “Appending” the TIME and USERNAME using “>>” instead of “>” that DATE uses.
It’s reading 3 lines of our data file
The data file is deleted after it’s read leaving our system clean of temporary files.
The data is displayed by also using the CR (Carriage Return) variable to start new lines for the additional pieces of data.
REM ------------------------------
REM DQ = Double Quote Character
REM CR = Carriage Return Character
REM ST = Single Tab Character
REM WF = Working File
REM ------------------------------

DIM DQ = ascii(34)
DIM CR = ascii(10)
DIM ST = ascii(9)
DIM WF = "C:\Temp\COD Data.Txt"

REM ---------------------
REM Get Date (yyyy.mm.dd)
REM Get Time (hh:mm)
REM Get User (login name)
REM ---------------------

Exec("cmd.exe", exec_wait + exec_show_min, "/C for /F " + DQ + "tokens=2-4 delims=/- " + DQ + " %A in ('date /T') do echo %C.%A.%B>" + DQ + WF + DQ)
Exec("cmd.exe", exec_wait + exec_show_min, "/C for /F " + DQ + "tokens=1-2 delims=: " + DQ + " %A in ('time /T') do echo %A:%B>>" + DQ + WF + DQ)
Exec("cmd.exe", exec_wait + exec_show_min, "/C echo %username%>>" + DQ + WF + DQ)

REM ---------
REM Read Data
REM ---------

DIM myDate
DIM myTime
DIM myUser

Object myFile as File (WF, forinput+istext)

myDate = myFile.Readline()
myTime = myFile.Readline()
myUser = myFile.Readline()
myFile.Close()

REM ----------------
REM Delete Data File
REM ----------------
Exec("cmd.exe", exec_default + exec_show_min, "/C DEL " + DQ + WF + DQ)

REM ------------
REM Display Data
REM ------------

Debug "Date:" + ST + myDate + CR + "Time:" + ST + mytime + CR + "User:" + ST + myUser
It no secret that not every Autodesk Fabrication pattern is supported in Revit. I’ve recently finished a more in-depth analysis of which patterns are and are not supported in Revit. Each of the 703 different pattern types were tested in each version and each update of Revit.
On the Fabrication COD Scripts page, you can find a Revit Support Report script. That script will analyse your ITM library and generate a CSV report of the status of every ITM in your Fabrication Configuration.
You can also find the complete results of my testing on the Revit Support page. Here’s a summary of the the testing…
Tested Version
Each of the below versions of Revit were tested with all the the 704 different patterns:
2016
2016R2
2061R2SP7
2017.0
2017.1
2017.2
2018.0
2018.1
2018.2
2018.3
2019.0
2019.1
2019.2
Testing Criteria
“Supported” for purposes of this testing is based on whether Revit allows a particular pattern to be used in the Fabrication Part Browser.
Testing Results
Testing results will have one of the following status descriptions.
No – No Revit support
Varies ({verison}) – Revit support varies between Revit version
Yes (Risk) – Revit does support but use NOT recommended due to issues
New ({version}) – New Pattern supported in later Revit versions
Yes – Pattern is supported in all Revit versions with no significant issues
Support Status = No
No – Parts not supported by the Parts Browser are obviously listed as having “No” support. There are a total of 84 different patterns listed in this category. They are as follows…
125
126
127
128
129
130
141
158
202
203
204
205
206
207
208
209
210
211
212
213
215
216
218
220
221
228
230
301
302
308
503
505
521
530
764
765
803
804
805
806
833
873
910
913
928
960
961
964
966
969
974
980
983
985
994
996
999
1049
1102
1106
1114
1142
1150
1152
1157
1161
1162
1165
1168
1169
1181
1194
1196
1198
2185
2189
2190
2191
2192
2199
2200
2873
3108
3873
Support Status = Varies
Varies(version) – In some cases, Fabrication Parts were initially allowed or supported in earlier versions and later were restricted. These parts have a status of “Varies” followed by the version where the change occurred. It’s recommended you avoid use of these patterns even in versions where they work as they will not be supported in later versions. There are 17 patterns that once worked in Revit but are no longer supported. They are as follows…
0
182
222
381
845
853
855
864
876
898
903
912
915
971
1105
1170
1175
Support Status = Yes (Risk)
Yes (Risk) – Patterns that list “Yes (Risk)” are technically supported in Revit but I highly recommend avoiding their use. Patterns with this status have issues like inserting at the Revit’s Project Base Point and not the cursor location. They also have a tendency to crash Revit if you attempt to grip or edit them. As a result, I highly recommend avoiding their use. There are 29 patterns in this category. They are listed here…
119
189
317
346
347
348
349
350
351
352
353
368
369
390
392
397
398
415
810
828
922
930
962
963
968
973
1159
1160
1176
Support Status = New
New (version) – Some patterns were not around in earlier versions of Revit but later added and supported in Revit. These patterns are listed as “New” followed by the version of Revit they became available in. These patterns are generally safe to use for Revit. There are 19 patterns in this category which are listed here…
217
1206
1207
1238
1239
1240
1241
1242
1243
1244
1245
1246
1247
1248
1249
1250
2197
2198
2217
Support Status = Yes
Yes – Parts allowed by the browser that work across all versions of Revit are listed with e “Yes” status. There are 555 patterns in this category. They are listed here…