Merging Autodesk Fabrication Databases (Method 1 of 4)
Warning: This is Part 1 of a 4 part series on merging Autodesk Fabrication Databases. Autodesk Fabrication software is extremely powerful and flexible but that also makes it very fragile. Use the below guidance with caution. I highly recommend backing up your configuration before attempting anything I’ve recommended. It never hurts to have a firm grasp of how Autodesk Fabrication functions from an administrative perspective. Consider yourself warned!
Preface
You shouldn’t find yourself merging parts of different Fabrication databases very often. If you do, you may want to revisit your database management workflow and practices.
However there are a number of legitimate reasons you may do it. Most common is the database you’re using now isn’t the one you used a few years ago because you started over. It’s common for a Fabrication database to be a mess. They’re hard to learn and understand and while you learn, you do a little damage unknowingly. Maybe it’s turnover of the staff managing your configuration. Each new person will say they know how to manage Fabrication and what you’re doing is wrong. So they fix it. In the end, you end up with a mix of database management “Styles”.
And last but not least, it’s because trades men and women manage your data. Don’t get me wrong. Your trade staff are hands down the most qualified to manage an Autodesk Fabrication configuration. This is why the task gets assigned to them. But ultimately, what do companies “want” them to do? Detailing and modeling….run piping, plumbing, sheet metal, electrical, etc. Management more often than not pushes them to get back to modeling because management really doesn’t understand the importance of a good database. This leads to shortcuts and mismanagement through no fault of those doing the work. They’re doing the best they can given the constraints their under.
Whatever the reason, if you need to merge parts of different Fabrication Database configurations together, I’ll explain four different methods in the coming posts.
Method 1: Importing / Exporting Database Items
Export/Import Database is the most commonly used method. It’s also the most widely know. In 2014 and earlier versions, many of these were separate commands for each part of the database. In the 2015 version, they were wrapped up in a single command. This process allows you to export and import the following items…
| Airturns | Insulation Specifications | Splitters |
| Ancillaries (except Kits) | Installation Times | Stiffeners |
| Connectors | Seams | Supplier Costs |
| Dampers | Sections | Supports |
| Fabrication Times | Specifications |
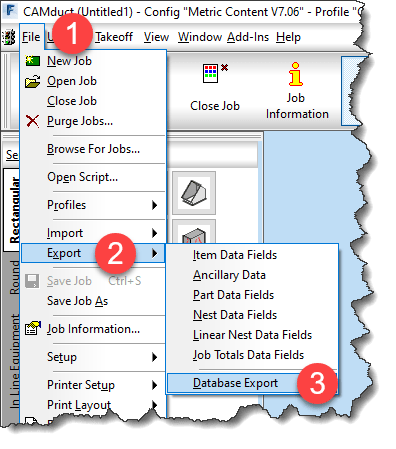
To initiate the Export process, type DBEXPORT at the command line in CADmep. In CAMduct or ESTmep, select File -> Export -> Database Export from the menu as shown below…
Once you start the command the Database Export dialog is displayed. You can switch tabs and select various database entries to export.
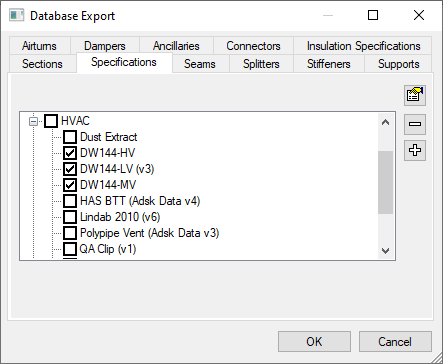
Once you’ve selected the items you wish to export, click OK and save the export file.
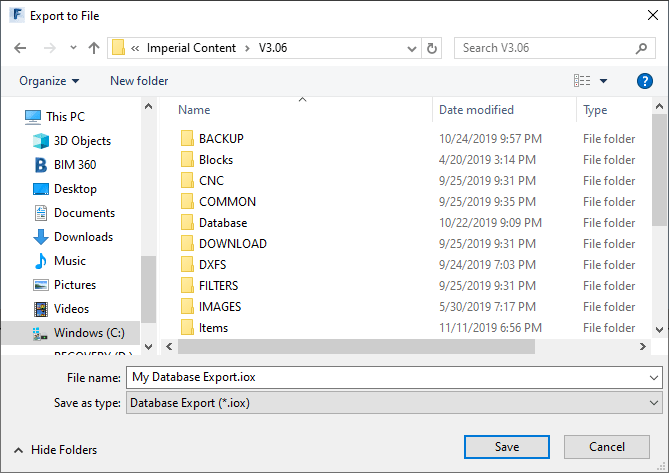
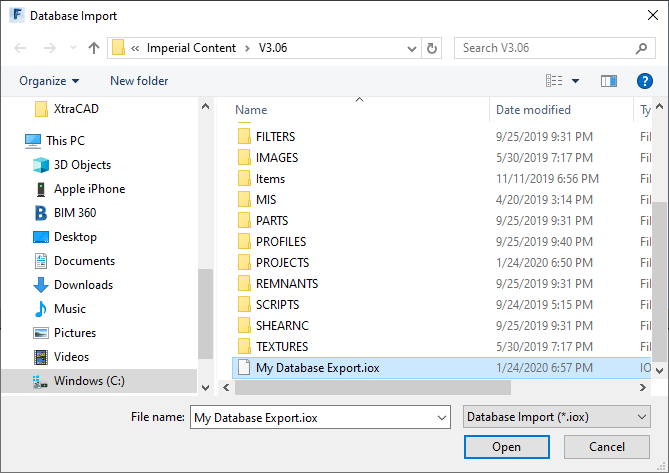
This *.IOX file contains everything you selected for export. You can then use this file to import those settings into another database configuration. The process for importing is very similar. Type DBIMPORT at the command line in CADmep or pick File -> Import -> Database Import in ESTmep or CAMduct from the menu shown below…
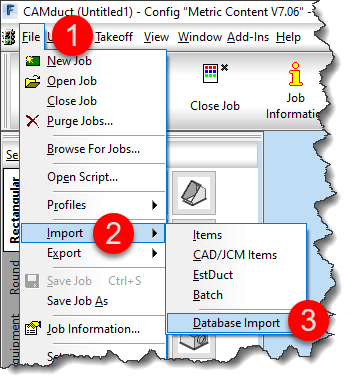
Upon initiating the command, you’re prompted to select an *.IOX file for import. Select the file you wish to import and click OK.
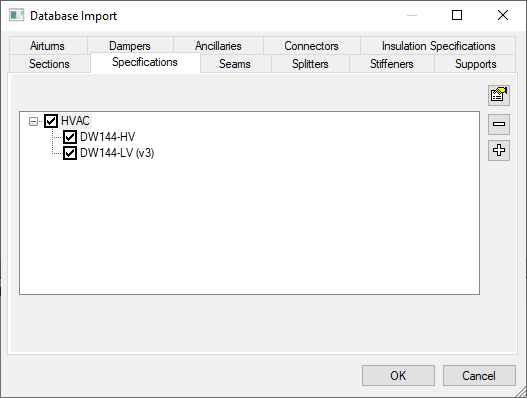
After selecting the file, you are presented with a dialog just like the Export dialog. In this one, you can navigate the various tabs and select what you would like to import.
There is no good way to see what’s available for import without checking all of the tabs. Only items included for export will be displayed. You can pick and choose to import some or all of the items that were in the export file.
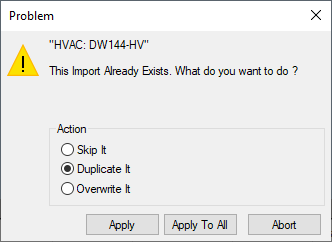
If an item you are importing already exists, you can choose to Skip, Duplicate or Overwrite the item. A word of caution, if your configuration has not been managed well, be very careful selecting the Apply to All button. There are times when the items Fabrication thinks are duplicate are indeed different items. This can be due to database corruption or misaligned indexes or any number of other reasons. If you’re concerned, select Apply for each item one at a time to verify the duplicates aren’t unexpected.
Pros:
> Easy to use
> Most common items supported
> Dependent items (e.g. Ancillaries attached to a Support) are included even though they are not displayed.
Cons:
> Not all database areas supported (e.g. Materials, Ancillary Kits, Notches, etc.)
Stay tuned for Method 2 in my next post.