I’ve been seeing a recent trend in project teams. An increasing use of Autodesk Desktop Connector to link Revit Cloud Models. While it can and does work (sometimes), it’s a real bad idea and should be avoided unless absolutely needed. The reasons are subtle and nuanced. But those nuances are a make or break in terms of success.
I’ll try to explain as best I can. I’ll even give you steps you can do to reproduce this issue yourself. But first, let’s go over why Desktop Connector exists in the first place.
A Brief Desktop Connector History
Autodesk’s first attempt at a proper Cloud workflow for Revit was called Collaboration for Revit. It later became BIM360 Design and today is called BIM360 Collaborate Pro. Same idea…take a Revit model and manage it in the Cloud from Sync’d local data. Practically speaking, it’s a cloud version of Revit Server.
Back in those early days, you could link to other Revit cloud models. But Revit supports other types of links besides RVT files. So people would link to file servers. But in a collaborate environment, other teams didn’t have the same file servers or folder structures. Those other linked files linked DWG’s or IFC’s would break. So like the good technologist’s they are, BIM Managers started using services like Dropbox across the product team. Those non-Revit files were linked from there so the links would be common across of team members.
As a result, Autodesk later acknowledged the value in doing this and released it’s own ‘sync’d drive’ tool called Autodesk Desktop Connector. So that’s why it’s there. It’s intended to link non-Revit files or Revit files that are NOT cloud models.
One could argue that Autodesk should have just made Collaboration for Revit work with those other files types. I agree and it’s a nice thought. But it’s likely not the case because the Revit files you see on BIM360 Docs (now Autodesk Docs) are NOT the same files as are used by Revit’s Cloud collaboration tools. You can read more about that here (https://www.darrenjyoung.com/2022/03/29/the-2-sides-of-bim360-acc-docs/)
The False Alure of Desktop Connector
When I see Desktop Connector misused, the reason I’m given is usually the same. “We don’t want to Live Link models“. That’s to say, they don’t want to see daily changes from the other project teams in real time.
So that sounds reasonable. But if people would use BIM Collaborate Pro ‘properly’ this actually solves this problem and in a much more flexible way. BIM Collaborate Pro when setup and used properly allows 3 separate workflows or a combination of any of them….
- Link to Live Models
- Link to “Shared” copies of Models (only updates when the model owner chooses to share)
- Link to “Consumed” copies of Models (only update when you consume a shared copy)
Yup. That’s it. Complete flexibility on how you link to other Revit Cloud Models. In short, if you’re linking to get away from updates you don’t control, it’s because you’re not using the BIM Collaborate Pro properly. More accurately, whoever is hosting the project did not set it up properly and you’re a mere casualty caught in the cross fire. Something most sub-contractors are very familiar with.
The True Appeal of Desktop Connector
There’s really another reason people use Desktop Connector for Revit Cloud models. A result of Autodesk’s flawed logic that everyone on the project should be on the same platform, same project and same account. While it makes sense at a high level, it also means all other project teams who aren’t the hosting company are limited to the willingness and/or capabilities of the hosting company.
Taking that into account, one aspect of Desktop Connector is that you can link ‘between’ BIM360 or ACC (Autodesk Construction Cloud) accounts. That is, you can link files in your account, to project files in another team’s account. This cross account linking is NOT available in BIM Collaborate Pro with Cloud models or Cloud Workshared models but it is in the Desktop Connector.
When you put this all together, this means companies can link to files from other companies but still control their own models on their own account. And they’re not live linked either. This is why we’re seeing a proliferation in Desktop Connector usage with Revit Cloud Models.
The new Autodesk Construction Cloud has some “Bridge” functionality designed to facilitate this. I tested the Bridge functionality when it first came out. It didn’t work as required, expected or as advertised IMO. It may or may not have improved since then but that’s not the point of this article. The point of this article is about linking to Revit Cloud models from Desktop Connector. Why it’s problematic, not a recommended best practice and why it should be avoided.
The Desktop Connector Problem
To demonstrate the problem, we’ll use two separate sets of 3 Revit files each linked to each other within the set like the following…
- Set 1 (problem set)
- Test – 1.rvt (Link to Test – 2.rvt & Test – 3.rvt)
- Test – 2.rvt (Link to Test – 1.rvt & Test – 3.rvt)
- Test – 3.rvt (Link to Test – 1.rvt & Test – 2.rvt)
- Set 2 (working set)
- Test – A.rvt (Link to Test – B.rvt & Test – C.rvt)
- Test – B.rvt (Link to Test – A.rvt & Test – C.rvt)
- Test – C.rvt (Link to Test – A.rvt & Test – B.rvt)
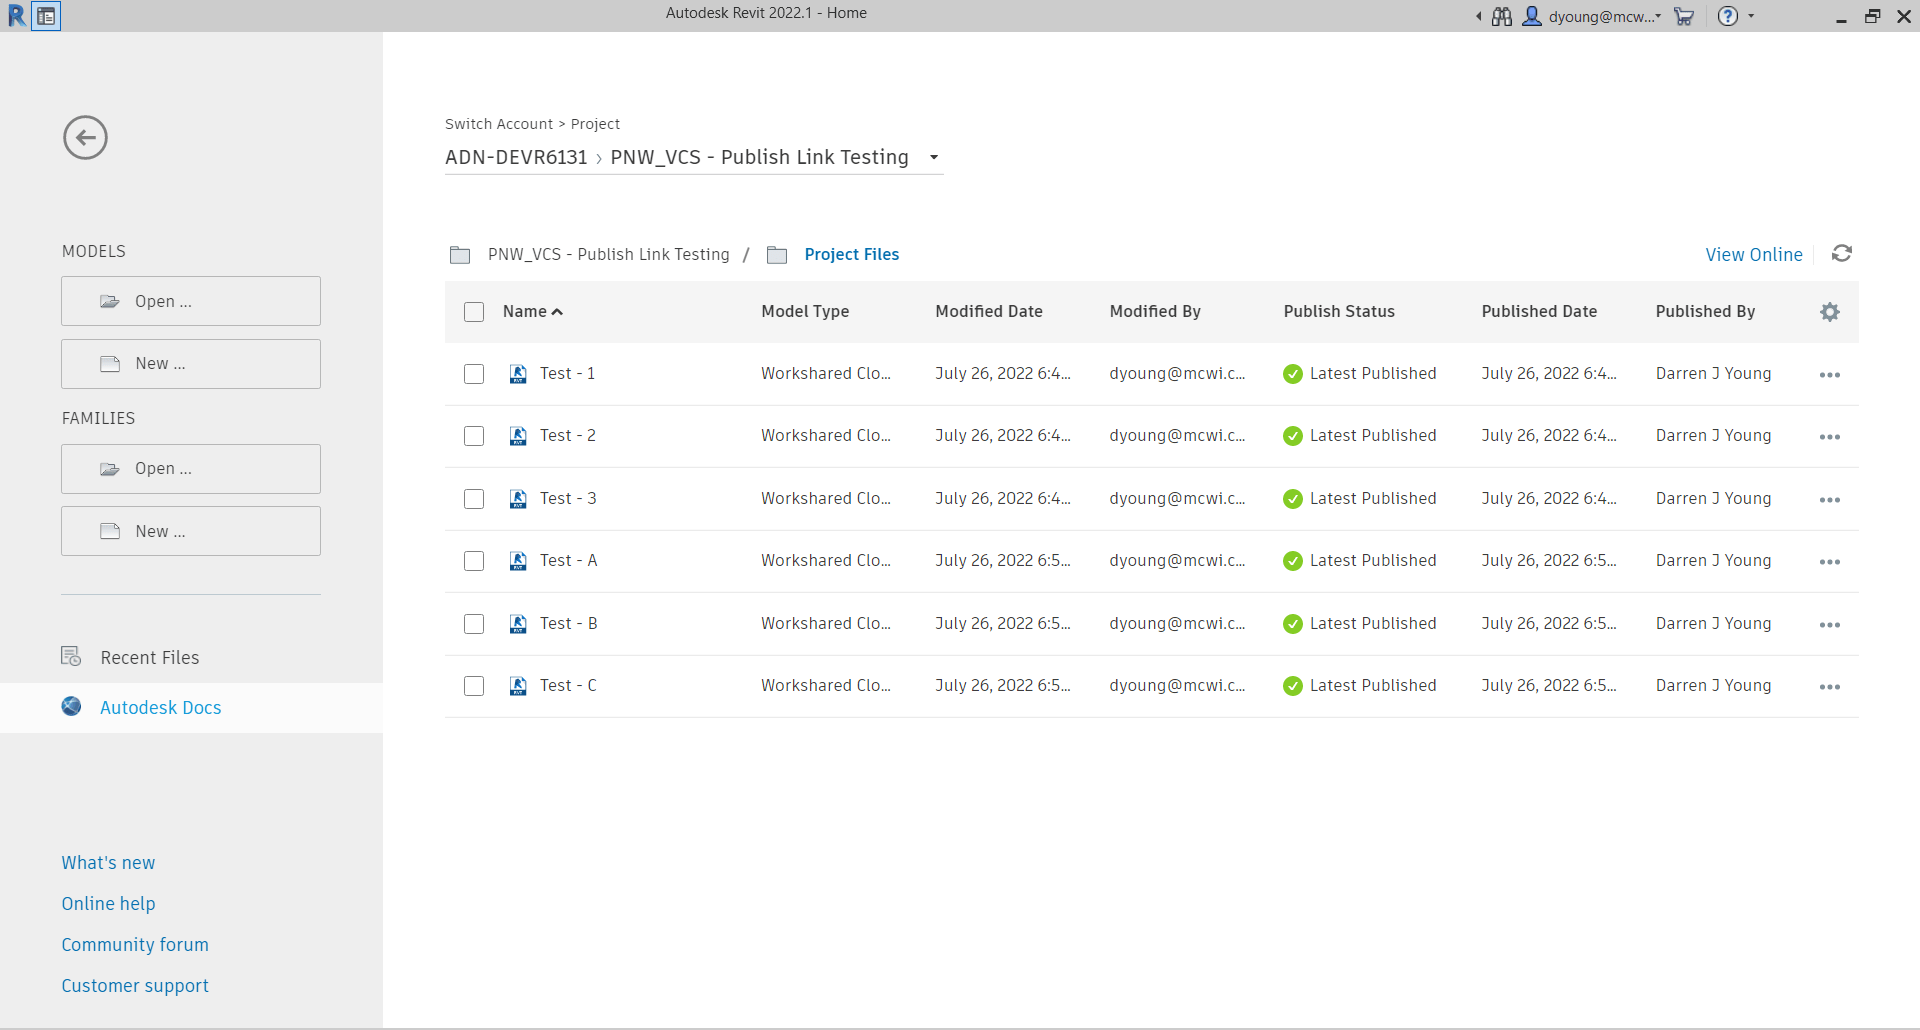
Each Revit model is a Cloud Workshared Model. (a standard Cloud Model would function the same for this issue). You can tell they’re Cloud Models be viewing them in Revit’s interface like shown in the following image…
If any of the Revit files were not Cloud Models, they wouldn’t appear here in Revit but would appear from the BIM360 or ACC web interface. You can see in the following image, those same files are listed in the web interface. They were all published so the version in Autodesk Docs displays the same contents as is available in BIM Collaborate Pro.
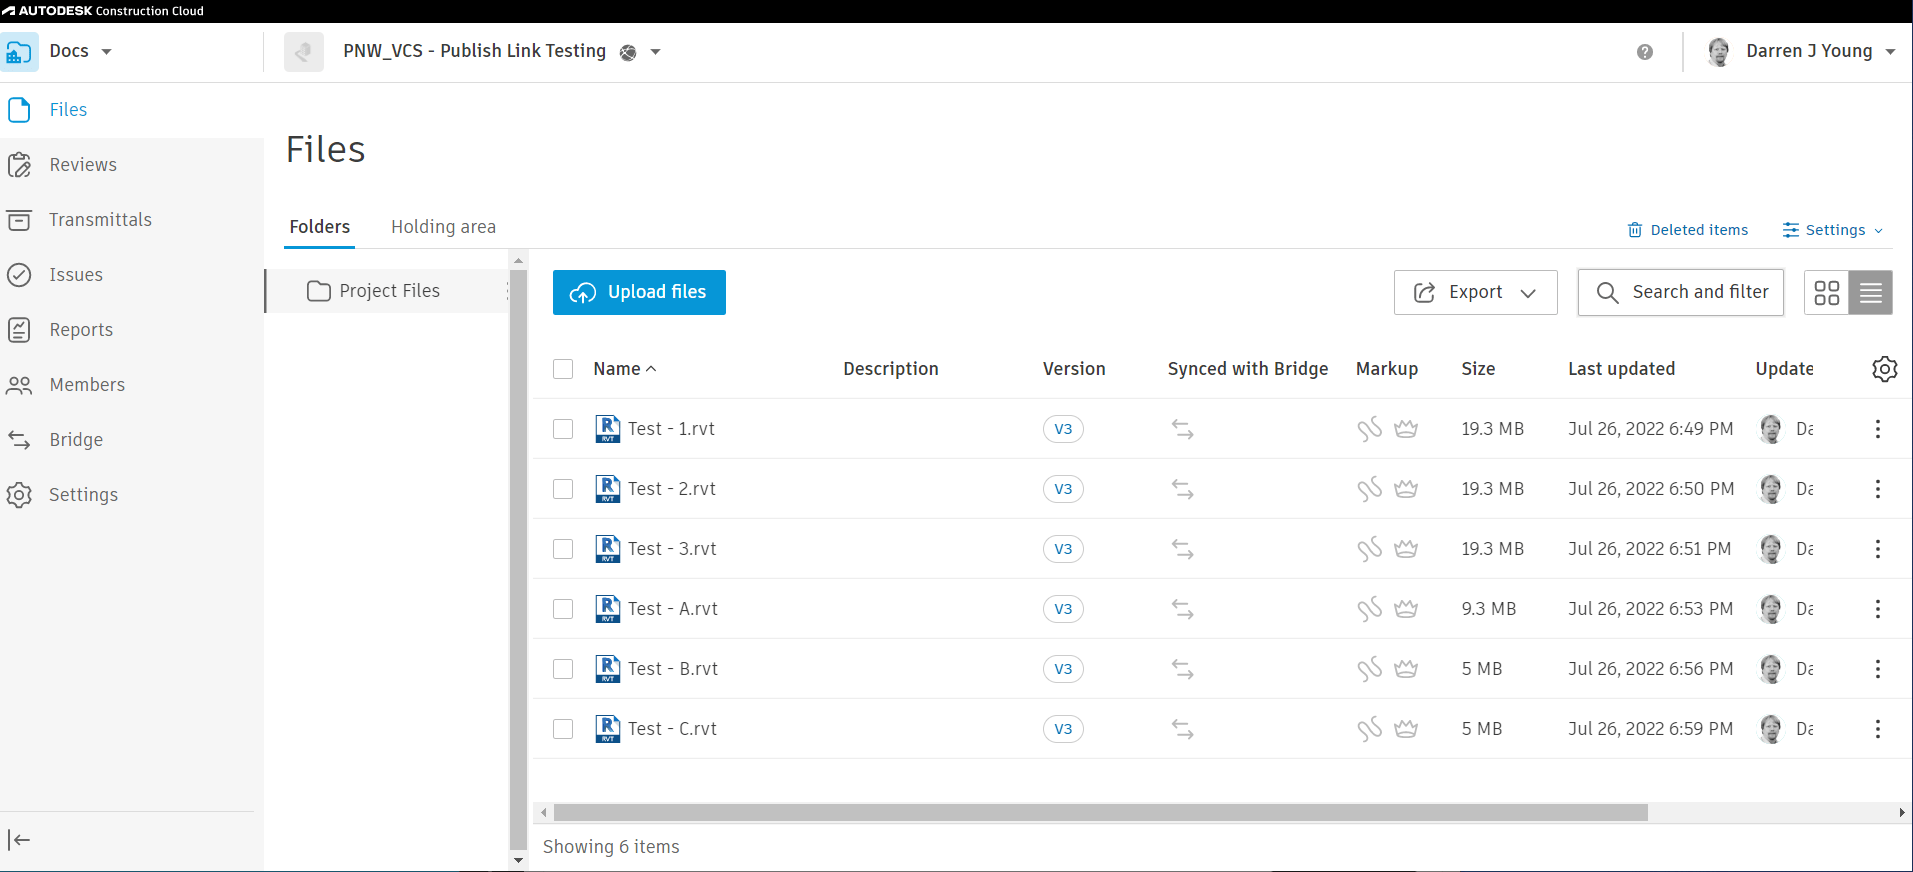
So far, all seems fine. The files you see in the BIM360 or ACC interface are the same ones that are available in Desktop Connector. Now here’s where the issues starts to manifest itself.
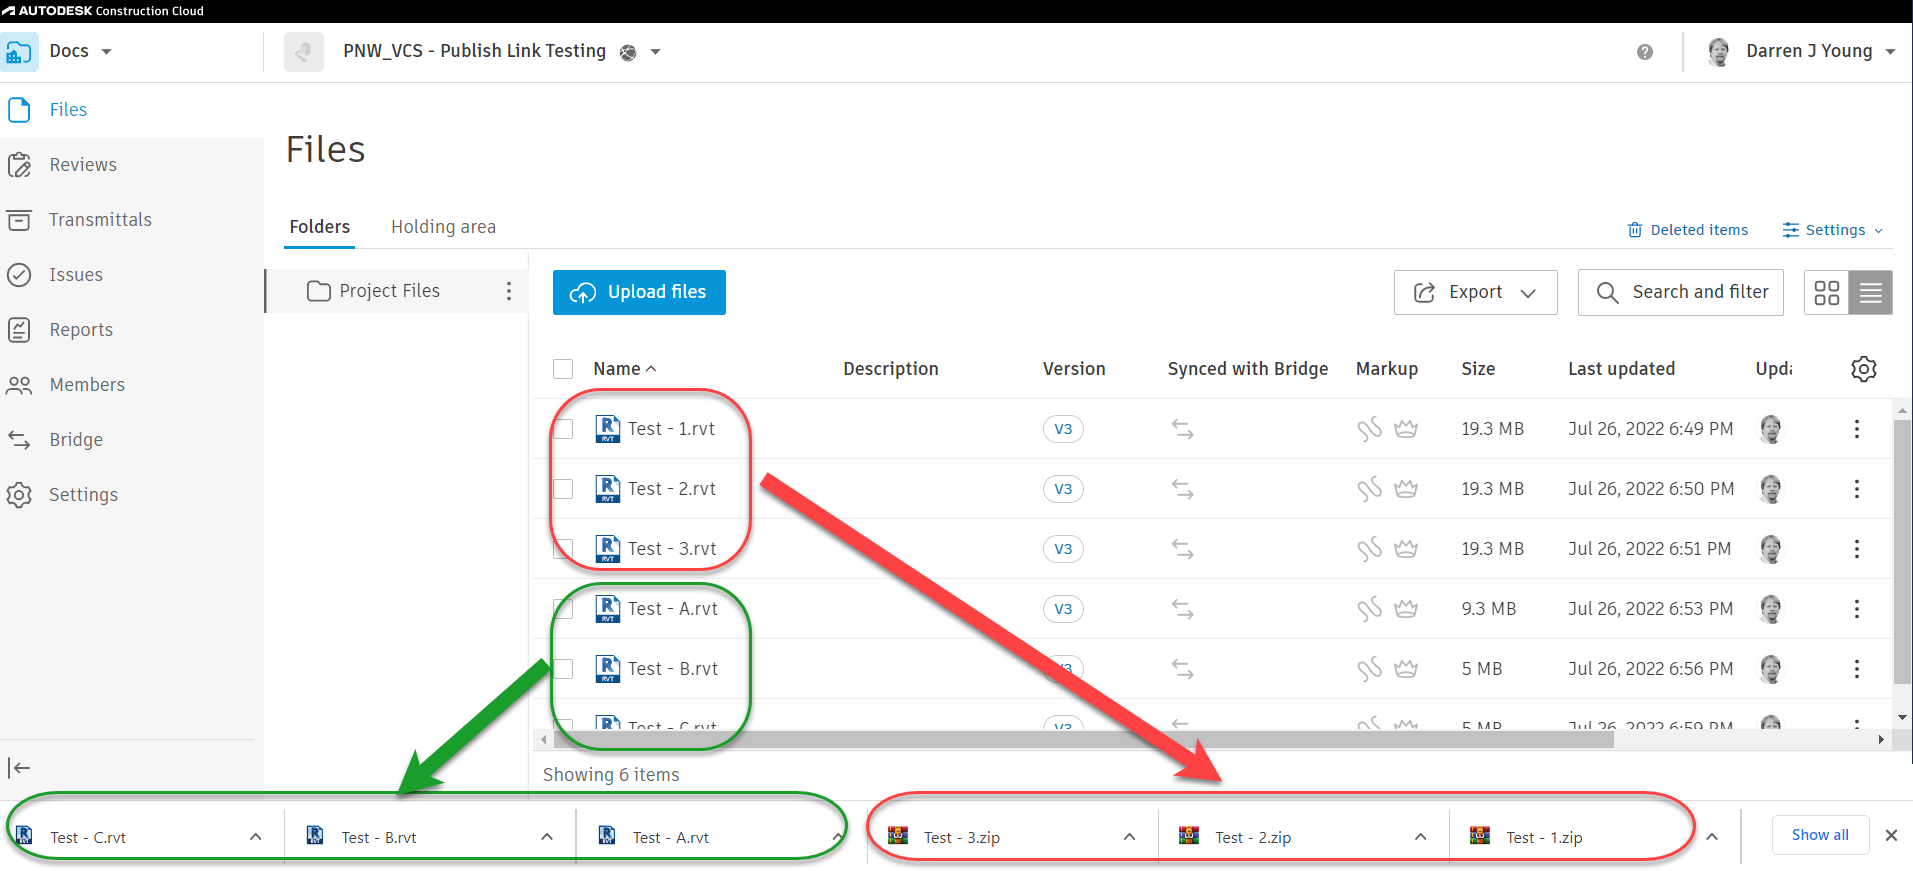
Take a look at what happens when we try to download the Revit Models from the web interface. Set 1, the numerical set download as ZIP files. Set 2 on the other hand, that alphabetic models download as Revit files.
Perhaps you’ve seen this before. I know many users who assume that the ZIP file downloads are there because the Revit files contain links. Because a non-linked model always downloads as an RVT. Other users think it’s part of the whole “Share/Consume” workflow of BIM Collaborate Pro. Both explanations are technically incorrect.
The following image shows the files and their downloaded names. Keep in mind that each set is a model collaborated in the Cloud the exact same way and linked the exact same way. In fact, they themselves are not linked from the Desktop Connector either. They’re linked properly through the “External Resources”. Aside from the files names, they are identical in every way.
Further Proof – RVT Doesn’t Mean RVT
To further complicate matters, Desktop Connector displays all the files as RVT files even though some are ZIP files. Here’s how to test that out. First, we’ll use Windows File Explorer to select and copy all the files to the desktop. You can see the first hints of something being wrong in the following image…
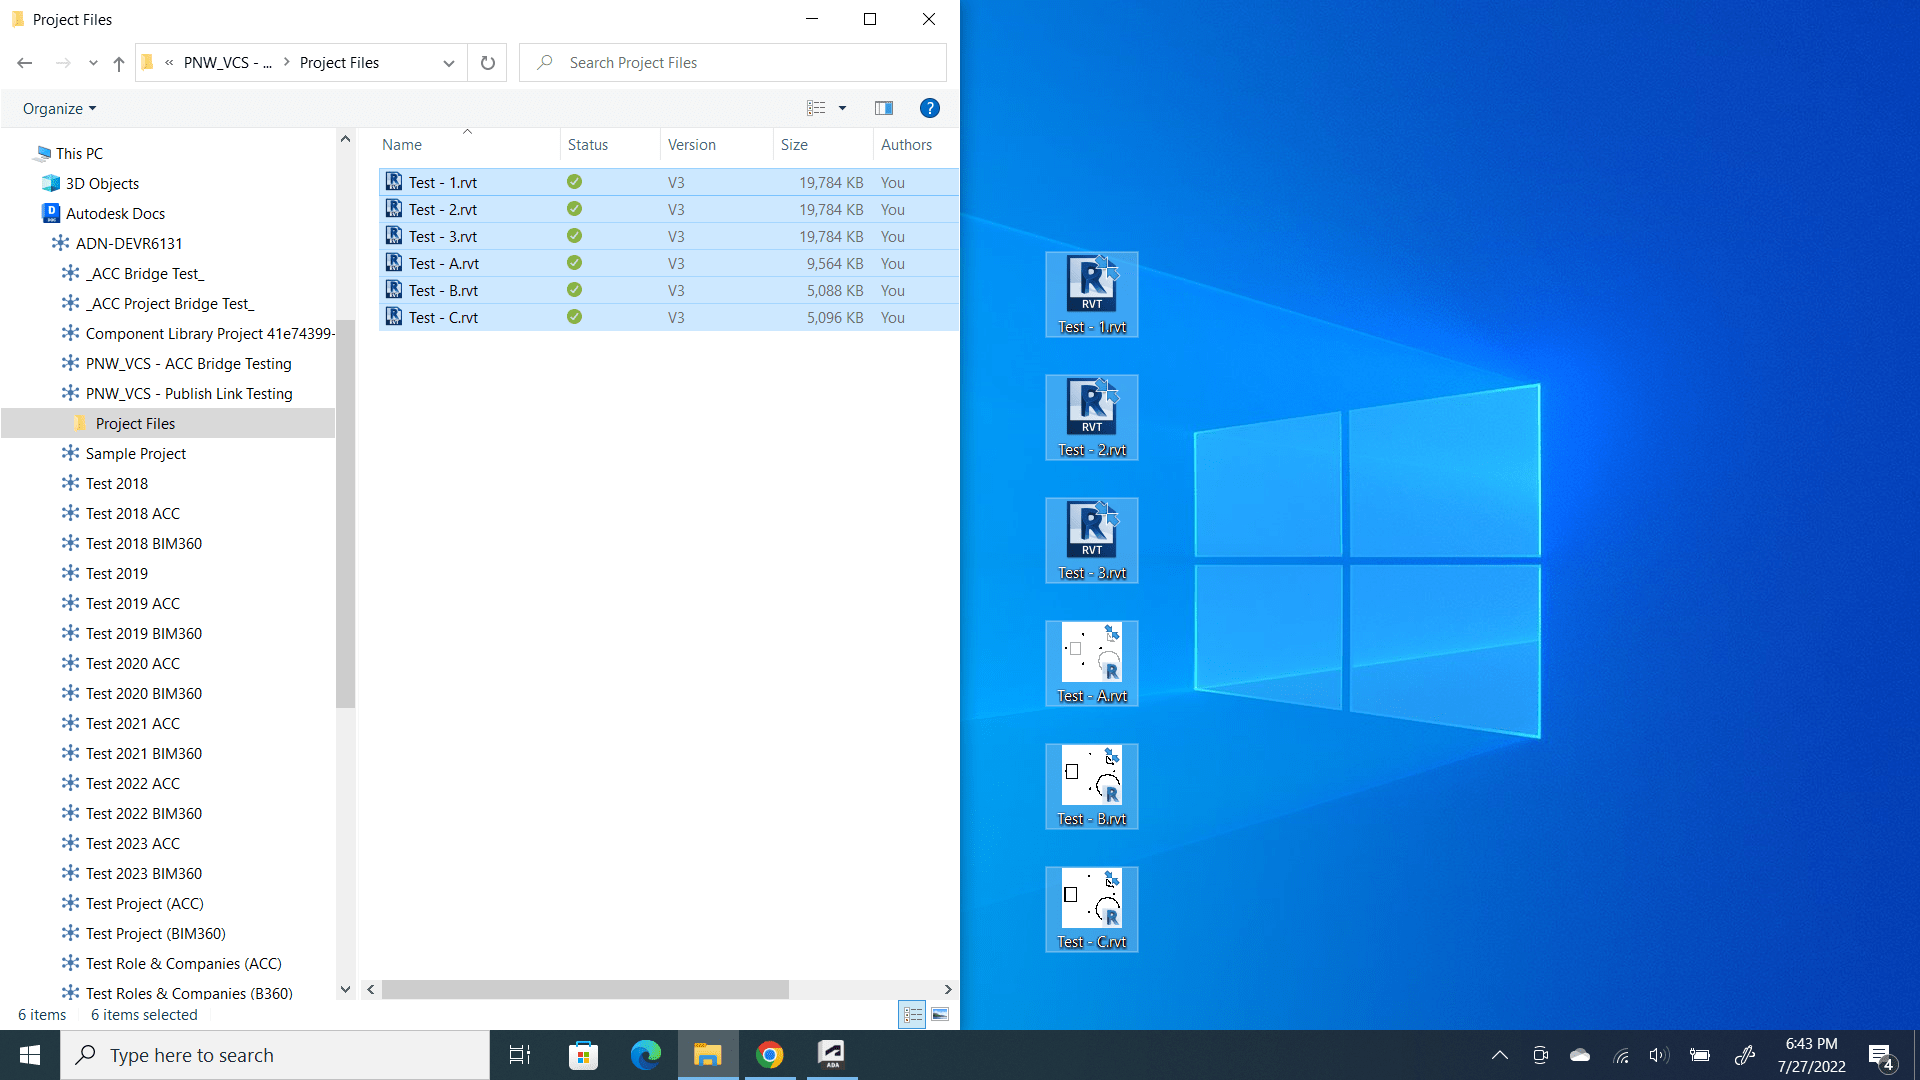
Notice that all the files are named RVT just like was displayed in the Web Interface of BIM360 / ACC. However you can also see the icons are different between the two sets of files. The Revit files display their preview. The others display the icon because if the RVT extension because it can’t find a Revit preview. So let’s test our theory that some of these are actually ZIP files named wrong.
We’ll rename all the files to the ZIP extension and attempt to open them. The following images shows the renamed files. It also shows happens when you attempt to open the ZIP for one of files from Set 1 (Test – 1.rvt, Test – 2.rvt & Test – 3.rvt).
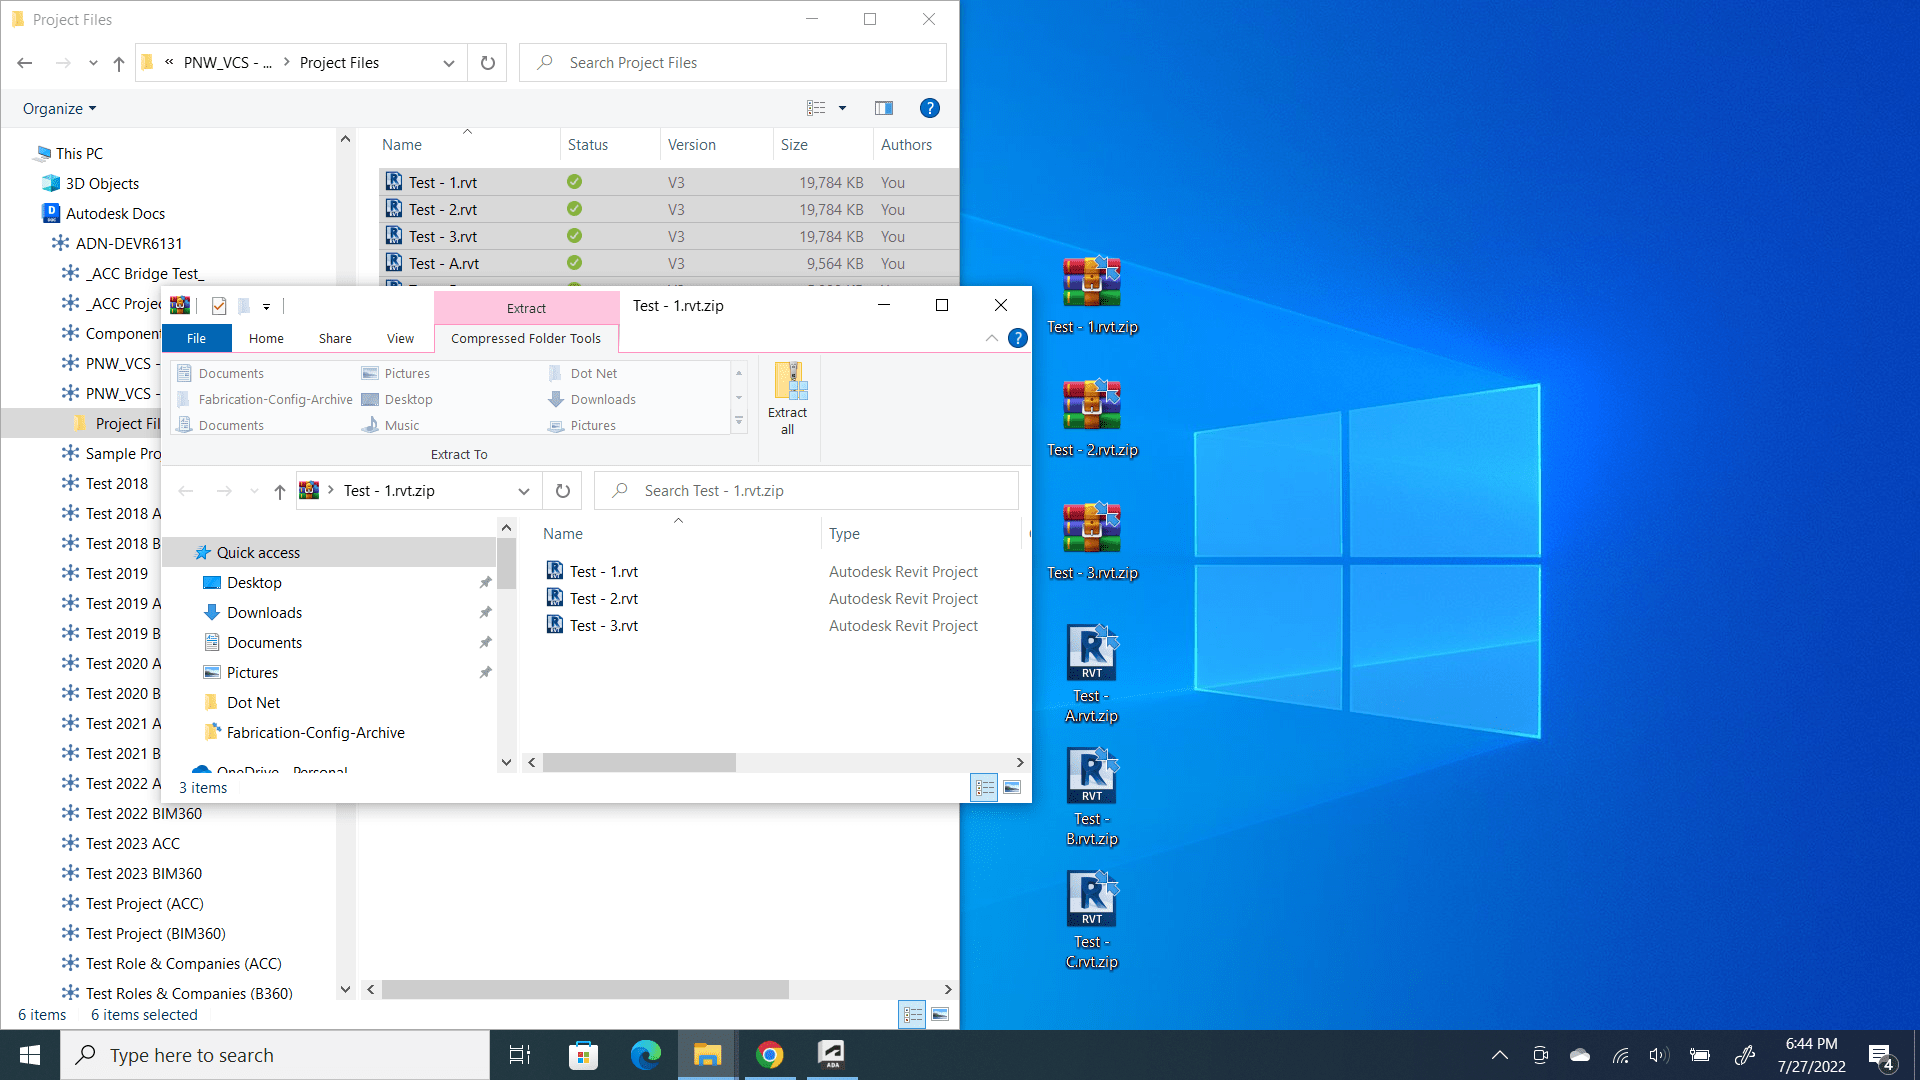
You can see when attempting to open the file TEST – 1.rvt.zip (remember we renamed to a ZIP) it shows the contents. It contains the Revit file and the links that Revit file uses.
Now let’s try the same thing with another file. This time. we’ll use the file Test – A.rvt.zip from Set 2.
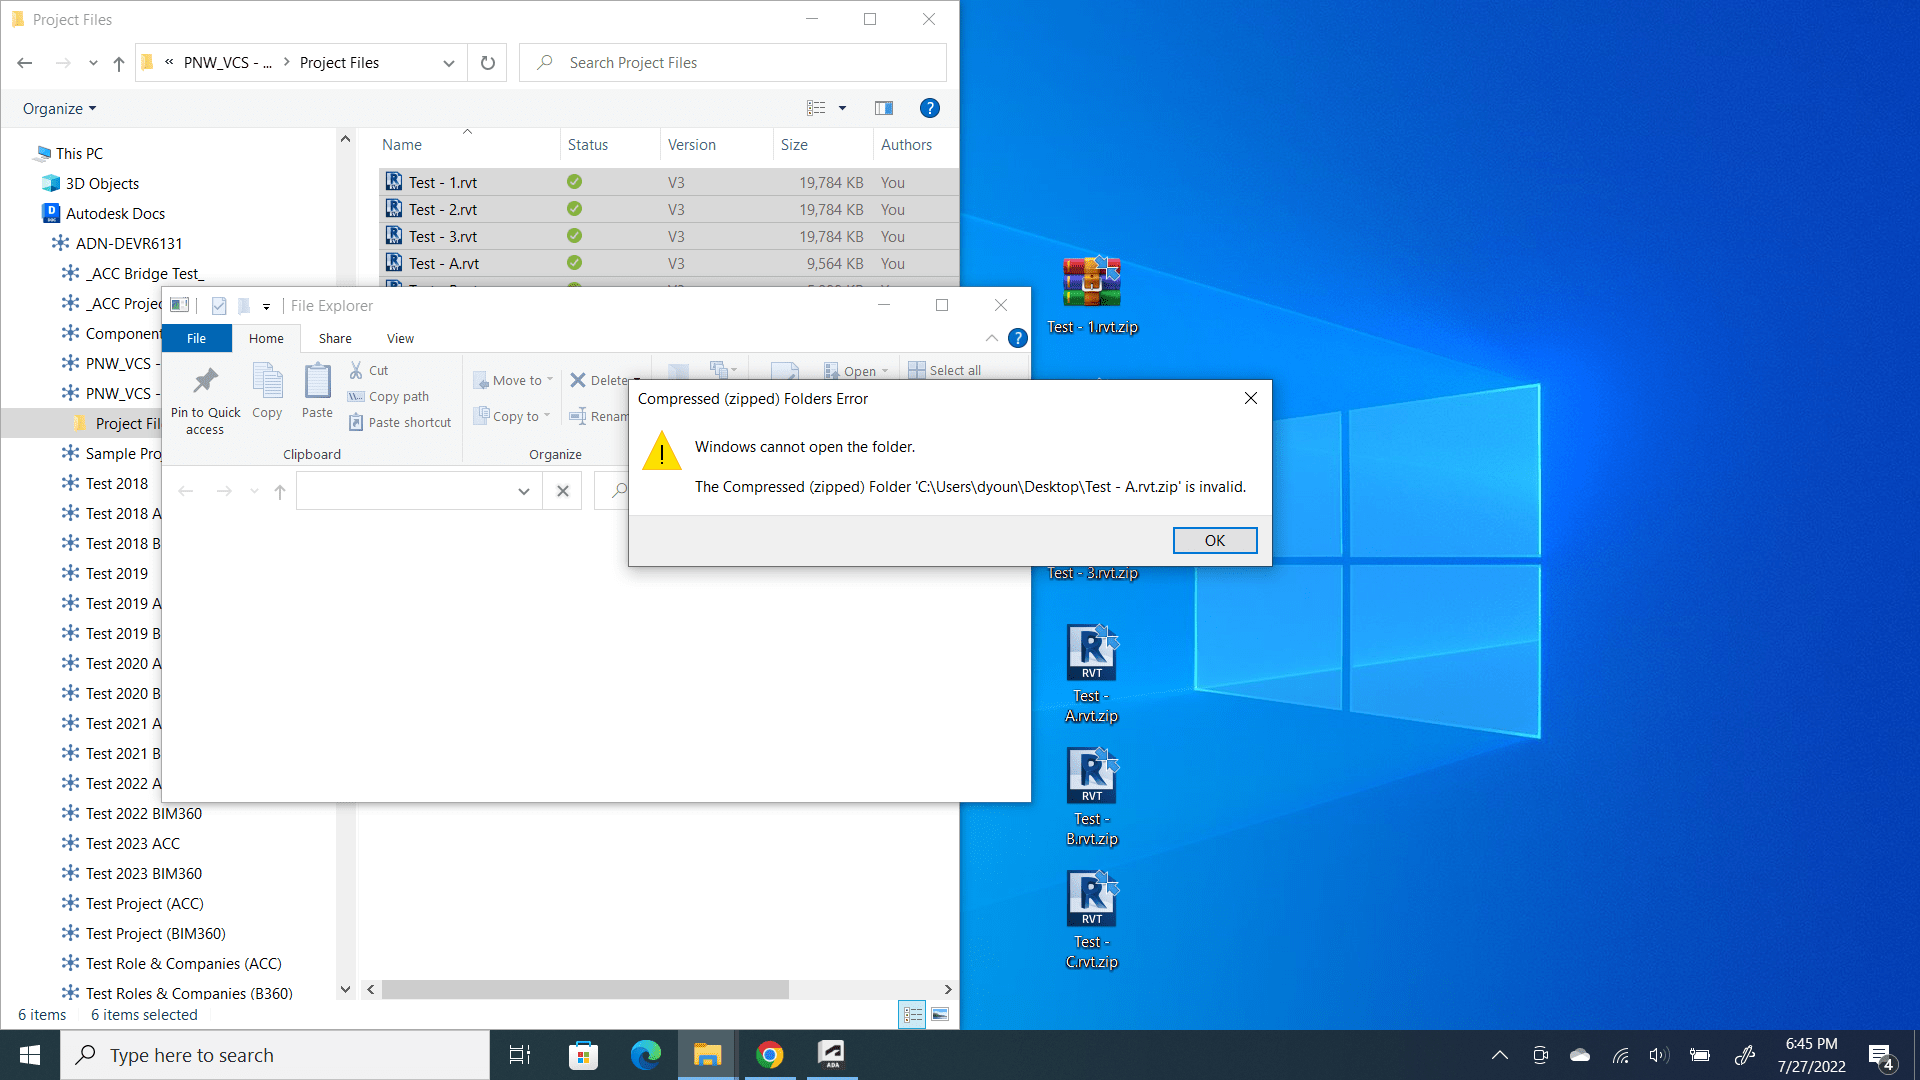
You can see that despite renaming the file as a ZIP file, Test – A.rv.zip will not open and displays no contents. That’s because it is indeed not a ZIP file.
Summary of the Desktop Conector Problem
To summarize what we just saw, the web interface to BIM360 / ACC as well as Desktop Connector showed that all the files were RVT files. But upon testing with 2 different methods (web download & copy/rename from Desktop Connector) we can see that the two sets of files are not the same.
Set 1 is comprised of ZIP files despite showing their name as RVT and Set 2 are actual RVT files.
We can perform one further test to see if this is the case, We can start a new Revit file and try to link one of each set from the Desktop Connector. The following images shows just that…
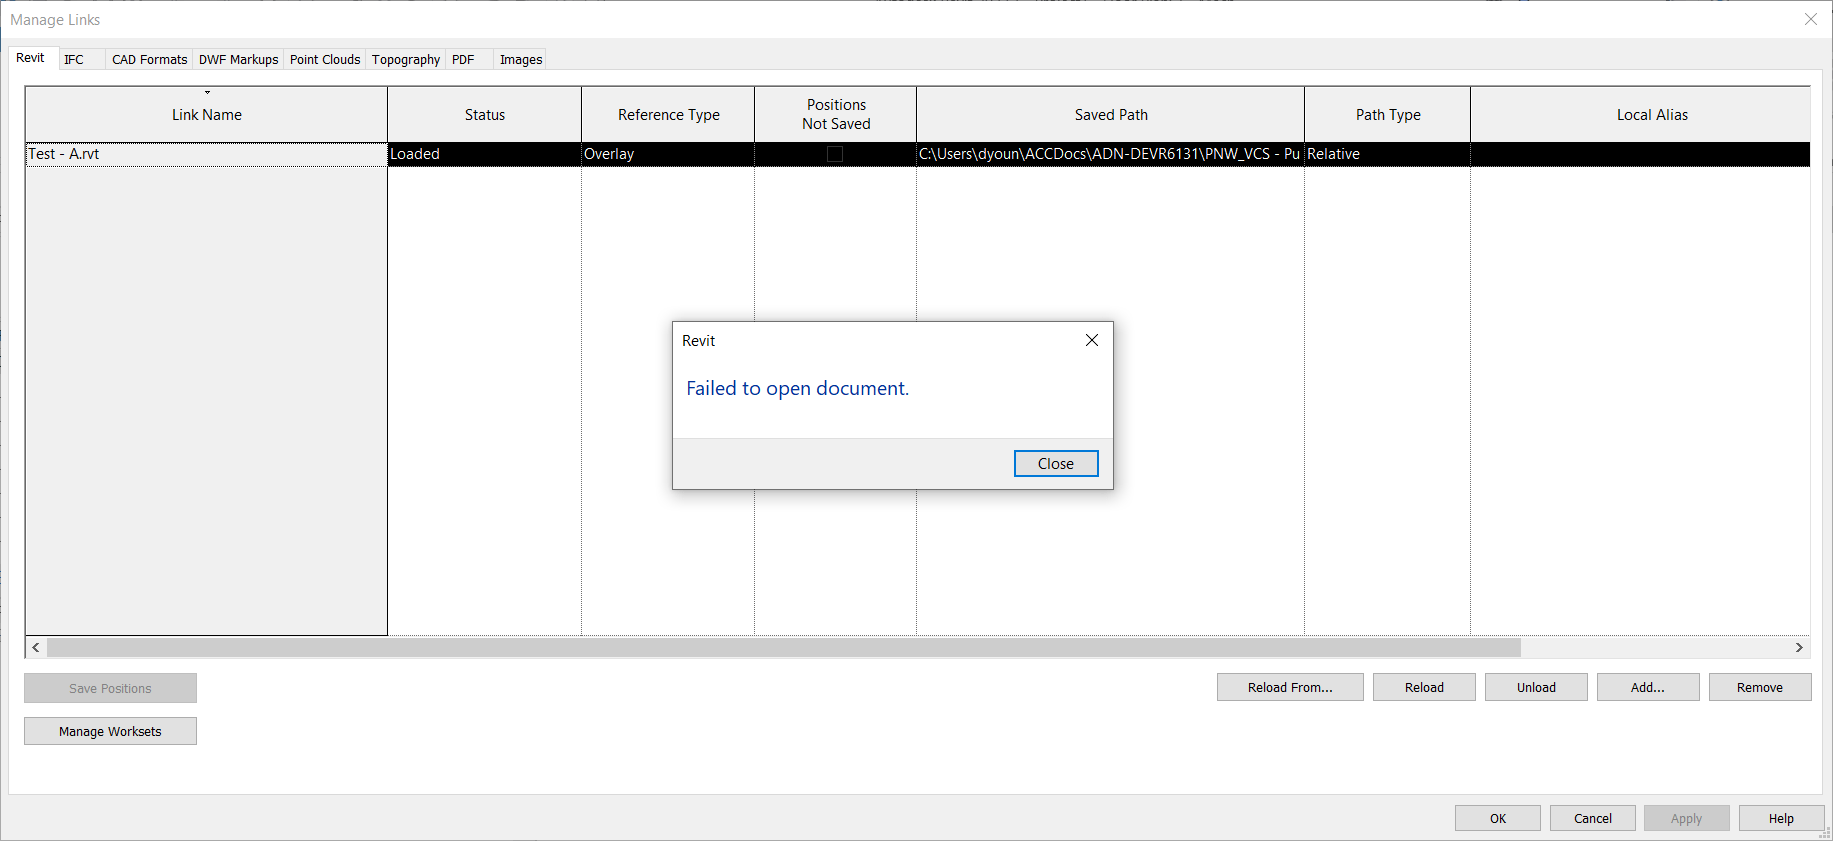
You can see we were able to successfully link Test – A.rvt (from Set 2) using the Desktop Connector. But when we try to link Test – 1.rvt (from Set 1) we get an error, Failed to open document.
Again, this is because despite what you see (the RVT file extension), the file is actually a ZIP file. This is the root of the problem with using Desktop Connector to link Cloud Models. Linking non-cloud Revit models is not a problem. More in that in the next section when we cover “How” and “Why” this happens.
The How and Why
The issue of when BIM360 / ACC is using a ZIP file vs. a RVT file behind the scenes is actually quite predictable and a little controllable. So let’s take a look. It might be a little difficult to understand but we’ll try explain anyway. We’ll then follow-up with the steps to do it yourself.
At the root of the issue is that the Cloud model Revit uses is a separate file that the one you see in BIM360 / ACC Docs and Desktop Connector. You choose when to “publish” the one that shows up in BIM360 / ACC. And here’s where it starts to get complicated. We’ll use the names of the samples models to make it a little more clear.
If you have cloud model Test – 1.rvt open, and you link to cloud model Test – 2.rvt, if cloud model Test – 2.rvt has changes that are unpublished to BIM360 / ACC Docs when you publish Test – 1.rvt to BIM360 / ACC Docs, Test – 1.rvt will be a ZIP file.
On the other hand, if you link to cloud model Test – 2.rvt and it’s latest version is published to BIM360 / ACC Docs then when you publish Test – 1.rvt and download it, it will be a RVT file.
Did you catch that? Whether a Cloud model ends up as a ZIP vs. a RVT depends on the Publish Status of the Cloud models it links when you publish it.
Let’s look at that visually. The below image shows the 3 models from Set 1. Notice how none of them have the current version published. When you publish one of these, or even all three of these you’ll end up with a ZIP file.
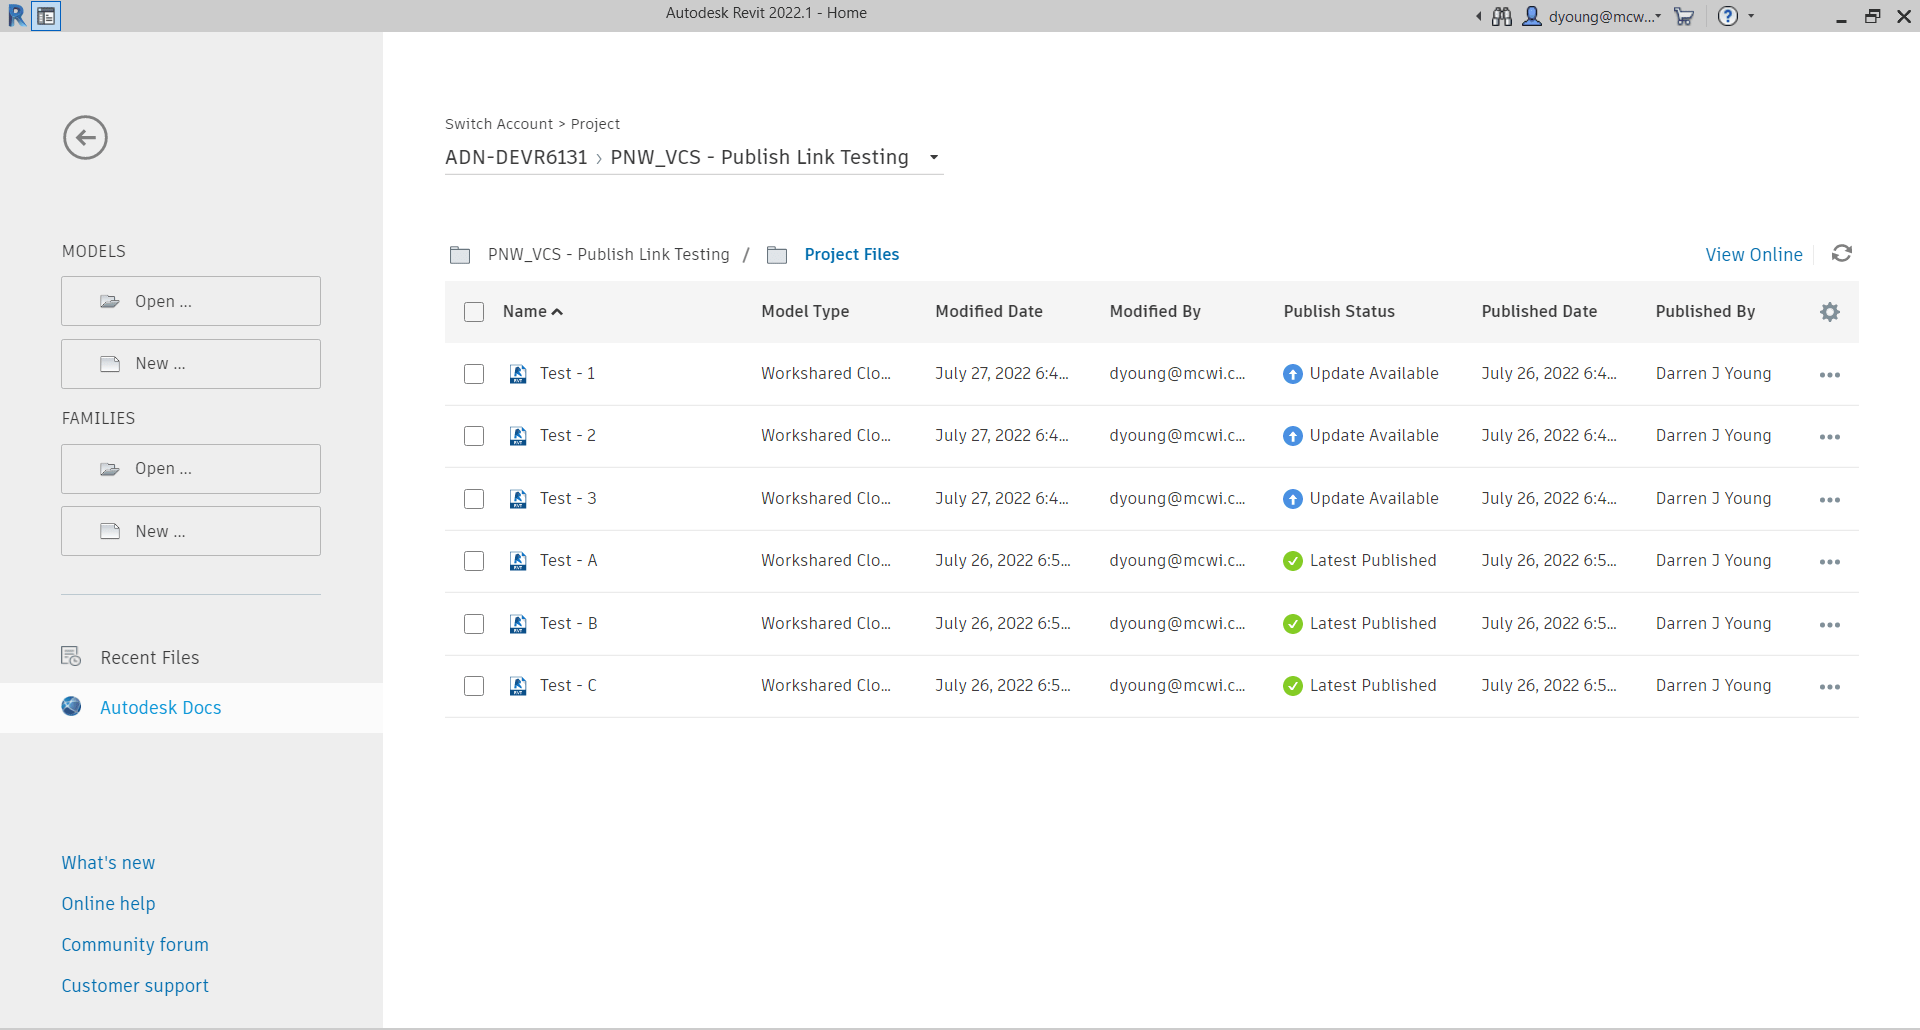
Again, the issue is that you linked a cloud model in Revit when that cloud model had unpublished changes. Even if you published all of the models now, you’ll still get ZIP files with downloads and Desktop Connector. That’s because when they were published, there were unpublished changes which made them ZIP files. Further publishes will always make more ZIP files because they now reference Cloud models who’s Published versions are ZIP files not RVT. Yea…that’s a bit complicated. Just know that once you start getting ZIP Downloads, they’ll stay that way. From here on out, there’s only one way to fix it which we’ll get to momentarily.
How Not to get a ZIP
Now here’s where the process get’s slightly different if you want a RVT. The difference here is when you go to link the Cloud model, you need to make sure the file(s) you’re linking don’t have unpublish changes when you publish it. So when you have Test – A.rvt open, make sure Test – B.rvt doesn’t have unpublished changes, if it does, Test – B.rvt needs to be published before Test – A.rvt. Then when you then publish Test – A.rvt it will download as an RVT and Desktop Connector will be a ‘real’ RVT file.

So that sounds simple. Just make sure when you link the cloud model that’s it’s most recent version is published. But it’s not that simple. At any point in the future if one of the linked files is not published when you publish the model, you’re back to the ZIP file again and it stays that way. Until you fix it.
Unzipping the ZIP
If you ever link a cloud model that has unpublished changes you’ll end up with ZIP files. Further more, if at any point you publish you model, any one of the linked cloud models has unpublished changes, you’ll get a ZIP file again. And it won’t get fixed again easily.
This is why you should NOT link to cloud models from Desktop Connector. Because you’re relying on the author to understand this and know what to do. In fact, in the course of a real project, it’s damn near impossible to make sure you’re not going to get a ZIP. You can’t control when the project teams make changes and publish.
However, if you do want to fix the ZIP problem, here’s the process.
- Open your Revit model and “unload” (not remove) and cloud model links. Save/Sync and publish the model.
- Repeat Step 2 for all of the linked Cloud model. Make sure none have the links loaded.
- Once all models have their links unloaded, republish them all.
- Reopen one of the models and reload the links. Save/Sync the model. One model only.
- Now Publish the model and wait for publish to complete before doing any more models.
- Repeat steps 4 and 5 for the remaining models.
So that’s the process to “fix” the issue. Each model needs to be republished with none of the cloud model links loaded. You then open one, sync and publish each model. If you do save/sync more than one model before publishing again, you’re back to the ZIP files.
Try It Yourself
This issue is a bit nuanced…what makes a ZIP files vs a RVT. An even when its a ZIP, The web site and Desktop Connector misleadingly tell you it’s an RVT. And if you do have it working, it’s still fragile and breaks easily. Which is why it’s recommended to NOT use Desktop Connector to link to Revit Cloud Models.
If you really want to understand the issue, it’s best to try it yourself. You can do it with just 2 files. Here’s how. Follow these steps exactly.
- Step 1 – Create file A in Revit and save as a Cloud model or Cloud Workshared model.
- Step 2 – Close file A.
- Step 3 – Create file B in Revit and save as a Cloud model or Cloud Workshared model.
- Step 4 – Close file B.
- Step 6 – Open file A and link file B using the “External Resources” (not Desktop Connector)
- Step 7 – Save/Sync file A and close.
- Step 8 – Open file B and link file A using the “External Resources” (not Desktop Connector)
- Step 9 – Save/Sync file B and close.
- Step 10 – Publish both files so their latest version appear in BIM360 / ACC Docs.
- Step 11 – Try downloading with model from the web and you’ll see they’re zip files.
- – – You’ve now recreated the process which makes the ZIP files – –
- Step 12 – Open file A and unload the link to file B.
- Step 13 – Save/Sync and Close file A
- Step 14 – Open file B and unload the link to file A.
- Step 15 – Save/Sync and Close file B.
- Step 16 – Publish both models. (when you publish doesn’t matter with links unloaded)
- – – Both models are now published with no Cloud model Links. This clears the ZIP issue. – –
- Step 17 – Open file A and reload the links to file B.
- Step 18 – Save/Sync and Close file A.
- Step 19 – Publish file A and wait for it to complete before continuing. This is important. It’s linked to a file B. While file B has no links loaded, it has all it’s changes published (the critical step)
- Step 20 – Open file B and reload the links to file A.
- Step 21 – Save/Sync and Close file B.
- Step 22 – Publish file B and wait for it to complete before continuing. This file is linked to file A which does have links, but it also has all of it’s changes published too.
- Step 23 – Try downloading the models now. You should get a RVT file instead of a ZIP.
- – – Both models are now published but are now accessible from Desktop Connector or downloadable as RVT files – –
It sounds like a lot of steps but it’s fairly quick to do. Perform these steps and you’ll get a better idea how the issue. Any time you have changes in multiple models before you publish, you’ll see the ZIP show up. If you change and publish a single model at a time, you’ll have RVT files. But also note, once you get the ZIP files, you’ll need to unload the links on all the files, republish and then open, reload and publish one at a time to clear the issue.
Summary
So that’s it. If you understand the issue, you’ll see how easy it is to have the ZIP issue show up. And that’s when linking from Desktop Connector breaks. And in the course of a project, it’s easy for others doing what I’ve explained above to break YOUR link to THEIR model when you use Desktop Connector.
So don’t use it to link Revit Cloud models if at all possible. If you’d like further reading on this, check out these Autodesk Knowledge Base articles…
“Failed to open document” when adding links to a Revit model through Desktop Connector.